Product Experience
Begin setting up your Flutter app's Product Experience!
Product Experience is available for integration from CEE SDK v3.2.6 onwards.
Installing PX Flutter Plugin
Implement plugin in pubspecs.yaml file under dependencies:
By using pub
smartech_nudges: ^1.1.0
For Flutter SDK Setup
Step 1 : Add SmartechPxWidget as topmost widget
Wrap your topmost class of application widget(MaterialApp/ CupertinoApp/ WidgetsApp) with SmartechPxWidget in your main.dart file of your project.
Widget build(BuildContext context) {
  // SmartechPxWidget is a Px Customized widget which needs to be wrapped around MaterialApp
   return SmartechPxWidget(
     child: MaterialApp(
       home: const MyHomePage(),
     ),
   );
 }
Step 2 : Add PxNavigationObserver in properties of MaterialApp
Add PxNavigationObserver.instance as property of navigatorObserver (Property of MaterialApp/ CupertinoApp/ WidgetsApp)
Widget build(BuildContext context) {
   return SmartechPxWidget(
     child: MaterialApp(
       //navigationObservers is a property of MaterialApp
       // PxNavigationObserver.intsance should be added to list of navigationObservers
       navigatorObservers: [PxNavigationObserver.instance],
       home: const MyHomePage(),
     ),
   );
 }
For Customer's with version below 1.1.0 navigation Observer needs to be added in below way.
Widget build(BuildContext context) {
   return SmartechPxWidget(
     child: MaterialApp(
       //navigationObservers is a property of MaterialApp
       // PxNavigationObserver() should be added to list of navigationObservers
       navigatorObservers: [PxNavigationObserver()],
       home: const MyHomePage(),
     ),
   );
 }
If the Customer is using MaterialApp.router as main widget. Then PxNavigation Observer should be declared in Go Router of the app.
 GoRouter router = GoRouter(
      observers: [PxNavigationObserver.instance],
   )
Step 3: To Send Events to Netcore
For sending events with Smartech to show nudges can be done at any point of the app you require. We recommend the below code if you want to see PNC Nudges.
NetcorePX.instance.logEvent("event_name", "smt", {});
Setting up page load events
You may use page load/page view events as triggers for Product Experience. You can check here on how to set them up
Step 4: Setting up Test Device
Product Experience dashboard lets you create Test Devices for your Android or iOS devices. Devices that are a part of your Test Devices will receive changes made on PX panel immediately. For all other devices, the data is cached locally to provide high availability.
To learn more about setting up test devices for Android, please click here
To learn more about setting up test devices for iOS, please click here
Step 5:Audience targeting based on user profile data
Server-side segments
If you want to use server-side segments as the target audience - please follow the steps given for user tracking & event tracking.
This will send data back to the CEE servers and allow you to create segments based on user profile attributes & event payload data.
We recommend that you implement user tracking step if you plan to use feedback nudges
Client-side user profile data
If you want to keep user profile data at the client-side and use this information to target specific user ids, please follow the below steps.
Client side user profile data is local to the device and none of the PII Information is shared back to Netcore servers.
- User ID
This is a pre-defined attribute that can be the user's email id, account id, or any other identifier that you use to uniquely identify a user. If not set, CEE SDK will generate a device-specific unique string to uniquely identify the app user.
NetcorePX.instance.setUserId("user_id");
Clear Identity
This will clear the user’s identity and after this, all activity will be tracked as anonymous.
NetcorePX.instance.clearUserId();
- Custom Attributes
Custom Attributes allow you to target users based on any data that you want. For example, to set a value for a custom attribute called “age”, you need to do the following:
// Use this for passing single attribute
NetcorePX.instance.putAttribute("emailId","[email protected]"};

// Use this for passing multiple attribtes
Map<String,Object> attributes = {"name":"netcore","age":"27"};
NetcorePX.instance.putAttributes(attributes);
For Android SDK Setup
Step 1: Define Latest SDK version
Add below line in gradle.properties
# Version of smartech base SDK to use with Flutter
SMARTECH_PX_SDK_VERSION=<<nudge_sdk_android_version>>
Step 2: Integrate the latest CEE SDK
Put your Smartech panel's app Id, Hansel App ID & Hansel App Key in the meta-data tag of your application's manifest file, it should be added within the application tag, but outside of any component within the application tag.
To get Smartech App ID, follow steps given here , else please get in touch with your account manager to get the value of SMT_APP_ID , HANSEL_APP_ID & HANSEL_APP_KEY.
     </application>
				...
				<meta-data
   				android:name="SMT_APP_ID"
   				android:value="YOUR_SMARTECH_APP_ID_HERE" />

        <meta-data
            android:name="HANSEL_APP_ID"
            android:value="<hansel_app_id>" />

        <meta-data
            android:name="HANSEL_APP_KEY"
            android:value="<hansel_app_key>" />
      	...
    </application>
Step 3: To initiate the PX SDK, Add below code in MyApplication.kt file
MyApplication.kt fileclass MyApplication : FlutterApplication(){
override fun onCreate() {
super.onCreate()
// Initialize Smartech Sdk
Smartech.getInstance(WeakReference(applicationContext)).initializeSdk(this)
}
override fun onTerminate() {
super.onTerminate()
Log.d("onTerminate", "onTerminate")
}
}
override fun onCreate() {
	super.onCreate()
	SmartechBasePlugin.Companion.initializePlugin(this);
}
Note : Make sure you have registered your Application class in the Application tag inside the AndroidManifest.xml file.
<application
    android:name=".MyApplication">
For iOS SDK Setup
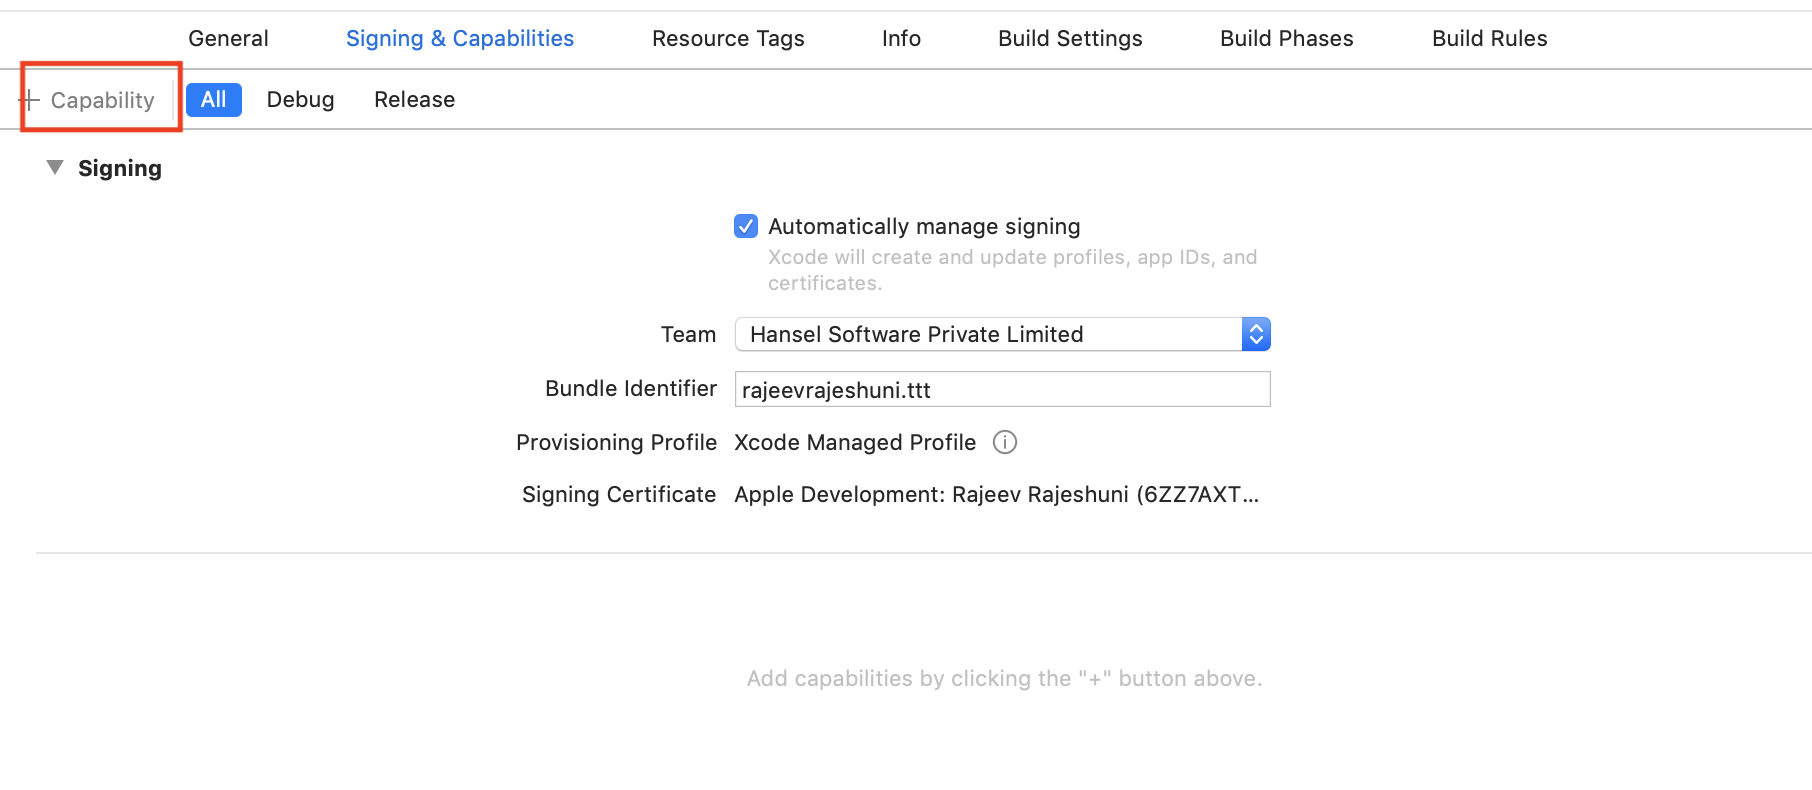
Step 1: Updating Capabilities
In Xcode target, go to Signing & Capabilities, and click on "+Capability" as shown below, if you do not have any "Keychain Groups" setup. If you do, you can directly proceed to the next step.

Click on "+Capability" to get started
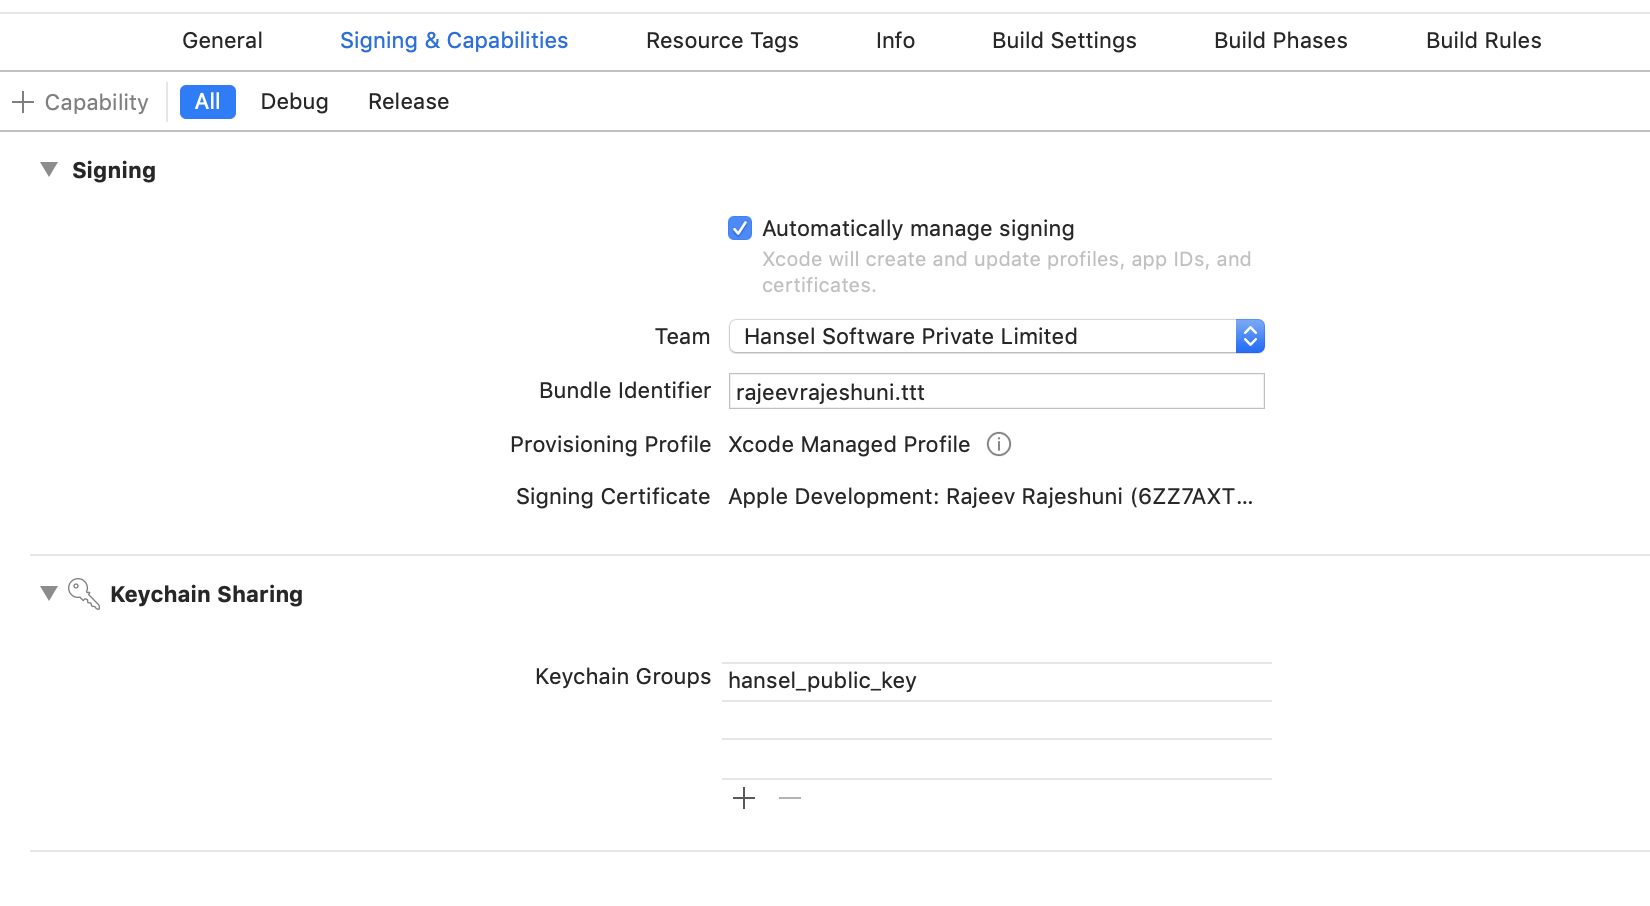
Add a new Keychain Group (as shown below) and enter hansel_public_key (Hansel uses KeyChain Sharing for decryption of Hansel SDK's responses)

Create a new Keychain Group with the value as shown
Step 2: Configure Apps Info.plist with Hansel Keys
You need to add a key named HanselKeys with type Dictionary. Init add the following keys and values with their types.
| Key | Data type | Description |
|---|---|---|
| HanselAppId | String | Please get in touch with your account manager to create app on Hansel dashboard |
| HanselAppkey | String | Please get in touch with your account manager to create app on Hansel dashboard |
Following is the source code snippet of apps Info.plist for key Hansel Keys:
<key>HanselKeys</key>
	<dict>
		<key>HanselAppId</key>
		<string>value of app id</string>
    <key>HanselAppKey</key>
		<string>value of app key</string>
	</dict>
Following is the image representation of apps Info.plist for key HanselKeys:

Updated 5 months ago
