Add Smartech Javascript to your Website
JS Integration can be done Via two Methods -
1. Add JS directly to Your Website
2. JS Integration via GTM
Add JS directly to your Website
STEP 1: Click on Get Javascript SDK and copy the code and place it in the header of your website.
IMP NOTE
In the case of a common root directory and multiple website integrations/panels, different sw.js files can be handled by implementing double opt-in and individual sub-domain can have independent sw.js according to panel and site.
Javascript size details:
When it is residing on our server the size is 150 KB and when it is served via CDN it is 45 KB
The code will look like something like this :
<script  src=’//cdnt.netcoresmartech.com/smartechclient.js’></script>
<script>
smartech('create', '<Smartech Panel identifier>');
smartech('register', '<Website Identifier>');
smartech('identify', '<Unique user identifier/Primary Key of the smartech panel >');
</script>
STEP 2: Download Zip file for the sw.js file. You will get this file from the 'get Javascript Code' popup. Place the downloaded sw.js file at the root directory of your website.
Doing the above task will ensure two things -
- You will be able to Show Web Messages on your Website.
- You will be able to send Web Push Opt-In Message. (Click here for following the Opt-In Steps)
While in most cases adding the above code and the Service Worker (sw.js) file would suffice and will start capturing the user tokens to send push notifications.
However in some cases, if you have been using Vapid technology or One Signal so far to collect tokens and send push notifications as against the FCM and APNS gateway, you will have to further add the following snippet of code along with Js code so that the migration of tokens can be done successfully.
<script>
    if (localStorage.getItem('__stmigrate') === null) {
        navigator.serviceWorker.getRegistration().then(function(reg){
            reg.unregister().then(function(data){
                localStorage.setItem('__stmigrate', 1);
            });
        });
    }
</script>
ANATOMY OF THE JS FILE
- At the end of the above JS code, 'Identity' is Empty.
- Ensure to pass your 'Primary Key' in Identify in case of logged in user.
- Leaving the field blank will capture user details anonymously.
- When you access the JS file as being shown above, the panel identifier and website identifier of your panel will already be pre-populated.
Once done, you will immediately be able to see tokens coming onto your Smartech Platform.
JS Integration via GTM
Introduction
The conventional way of integrating the Smartech Java Script is to embed the JavaScript code into the destination website. This integration is needed to track the user's behavior on the website. Once integrated we can track custom activities such as customers page browse, customer adding a product to cart or a customer subscribing for a SIP / Mutual Funds plan / e-Newsletter, etc.
There are situations when the 3rd party custom Java Script cannot be embedded into the source code of the website due to various reasons. In such cases, Google Tag Manager (GTM) plays a vital role in integrating the Java Script with the end website.
Google Tag Manager is a free tag management solution provided by Google. Through this online tool, you can deploy and manage various marketing and analytics tags on the destination website / mobile app. A tag is a bunch of JavaScript code which is used to collect measurement and marketing data from the website and then send the data to 3rd party services. Smartech is also a 3rd party service providing custom Java Script for achieving a marketer’s needs like Google Analytics, Google AdWords, Facebook, etc.
Setting Up Google Tag Manager Account
Add Account & Container
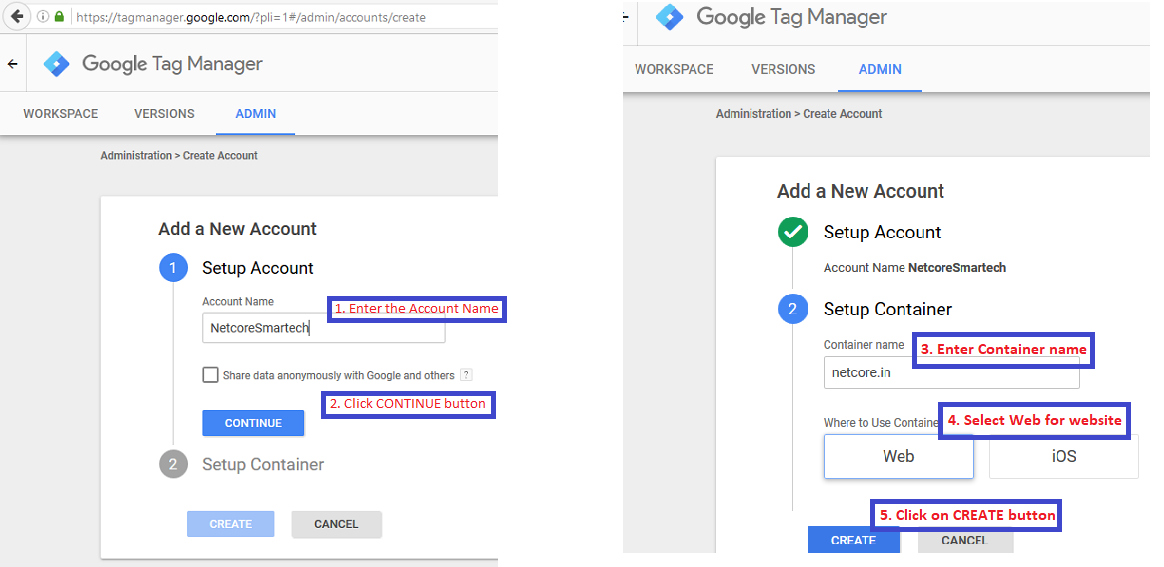
Login to https://tagmanager.google.com and create a new account & container as given in the below screenshot.
Install Google Tag Manager
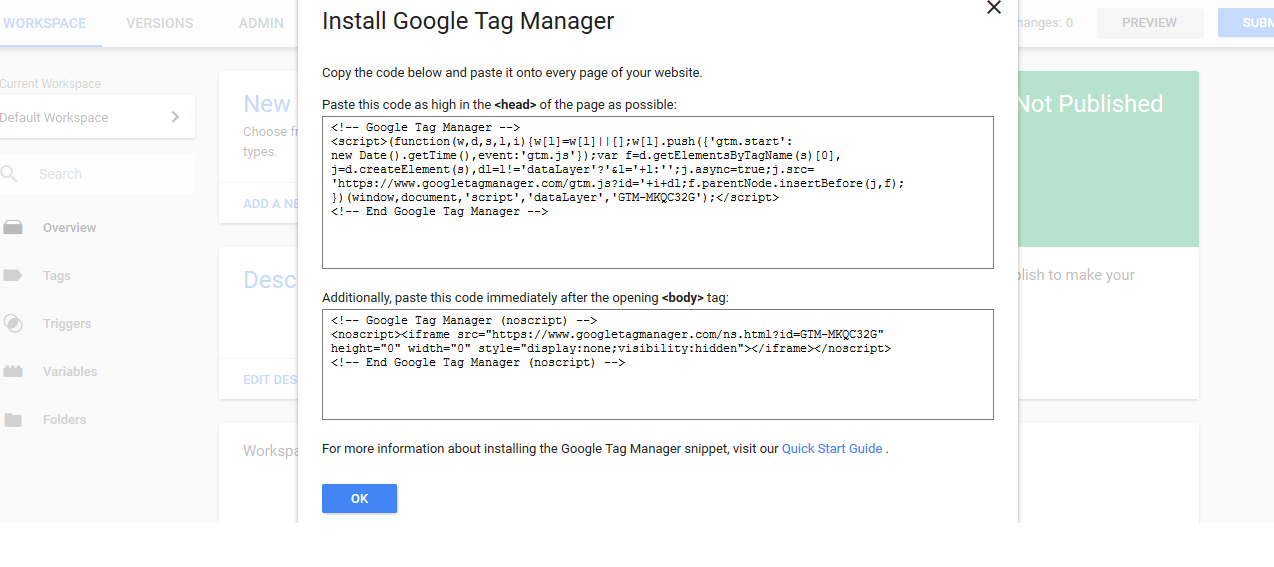
Upon creating of account & container GTM prompts the user with couple of Java Script snippets which needs to be embedded into the source code of the website.
<!-- Google Tag Manager -->
<script>(function(w,d,s,l,i){w[l]=w[l]||[];w[l].push({'gtm.start':
new Date().getTime(),event:'gtm.js'});var f=d.getElementsByTagName(s)[0],
j=d.createElement(s),dl=l!='dataLayer'?'&l='+l:'';j.async=true;j.src=
'https://www.googletagmanager.com/gtm.js?id='+i+dl;f.parentNode.insertBefore(j,f);
})(window,document,'script','dataLayer','GTM-CONTAINER ID');</script>
<!-- End Google Tag Manager -->
<!-- Google Tag Manager (noscript) -->
<noscript><iframe src="https://www.googletagmanager.com/ns.html?id=GTM-CONTAINER ID"
height="0" width="0" style="display:none;visibility:hidden"></iframe></noscript>
<!-- End Google Tag Manager (noscript) -->
Overview of GTM panel
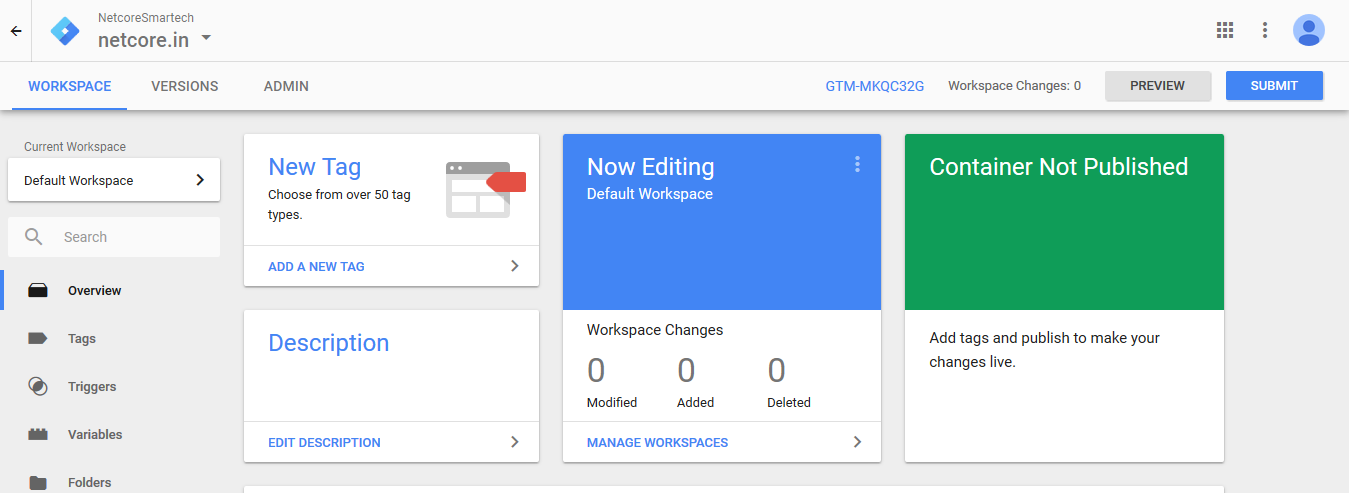
Tags
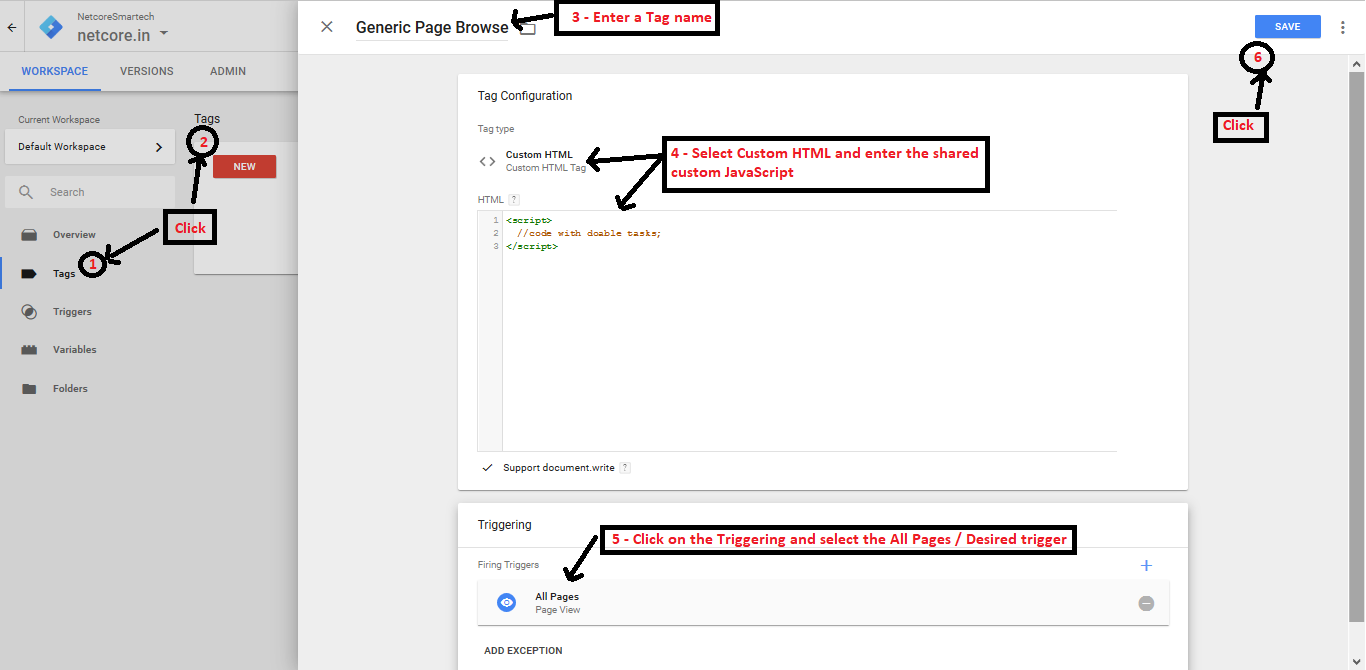
Tags help a marketer to define their needs in the form of pre-built add-ons like Google Analytics or AdWords Conversion Tracking or Remarketing etc. Along with the pre-defined tags GTM also supports for defining Custom tags usually 3rd party Java Scripts via the Custom HTML option. In order to create a new tag navigate to Tags menu and select NEW –> Click Tag Configuration –> Select Custom HTML. While a tag is created we have to select/create a trigger associated with the tag which says deploy the tag on the defined trigger. Below screenshot is a Generic Page Browse tag and trigger is on all pages.
Trigger
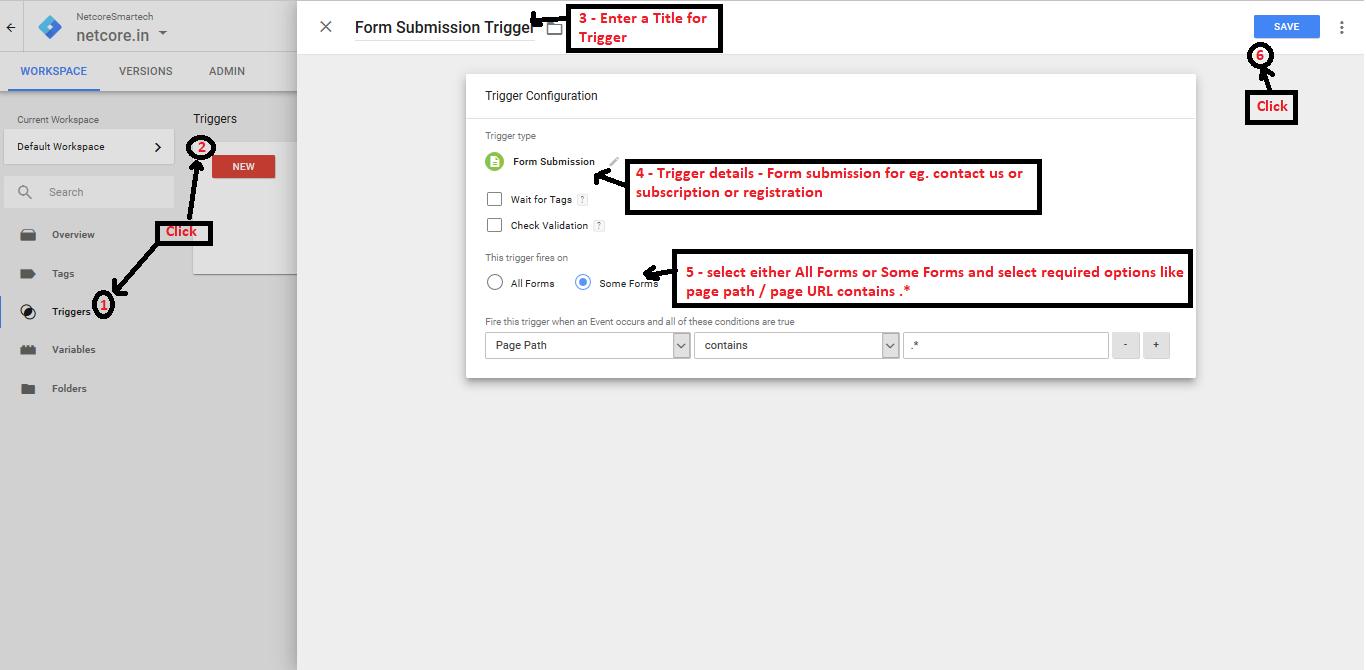
The required triggers can be either be created via Tiggers from the menu or while creating the Tags. The triggers are events that get fired on a certain condition defined. The triggers can be as generic as sending some data from All Pages of a website or specific pages / URL’s or send data on form submitted event. The tags get implemented only when the rule defined in the trigger is achieved.
Variables
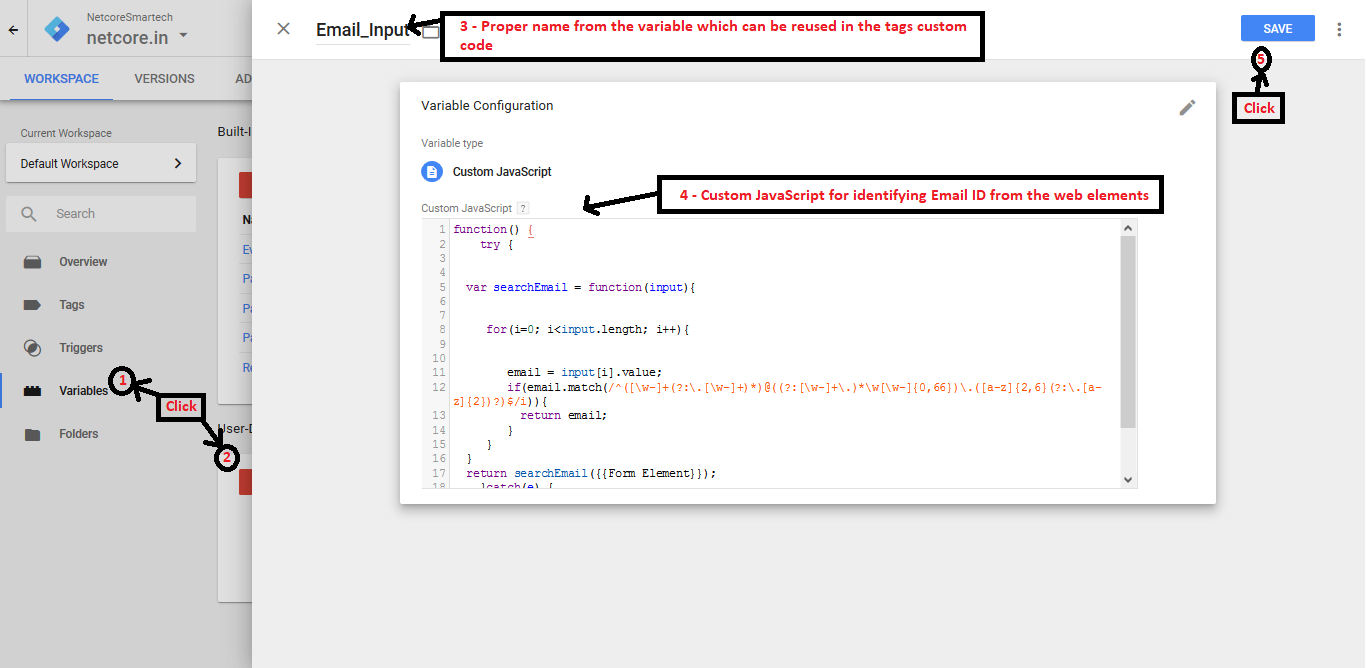
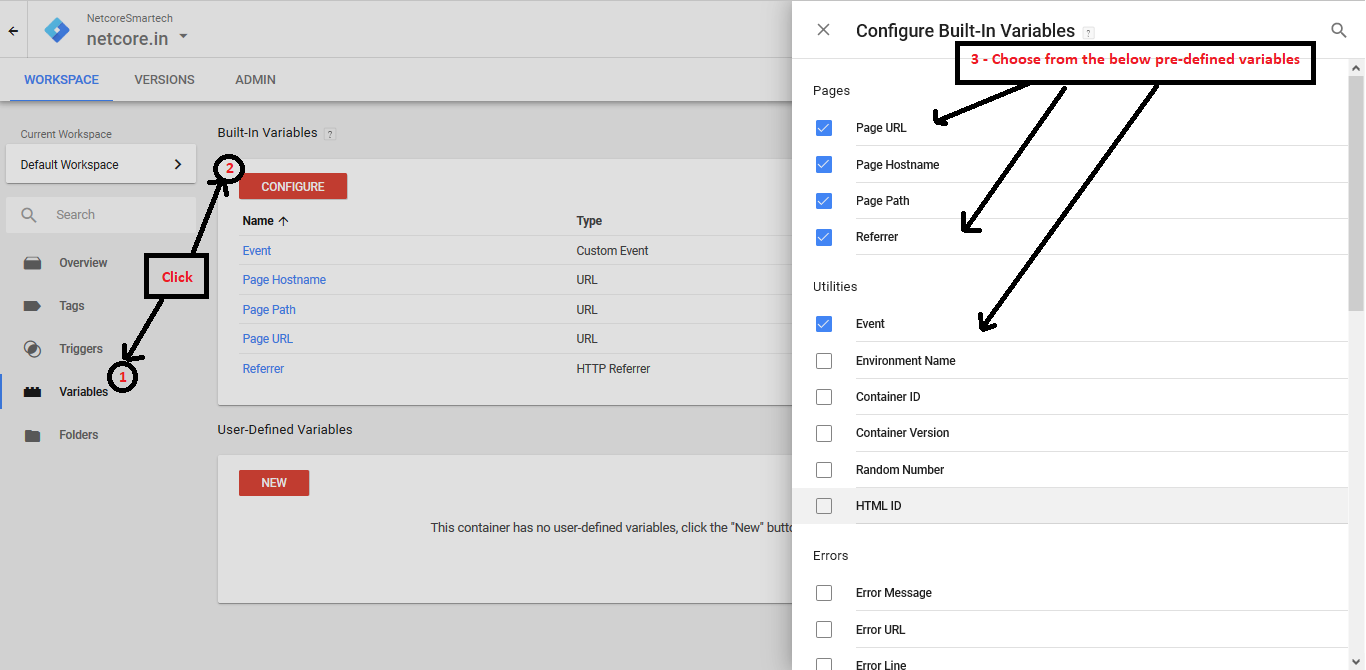
While implementing the Google Analytics or Custom Java Script tags, sometimes we might have to push data from the website viz Email ID, Name and / or Mobile number for the tracking and understanding users behaviour. At times the data is repetitive and makes sense to identify these data via variables i.e store the web elements in a variable and pass the variable’s data via the tag deployed. While creating Variable we can also have custom JavaScript function which returns the value. This is useful especially in case where email ID is entered at various placed on the website like registration / login or newsletter subscription. Instead of having multiple web elements to identify email from various places it makes sense to use custom function which can return the email value from any web element. New variables can be created from Variables -> User-Defined Variable. GTM also provides few predefined variable which we can make use of such as Click Element, Form ID, Page URL etc.
User-Defined Variables
GTM’s Pre-defined Variables
Integrating Smartech JS via GTM
In order to integrate smartech JavaScript (Custom) via GTM, below is the sequence of steps to be executed:
Create required Variables
Prepare a list of the variable which is required to be tracked and can be picked from the website. Below given are few samples for:
Dynamically picking the EmaiIId of the user (entered in the email text box)
We can pick an identifier for the email filled from the website view page source and use the identifier web element while creating the Email Id variable. But this approach becomes cumbersome when the web site has many places from where the customer of the website can enter his / her mail ID. There is a better approach to handle the situation i.e by dynamically pick the EmaiI Id from any email entering text box on the website such as Registering / Login / e-Newsletter subscription etc.
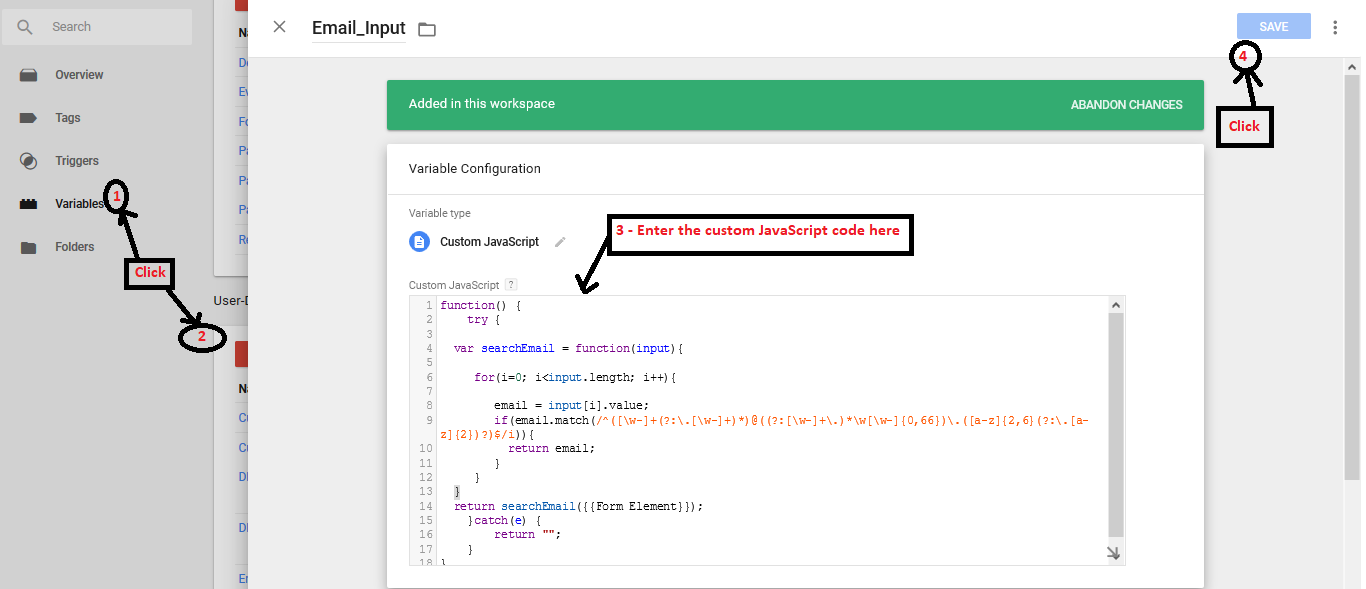
We can use the below-given custom JavaScript which will capture the emailID entered anywhere across the website.
function() {
    try {
        var searchEmail = function(input) {
        for (i=0; i<input.length; i++) {
            email = input[i].value;
              if(email.match(/^([\w-]+(?:\.[\w-]+)*)@((?:[\w-]+\.)*\w[\w-]{0,66})\.([a-z]{2,6}(?:\.[a-z]{2})?)$/i)){
              return email;
              }
          }
    		}
    		return searchEmail({{Form Element}});
    } catch(e) {
    		return "";
    }
}
Given below is the screenshot from GTM.
Dynamically picking the mobile number of the user (entered in the mobile number text box)
In line with picking the email id from the web elements across the website, we can also pick up the 10 digits Indian mobile number by using the custom JavaScript given below.
function() {
try {
var searchMobile = function(input){
for(i=0; i<input.length; i++){
mobile = input[i].value;
if(mobile.match(/^(\+91[\-\s]?)?[0]?(91)?[789]\d{9}$/i)){
return mobile;
}
}
}
return searchMobile({{Form Element}});
}catch(e) {
return "";
}
}
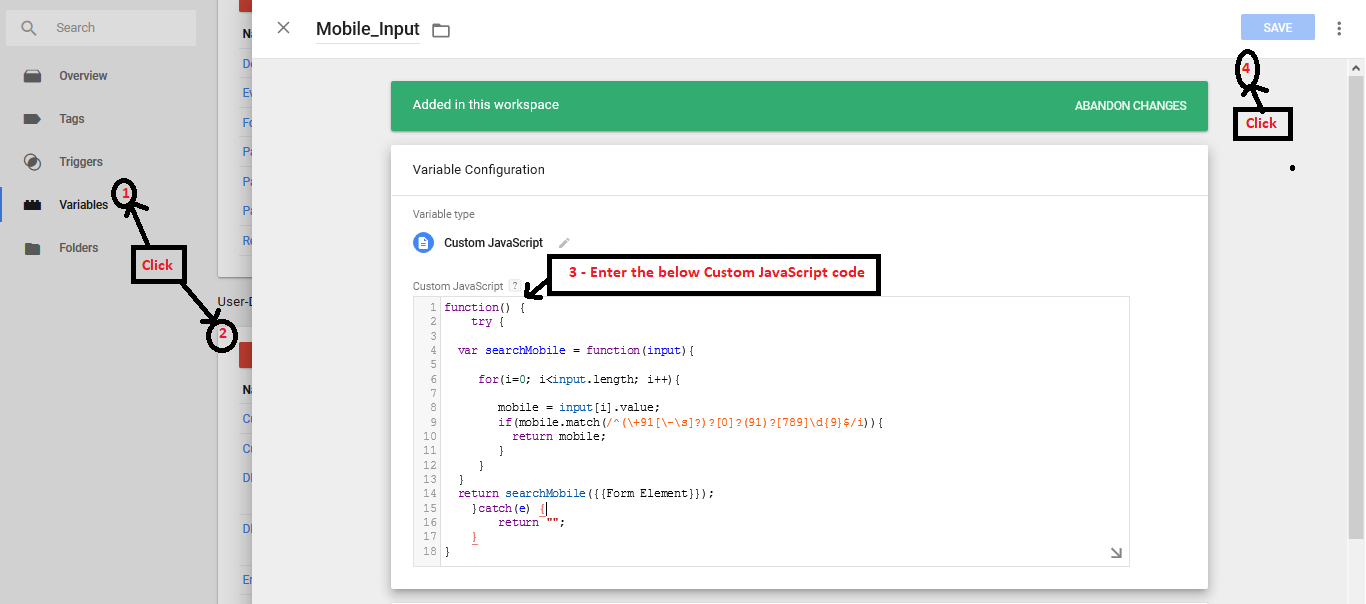
Picking the Name of the user through text entry in text box
Now a typical case where the users demographics are captured like name, age & sex, these web elements are not present across the website. These fields are only available while the customer registers on the website. So these web elements have to be identified with their web element ID (if not present then CSS Selector).
Based on the website implementation by the developers these web elements will either be having properties like “id” or “span css”. We can verify the website view page source and collect the information and either create the variable with ID or CSS Selector.
Given below is the screenshot with ID DOM Element.
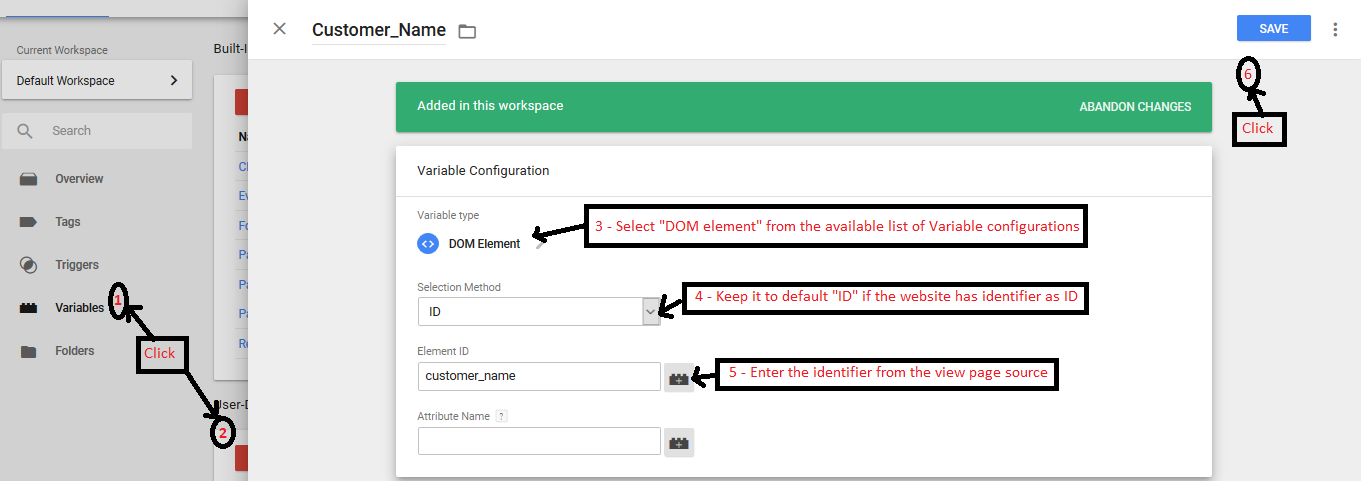
Screenshot with ID DOM Element
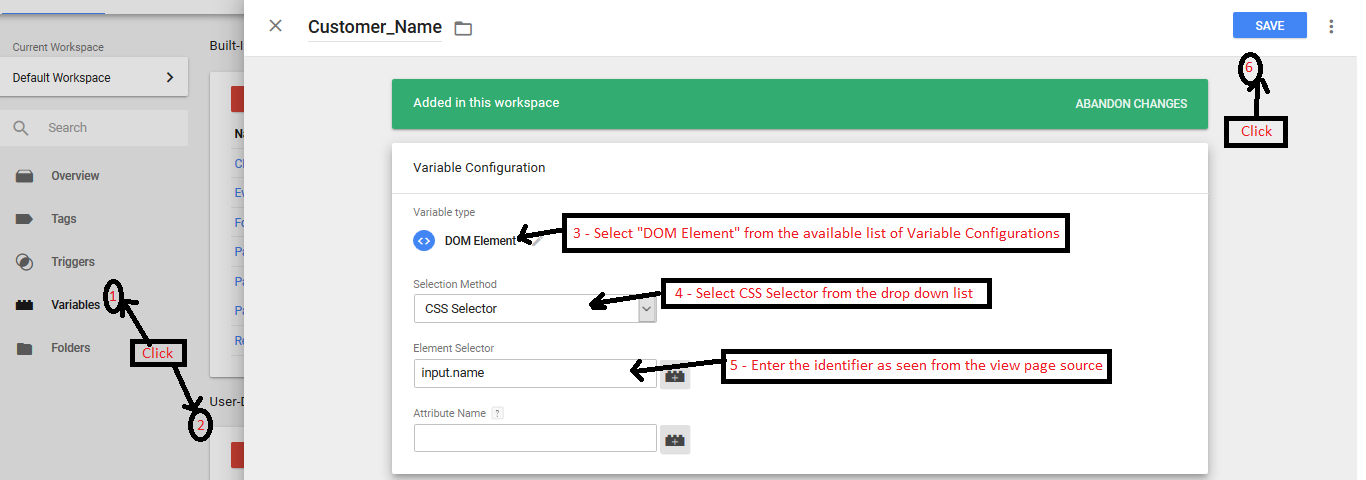
Screenshot with CSS Selector DOM Element
Picking the radio button selection through clicks
Apart from the text entry for Name and age the web element for sex (male/female) is usually present with radio buttons. The customer will click on the radio button based on his / her choice. This radio button click can be identified by using Click ID / Form ID based on the way the website is built.
Create required Triggers
All Pages Trigger
GTM by default has an inbuilt trigger for All Page and we need not create a separate trigger for this case. The all pages trigger will deploy the associated tag on all the pages of the website. On the other hand, consider this trigger to be a small piece of code which is present on all the pages.
Clickable Links Trigger
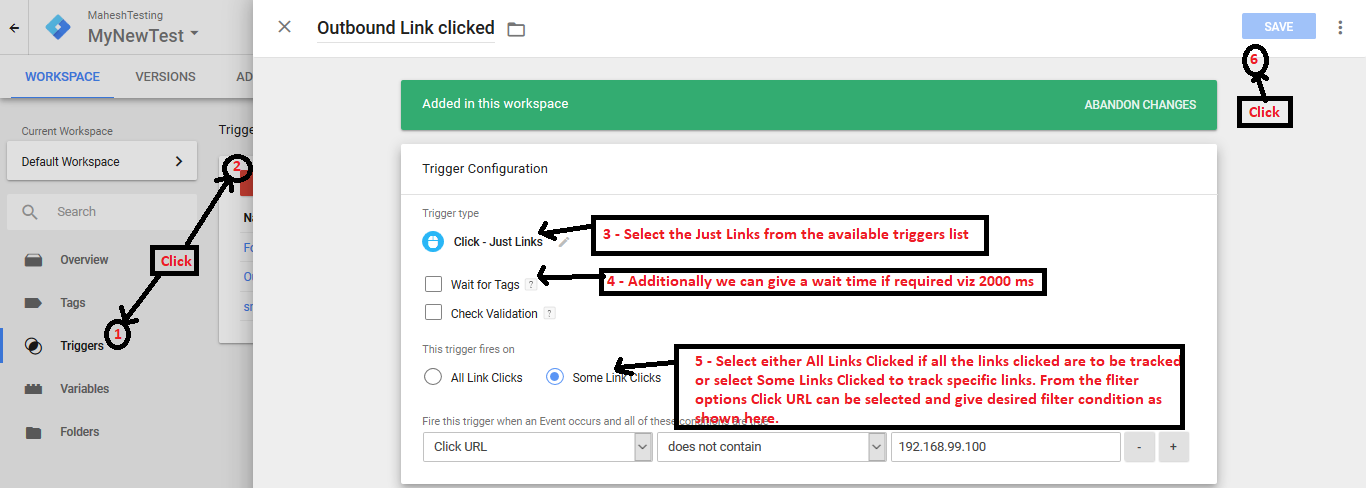
Consider a use case where marketer would like to know which links (both internal & external) the customer is clicking while he/she is on the web site. In order to deploy a tag around it with passing the data to either Google Analytics or custom JavaScript (smartech), this associated trigger of links clicked must be created first or also can be created while creating the tag. The trigger can be created from Triggers -> NEW -> Trigger Configuration -> (from choose trigger type) Click -> Just Links.
In order to set this trigger, it is advised to enable all the variables (GTM provided). Given below is the screenshot for enabling all the click-based variables.
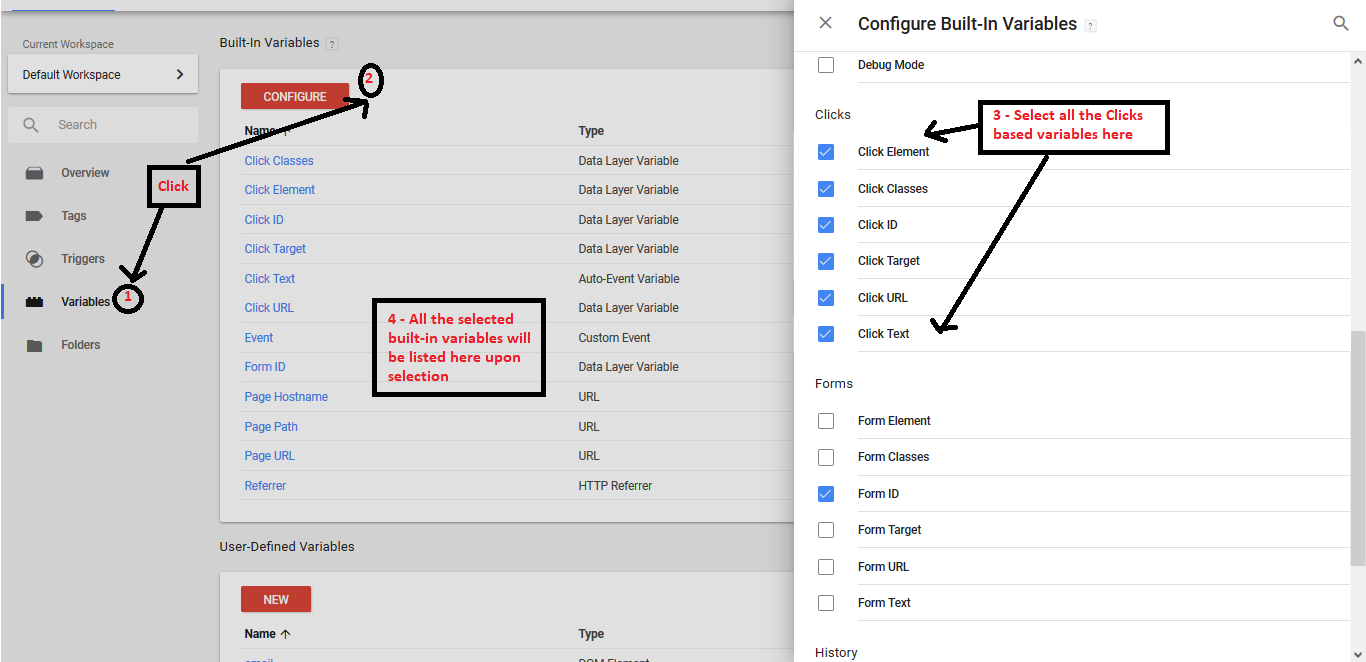
Next head over to create a new trigger for Clickable links. Choose Clicks – Just Link from the Trigger configuration and follow the instructions as given in the screenshot below.
Clickable All Elements Trigger
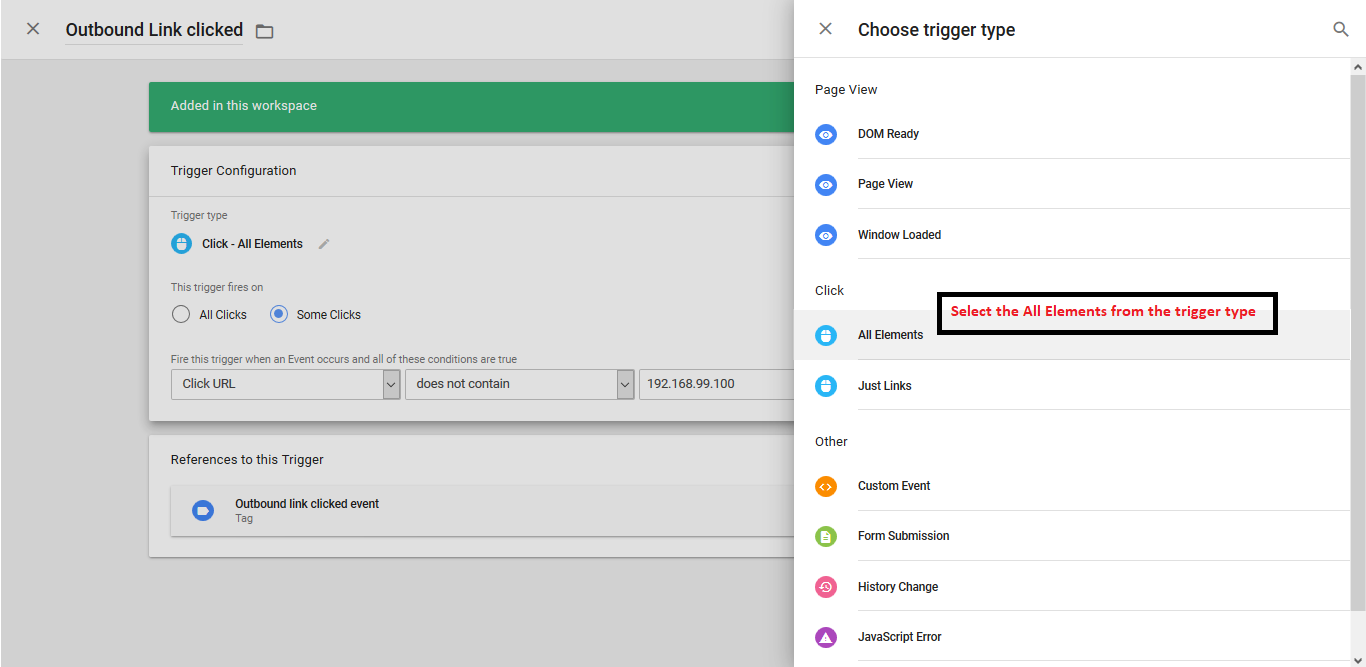
Now consider a case of tracking all the elements clicked / or few selected ones, we need to create trigger with Click All Elements and give desired filter condition.
Form Submission Trigger
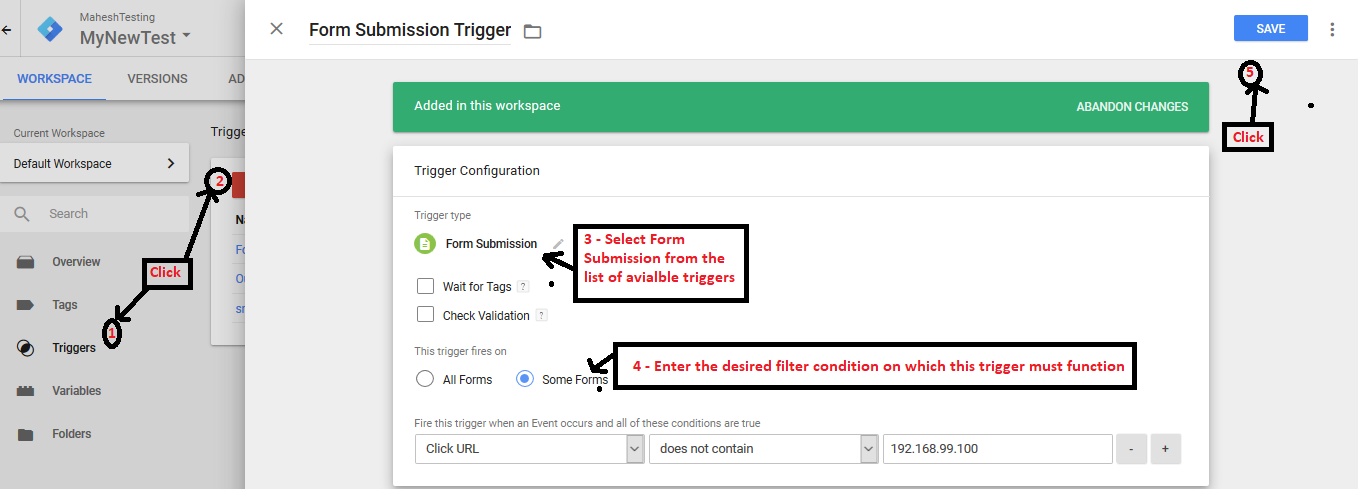
Let’s say the marketer wants to track all the data that their websites customers are entering in the form under contact us. There must be a trigger set for pushing the data via the deployed tag and this trigger can be created with Form Submission type.
Create Tags
Before we start with creating the tags, it's more important to understand what tags are how they are helpful. Tags are nothing but a piece of code that is injected by GTM to the website with the GTM ID to gather data or track user behavior/ navigation. This injection of code happens during the website access by any user which makes it advantageous over embedding the code directly into the source code of the website. Some times the embedding of code directly can increase the page load time which can be avoided using GTM. GTM has few Google-related tags like Google Analytics, Google AdWord Retargeting etc and also has plenty of pre-built 3rd party tags. For integrating smartech we have to use Custom HTML section and place the smartech JS for various use cases given below.
Smartech Base Tag
This is the initial connector between the website to smartech panel and GTM becomes an intermediate layer doing the integration i.e injecting code to the website and pushing the data from the website to smartech.
Here the Smartech JS is preset at http://tw.netcore.co.in/smartechclient.js
The alphanumeric string against the ‘create’ is the unique identifier of the smartech panel. All the data pushed from the website to smartech will be stored against this unique ID.
Next, the identity (here [email protected]) depends on the primary key of the panel i.e it can be users mail id if the primary key is email else it can be a mobile number or unique ID whichever applies.
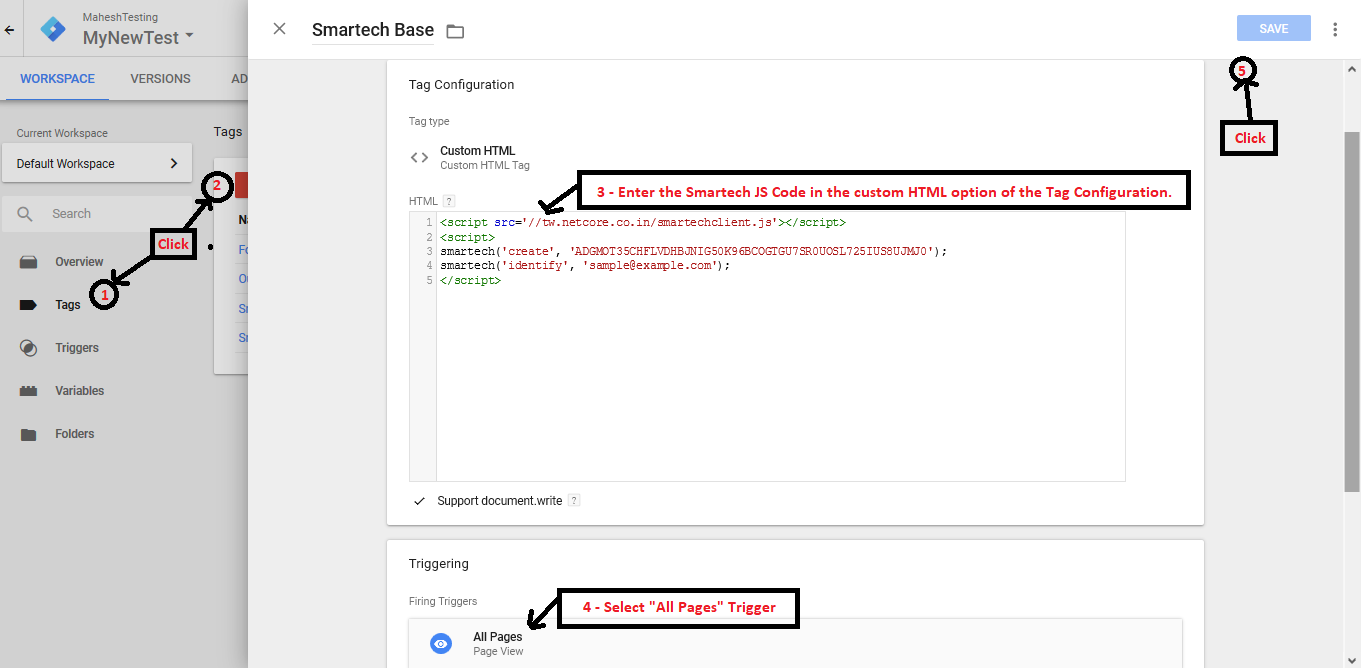
Irrespective of the case be this value has to be replaced with the corresponding constant. If in case we have a email variable defined already then this can be replaced with {{Email_Input}} as show in the screenshot below.
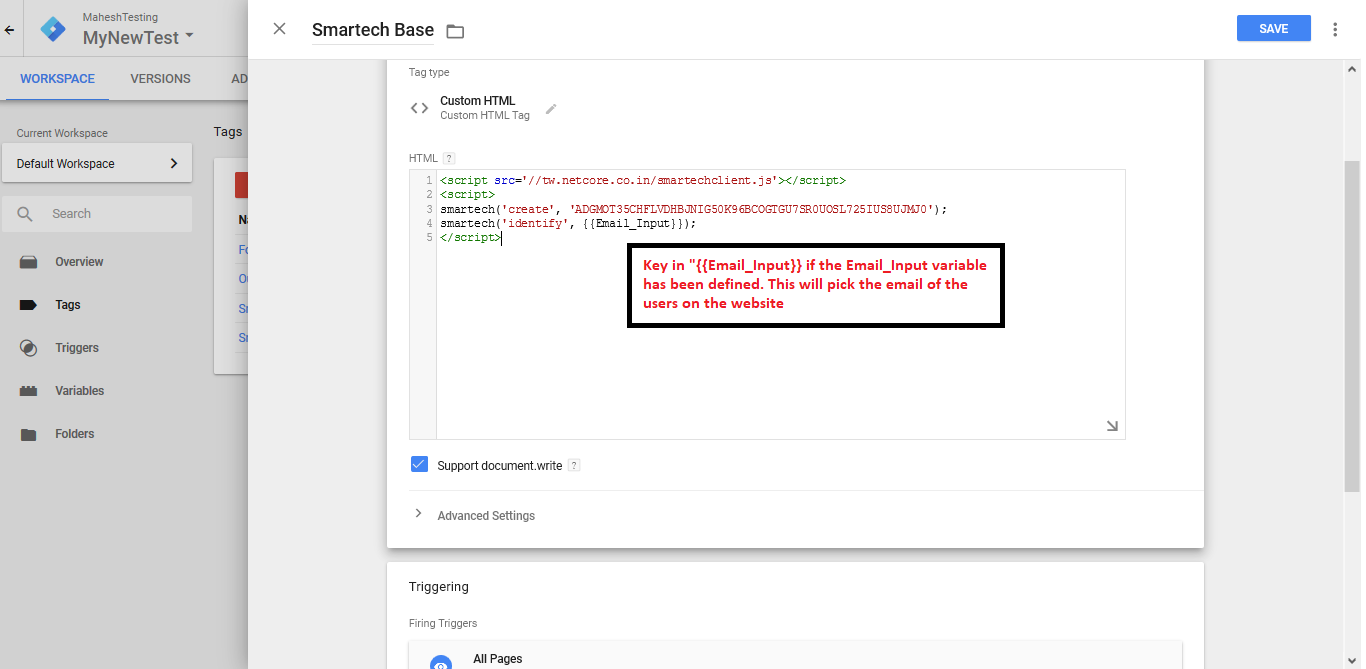
Also, the trigger will be for All Pages.
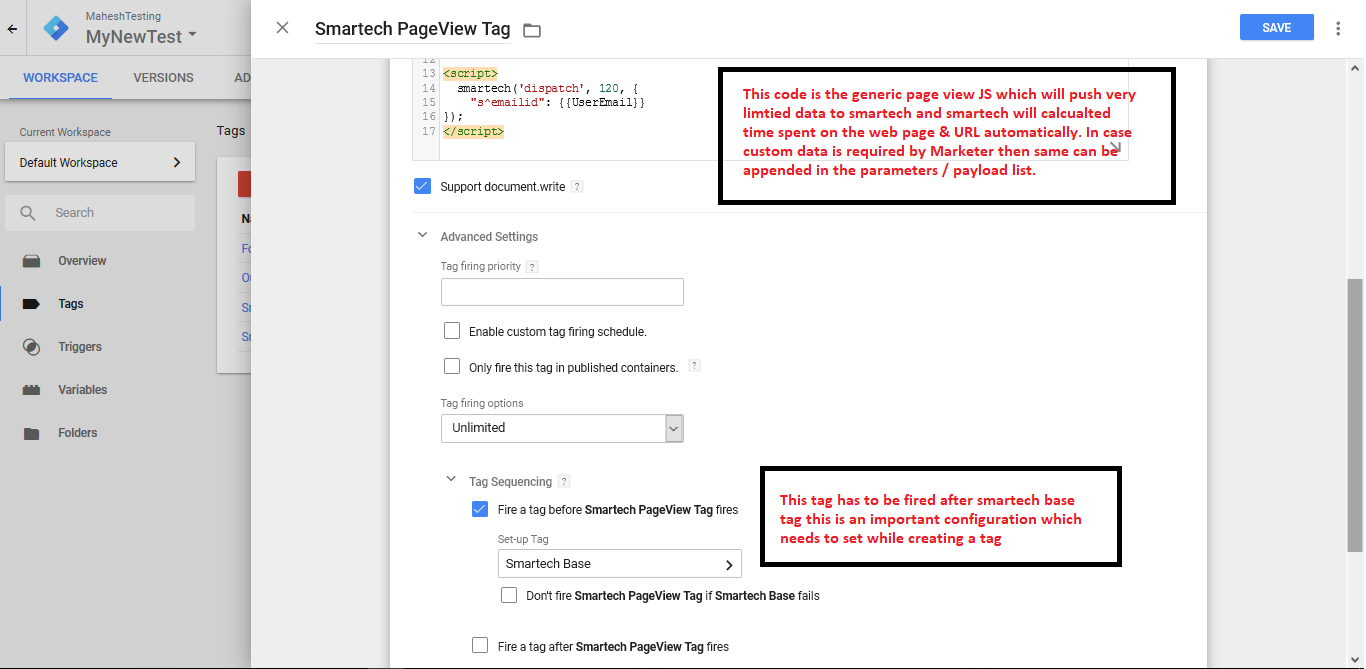
Smartech Page Browse Tag
This tag deployment is useful to understand the customer's site navigation and time spent on the website page(s).
Smartech User Registration Tag
This tag can be used while a new customer registers on the website and we need to capture the data of the user to a list created on the smartech panel. Here the JavaScript will have form activity and list ID where the data needs to be passed a given in the sample example screenshot below.
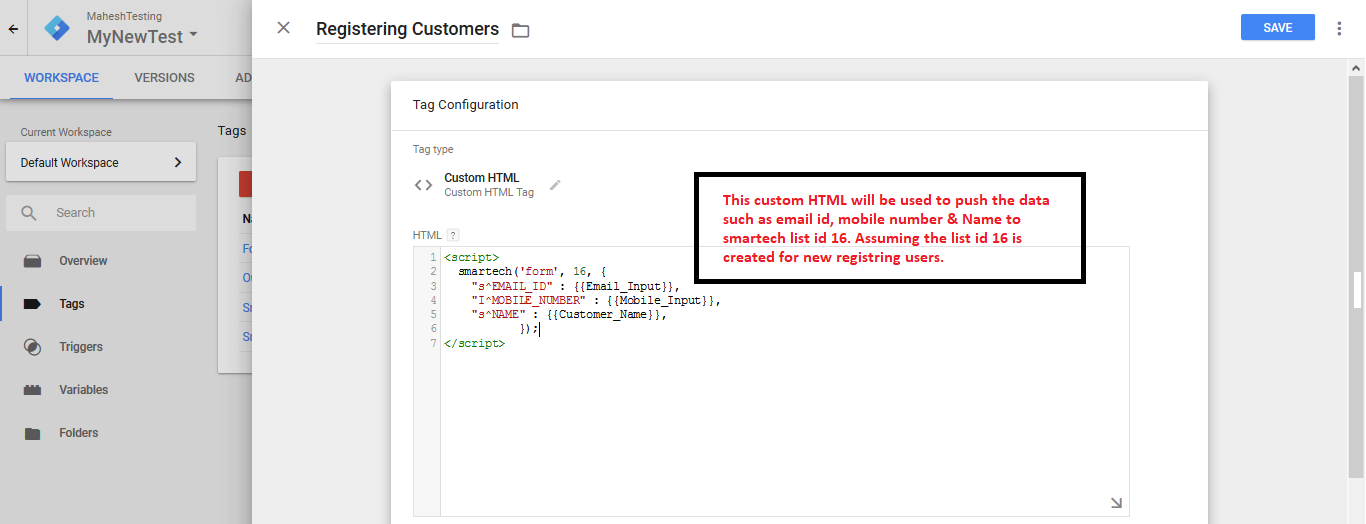
Please note to set the tag sequencing and also the desired trigger which could be on clicking submit button.
Smartech Add To Cart Tag / Remove From Cart Tag / Checkout Tag
The custom events designated for the e-commerce industry viz add a product to cart, remove from cart and checkout events can also be set via the GTM. Following below sample holds good for all such situations.
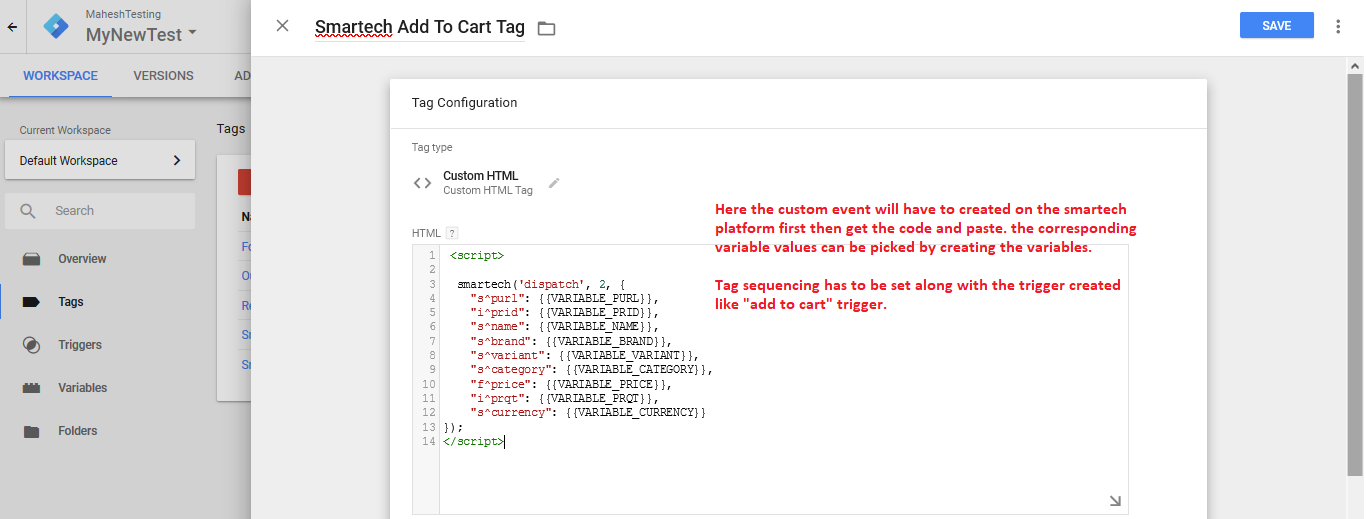
Smartech Page Scroll Tag
Apart from the smartech defined custom activities a lot of external built activities can also be used in GTM and pass the data to smartech. A typical example is Page Scroll tag by a customer. There are few pre-defined containers from the opensource community people which contribute to such events. We can import such containers and use them within GTM and push data to smartech.
We can use the page scroll recipe from http://www.lunametrics.com/labs/recipes/scroll-tracking/
And import to our container and which helps in getting the user's page scroll behavior.
Smartech e-NewsLetter Subscription Tag
e-Newsletter subscription tag can also be set in the GTM where {{Email_Input}} can be used in the custom JS and the trigger can be formed submit. This tag can be a dispatch to a custom event on smartech or a form call to list on smartech.
Further, this activity or list can be used to send newsletter emails.
Preview & Debug
Ones the Variables are created, Triggers are set and Tags are ready to be deployed to live website – it always advised to test the implementation. GTM has a preview and debugs mode which can come very handy in verifying the implementation done via GTM. While we enter preview mode if in case there are errors in our tags/triggers GTM will highlight them to be corrected before committing. In the preview mode, we can also see the data only on our browser as this mode puts only our browser on a special debugging mode.
We can enter the preview mode after each and every stage like post creating variable or triggers or create a single tag and test like developers unit testing.
Publish the tag / Live
Post verifying all the requirements are satisfied we can make the container live i.e all tags will be deployed for all users across the web site.
Also, it makes sense to have version numbers for all the containers made live. This will help in roll back to an older container version if any errors are encountered in the latest committed container.
Once done with the above steps, if you want, you can head over to the Web Message section to get started with running Web Messages on your Website, though activity tracking will happen only after completing the next step.
Head over to Integrations & Plugins section, for websites/apps on other platforms, since their integration method is different.
In case of any queries, please contact [email protected]
Info
- In the case of Shopify Websites only the event tracking can be configured using GTM
- In case of Magento Websites both event tracking and BPN can be configured using GTM
Updated about 5 years ago
