In-App message
Overview
To engage your active users for better conversion ratio, In-App message is a good channel to connect with such active users and show them specific and relevant content via In-App messages.
Prerequisites:
- In order to create In-app message campaigns, you should have the Smartech SDK integrated in your apps.
- Please follow this link for integration details of Smartech SDKs.
If it is already integrated, let's get started.
- Login to Smartech panel and go to "Campaign -> On-site Engagement - > In-App messaging".
- Here, you will see list of campaigns created for in-app messages. You can then click on "Create Campaign" (top right corner) to create new In-App message.
Setup
In Setup section, you can add following details:
- Campaign Name
- App Selection - You can select from the list of apps added in the asset section.
- Tags - You can add tags to your campaigns
- Advanced
- Conversion tracking - select an activity which you consider as conversion for this campaign. E.g. Purchase
- Payload parameters - You can also specify certain criteria for payload of the conversion activity. E.g. Purchase activity where product price is greater than 10,000.
- Control group - You can specify control group percentage here to see the uplift your campaign is going to give.
- Once all details are added, click on Save & Next to proceed to next step.
Audience
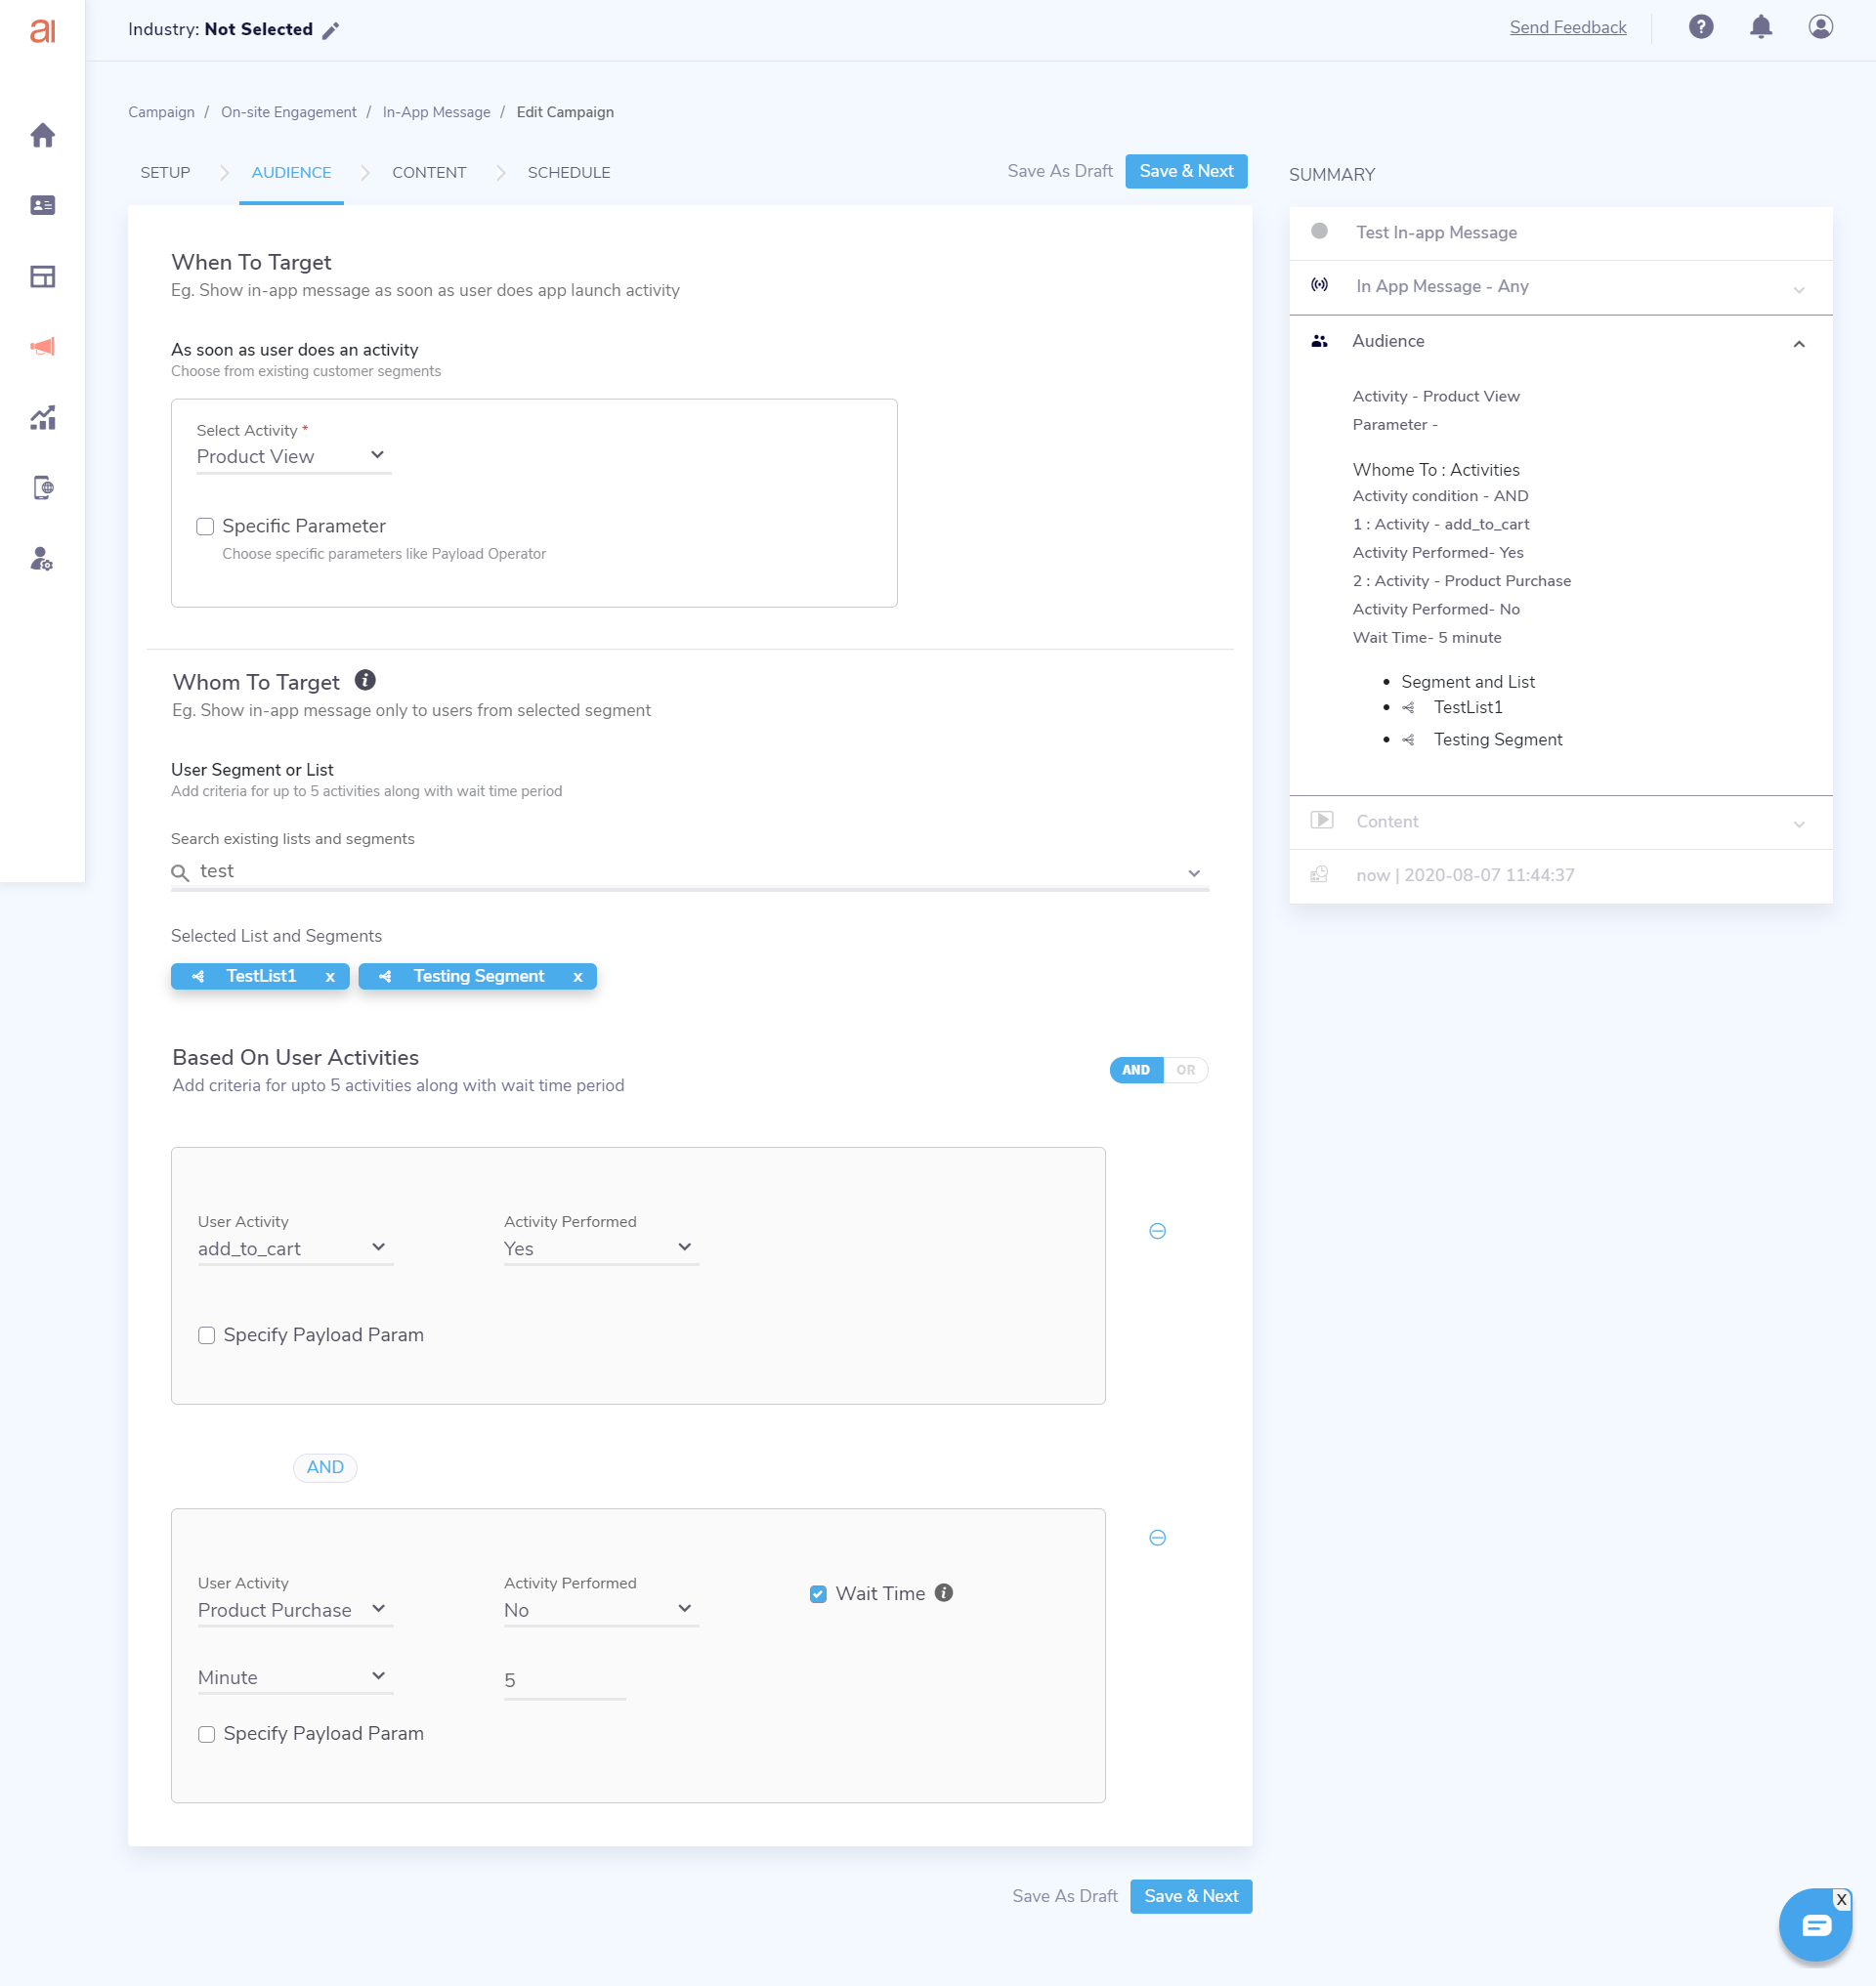
In this step, you need to specify the trigger criteria for your campaign. In other words, you need to select an activity name. Once user does this activity, he/she becomes eligible to see your in-app message.
- You can select activity from list of activities dropdown. E.g. Add to wishlist
- You can also further provide payload parameter criteria such as where product_price is less than 10.000.
Additionally, you can also specify specific user segment or list and also add multi event criteria for showing the in-app message campaigns.
- In Whom To Target section, you can select up to 5 user list or segment .
- In activities section, you can specify following things
- Choose an activity, select whether user should perform the activity as Yes or No
- In case of Activity performed: Yes, you can add further activity conditions. Up to Max 5 conditions.
- In case of Activity performed: No, you can specify the wait time period.
- You can also choose whether all conditions should work as AND or OR conditions. Please note Activity performed: NO is available only for AND conditions.
- You can also specify event payload parameter criteria as well in terms of payload, operator and its values
In Summary:
When to target : Event specified here will act as trigger for showing in-app message
Whom to target: Conditions specified here will define your target audience
Important
- Please note that ability to select List or Segment is available for clients who are on vertica
- Ability to select List & Segment and Multi event based conditions will be available for users who are on following SDK versions: Android SDK v2.2.19 and iOS SDK v2.5.5
- Please note that for using these targeting options for android, it is necessary that you migrate to AndroidX library if you haven't already.

Content
In this step, you will specify the content for the in-app message.
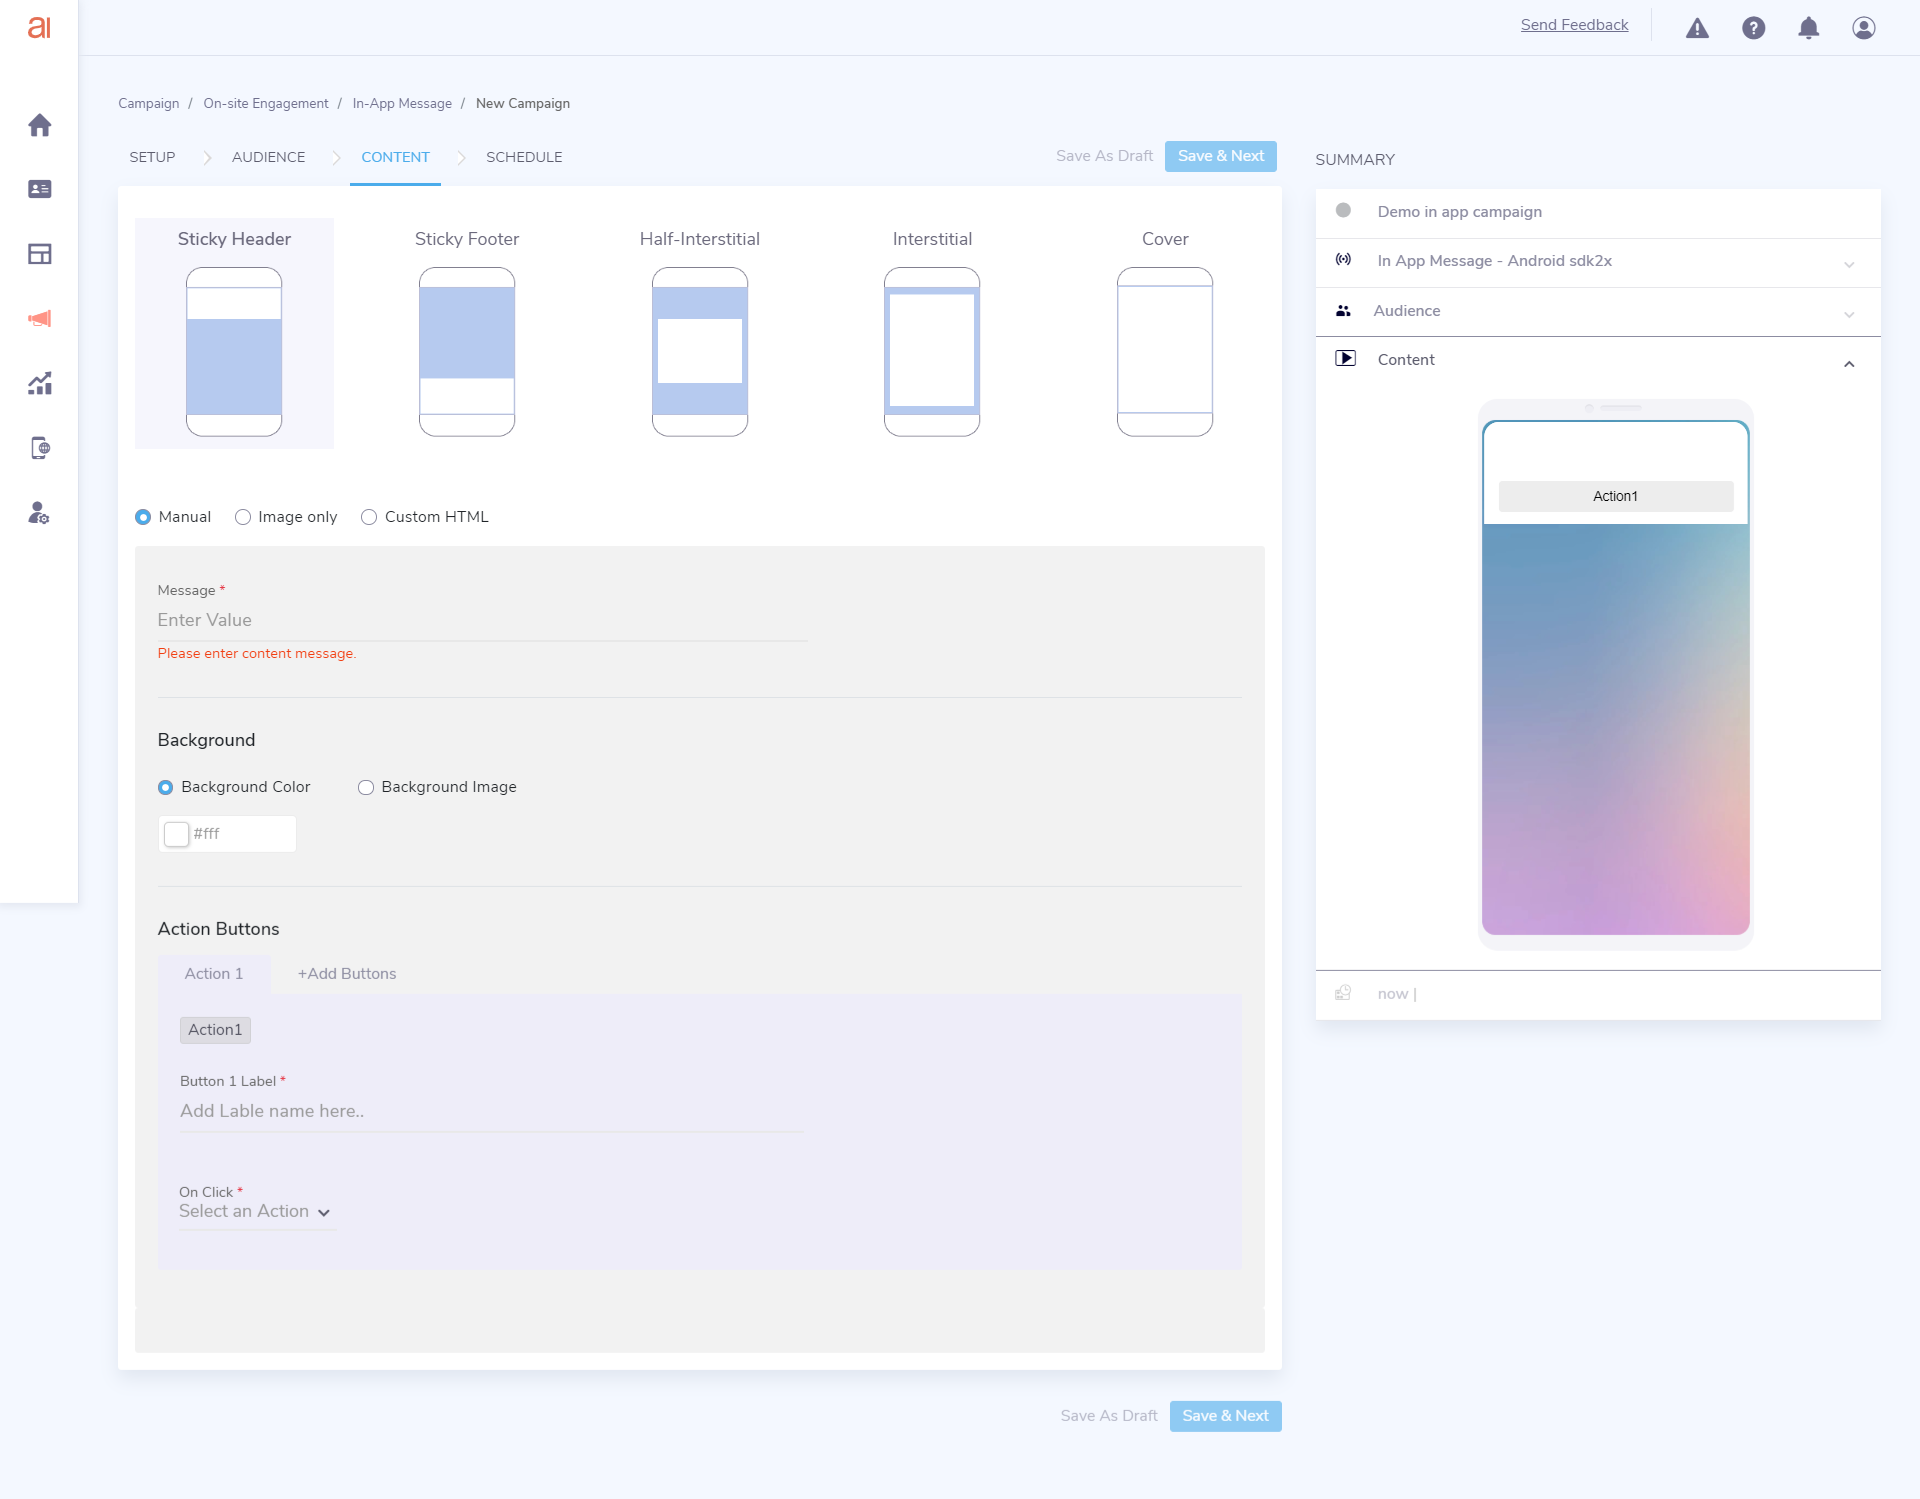
First, you need to choose the template layout from following options:
- Sticky header
- Sticky footer
- Half interstitial
- Interstitial
- Full screen cover
Once you select the template layout, you can start adding content via either of three methods available:
Manual
- Sticky header & Sticky footer
- Message: Recommended size is 80 characters
- You can add background color or background image
- Call to action buttons: You can add up to 2 action buttons. Recommended size is 15 characters
- Half interstitial, Interstitial
- Title: Recommended size is 35 characters
- Message: Recommended size is 150 characters
- You can add background color or background image
- Call to action buttons: You can add 1 action button. Recommended size is 15 characters
- Full screen cover
- Title: Recommended size is 80 characters
- You can add background color or background image
- Call to action buttons: You can add up to 2 action buttons. Recommended size is 15 characters

Image Only
- Sticky header and Sticky footer
- Image - Supported formats .jpeg, .jpg and .png with recommended 100kb size and 2:1 ratio
- Recommended size - 200 px X 100 px
- Half interstitial
- Image - Supported formats .jpeg, .jpg and .png with recommended 500kb size and 1:1 ratio
- Recommended size - 100 px X 100 px
- Interstitial
- Image - Supported formats .jpeg, .jpg and .png with recommended 500kb size and 1:2 ratio
- Recommended size - 100 px X 200 px
- Full Cover
- Image - Supported formats .jpeg, .jpg and .png with recommended 500kb size and 1:2 ratio
- Recommended size - 100 px X 200 px
Note: Image size restrictions are recommended for optimal user experience and applicable for images uploaded on the panel. If you wish to large size images, you can use a self hosted image url feature
In all of the templates > Image only option - you can add 1 call to action button.
CTA (call-to-action)
You can select from seven different call-to-actions as follow
- Redirect to deep link
- Patch a call
- Redirect to a website
- Send email
- Send SMS
- Even share the content through Whatsapp
- Close the In-App message.
Custom HTML
Here, you can add custom html + JS to create your own content. You can use this option if you wish to get complete control of how in-app message should look like.
In this option, you have two options to add custom html content:
- Direct URL - You can specify the valid url where you custom html is hosted.
- Inline html - here you can copy and paste the content directly in the content box provided.
Important
Please note that Direct URL under Custom html option will work on following SDK versions onward: iOS SDK version 2.4.3, Android SDK version 2.0.11 and 2.2.12 (Android X compatible)
However, please ensure that you confirm to the custom html guidelines given in the next section in order to ensure the experience is smoother and in-app message is shown to the user correctly.
Guidelines for using custom HTML in In-app messages
Pro Tip: Add gamification experience to your app
Use custom html feature for in-app messaging use cases around gamification like timer, wheel of fortune, scratch code, self-hosted/3rd party feedback surveys, customized multi-page in-app message.
- HTML file must contain the following javascript to support the in-app actions such as in-app click action and in-app close action, and to trigger in-app click event and in-app close event.
https://cdnt.netcoresmartech.com/smartech-app.js
And also need to add jquery to support the javascript
https://code.jquery.com/jquery-3.4.1.min.js
<script src="https://code.jquery.com/jquery-3.4.1.min.js" integrity="sha256-CSXorXvZcTkaix6Yvo6HppcZGetbYMGWSFlBw8HfCJo=" crossorigin="anonymous"></script>
<script src="https://cdnt.netcoresmartech.com/smartech-app.js"></script>
- The actions from the script can be performed by either assigning the predefined classes to the buttons or by calling predefined functions.
- There are three classes in this script, that are smt-click, smt-close, and smt-c2a
And also there are two functions included in this script i.enetcoreCloseInApp()andnetcoreTrackInApp(deeplink, customPayload)
To trigger in-app close event and to close the in-app window, either assign smt-close class to the button. For Example:
<button class="button smt-close">Close</button>
Or instead of assigning class to the button, you can call netcoreCloseInApp() function from the mentioned javascript in your javascript code.
For Example:
function closeInAppLocalFunction(){
	smartechCloseInApp();
}
- To send data to the application on button click, assign smt-click or smt-c2a class to the button and also define values for smt-click and smt-data.
- Values for smt-click and smt-data should be defined .
- Value for smt-click defines the action that app should perform (example: url or deep link should be open after in-app close)
- Value for smt-data must contain data in jsonString format which will get pass to the application (data will not get receive in application if no value or value in wrong json format is assigned to smt-data)
- When the valid json string formatted value is assigned to the smt-data, Then in application it will get received in Dictionary format. (only in case of deeplink or open url action)
For Example:
<button smt-click="https://www.google.co.in" smt-data='{"name": "Netcore"}' class="button smt-click">Open Url</button>
- Value for smt-data is optional. If the value for the parameter smt-data is not defined then the event will get triggered without custom data.
- Value for smt-data is not necessary for the actions like send SMS, call a number, whatsaap and send email
For example,
<button smt-click="sms:9850269829&body=Hello" class="button smt-click">Send SMS</button>
<button smt-click="tel:9850269899" class="button smt-click">Call a number </button>
<button smt-click="whatsapp://send?text=hello everyone"class="button smt-click">Whatsapp message</button>
<button smt-click="mailto:[email protected]?subject=Hello&body=This is Email" class="button smt-click">Email</button>
- The action “in-app clicked” can also be called via calling
netcoreTrackInApp(deeplink, customPayload)function in your javascript code
- Value for deeplink defines the action that app should perform (url or deep link should be open after in-app close)
- Value for customPayload must contains data in jsonString format which will get pass to the application
For example,
function openDeeplinkWithCustomDataLocalFunction(){
		var deeplinkValue = "smartech://image";
		var person = {
		  firstName : "John",
		  lastName  : "Doe",
		  age     : 50,
		  eyeColor  : "blue"
		};
		var payloadValue = JSON.stringify(person);
		smartechTrackInApp(deeplinkValue, payloadValue);
	}
- Sample Values for smt-click attribute or smt-c2a attributes are given below:
- Open URL: https://www.google.co.in
- Send SMS: sms:9899999999&body=Hello
- Call this number: tel:9899999999
- Deep link: www.google.co.in
- Whatsapp: whatsapp://send?text=hello everyone
- Email: mailto:[email protected]?subject=Hello&body=This is Test Email
Schedule
In this last step of campaign creation, you can specify the campaign start date and end date.
For start date, you can choose to publish the campaign now or at a later date and time.
For end date, you can run campaign indefinitely or choose a particular date and time.
You also have option to choose campaign frequency in terms of day of the week and time of the day.
For frequency of campaign, you can choose how many times this campaign should be shown to the users. You can choose x number of times per session or per day or per campaign in this option.
Preview
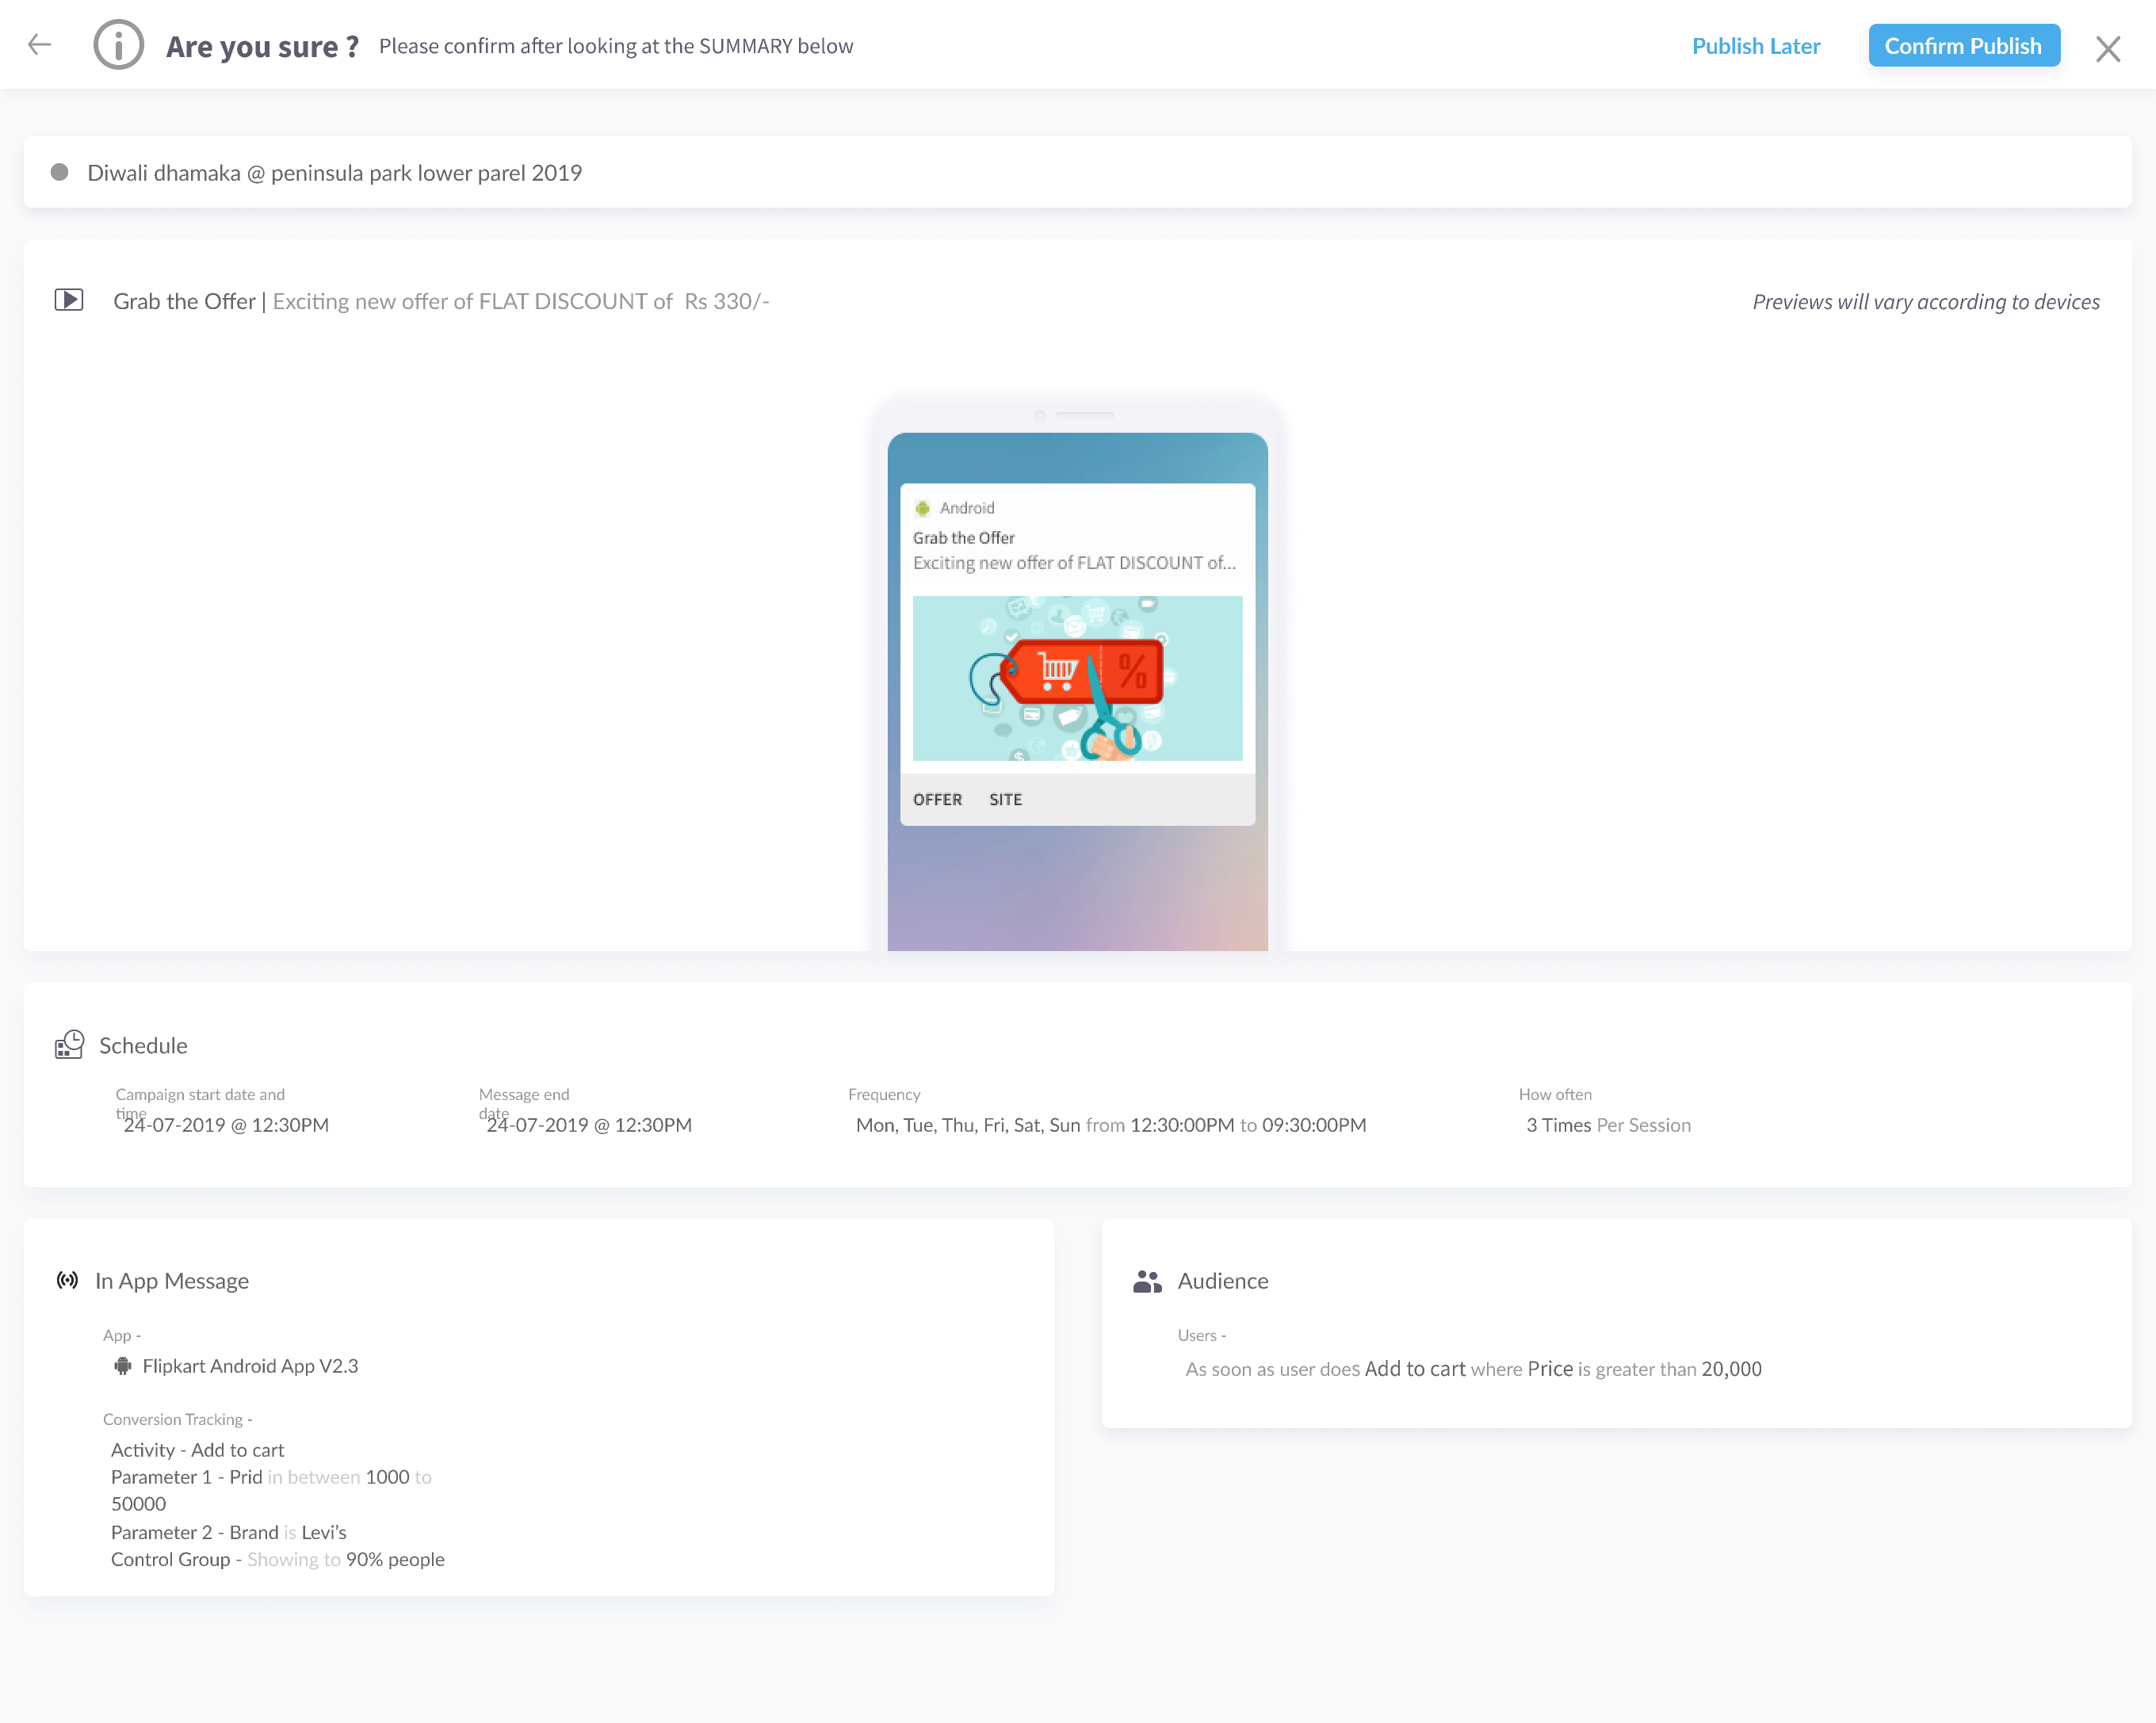
This section will provide you summary of the campaign details which you have created.
So before publishing check all the details carefully.

Campaign Listing
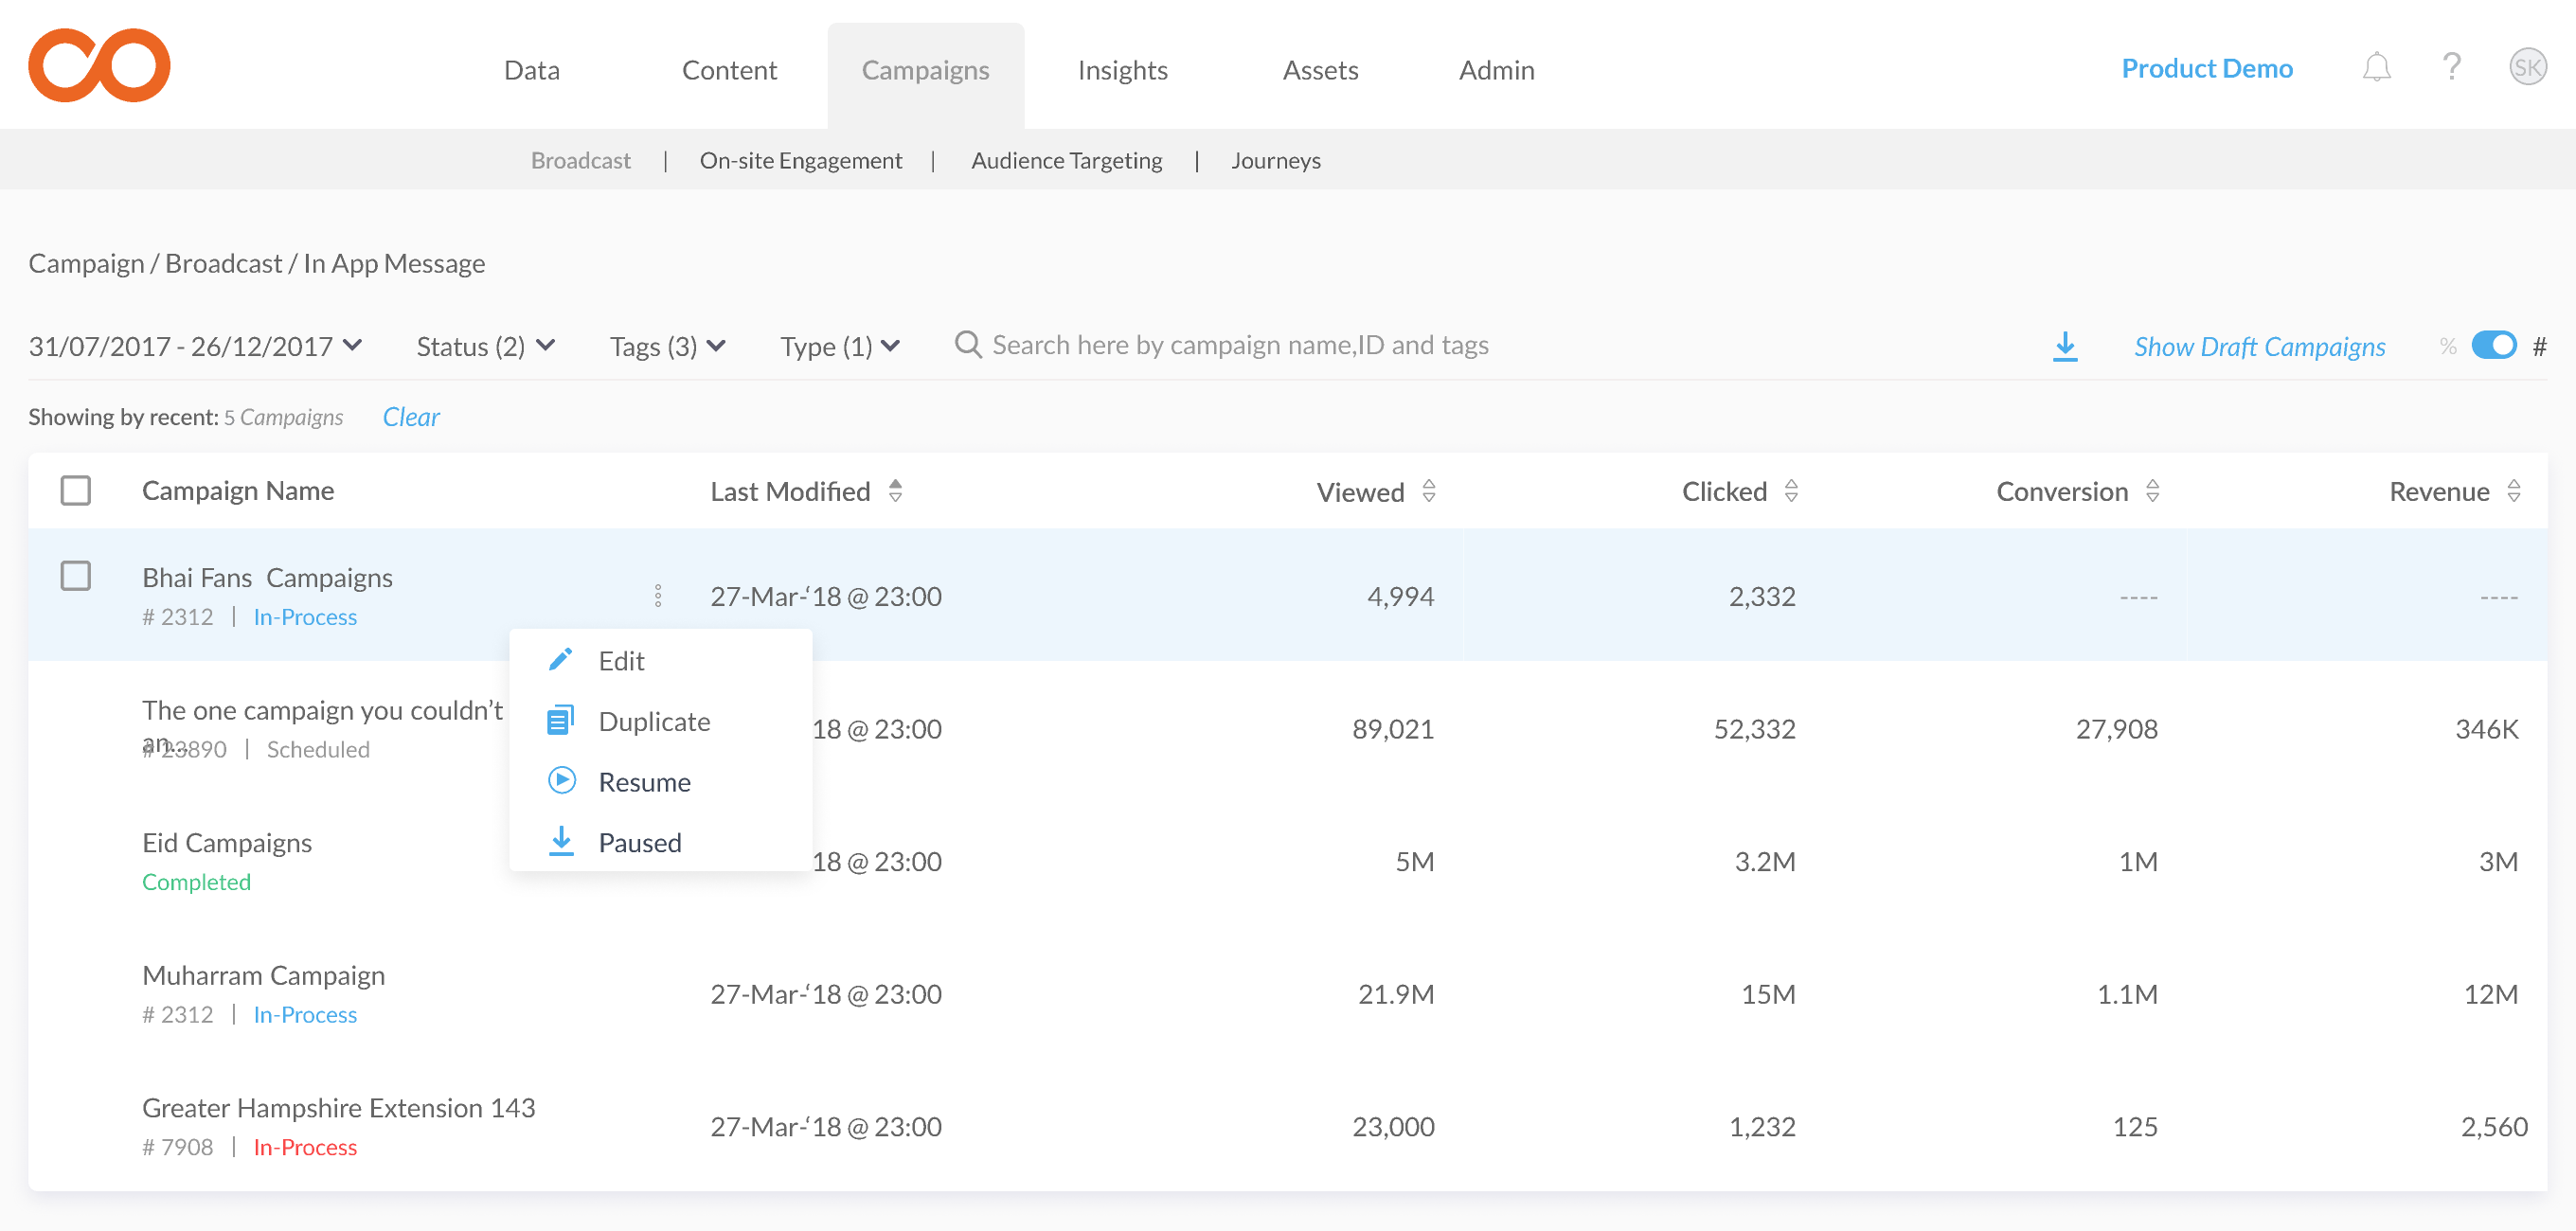
On mouse-hover, by clicking on ellipsis (3 dots) you can Clone a given campaign as well as download its reports, or by clicking on campaign title you can see the preview of the campaign.
The entire campaign listing can be sorted published time, sent & clicked.
You can also toggle between percentage and numeric values of the entire listing.
Search
The campaign listing page allows you to search any campaign by its name or id.
Filter
You can also filter based on Campaign Status such as scheduled, completed, failed, suspended, etc. as well as based on the Tags
Download Reports
This feature allows you to download reports of all or selected campaigns.

For any queries, please contact [email protected]
Updated over 4 years ago
