sFTP
Overview
Auto Import of data
In order to automate the list data flow from Admin to Netcore, FTP based integration model can be used.
Netcore will share the FTP credentials to Admin which can be used to connect and dump data into that location. Admin can use either his own FTP server or Netcore’s FTP server.
Details are mentioned below:
| Host/IP address | abc.ab.abc.abc |
| Transfer Protocol | FTP/sFTP |
| User | user |
- Inside the above FTP location, three Directories named "WORK", "ERROR" and "DONE" need to be created.
| Directory Name | Process Flow |
|---|---|
| WORK | In WORK directory, Admin will dump the target csv file |
| DONE | If the target csv file is successfully uploaded on Netcore’s interface, its moved to DONE directory. |
| ERROR | If target csv file is failed to upload because of any error/interruption, its moved to ERROR directory. |
- The structure of target CSV file in the WORK Directory is explained later in this section.
There are two modes of operation in FTP:
a) Auto Upload Process
b) Auto scheduling Process
| Modes of Operation | Usage |
|---|---|
| Auto Upload Process | In this process csv file is auto fetched from FTP and uploaded in the Netcore interface |
| Auto Scheduling Process | In this process csv is auto fetched from FTP and uploaded and also the respective campaign is auto scheduled in the Netcore interface |
MD5 and ROWCOUNT are the two modes of Data integrity check, either of these can be used to ensure the proper transfer of the data from Admin to Netcore FTP.
- In case of MD5 check, if the file name is new_mumbaiuser.csv, then the “mumbaiuser” will be treated as list name.
- Create md5sum of the corresponding target file then the corresponding md5sum file should be named as new_mumbaiusers.md5. This will be required to check the data integrity of the target csv file.
| Data Integrity Check | Mode | File Name Convention |
|---|---|---|
| MD5 | Auto Upload | new_.csv |
| MD5 | Auto Schedule | new.csv |
In case of ROWCOUNT check, Admin need to mention rowcount in the target file shown in below table
Note
Rowcount includes file headers and actual data.
| Data Integrity Check | Mode | File Convention Name |
|---|---|---|
| ROWCOUNT | Auto Upload | newROWCNT-.csv |
| ROWCOUNT | Auto Schedule | newMSID-_ROWCNT-.csv |
- File Content: The File structure will be flat as shown in the table below (sample structure)
| Sr No | Field | Data-type | Mandatory or Optional | Description |
|---|---|---|---|---|
| 1 | EmailAddress | Varchar | M | Email address of the customer |
| 2 | Attribute_1 | Varchar | O | Attribute for personalization |
| 3 | Attribute_2 | Varchar | O | Attribute for personalization |
| 4 | Attribute_3 | Varchar | O | Attribute for personalization |
Note
There can be N Attributes in the target CSV file.
Process Flow for Auto Upload
In this process csv file is auto fetched from FTP and uploaded in the Netcore interface
| Step | Steps for Auto-Upload |
|---|---|
| 1 | Admin will upload csv and keep it in FTP, Netcore will ping the FTP location in every 10 mins and extract the file and perform the basic validation checks: Check for the Mandatory/Optional parameters Check MD5sum Or Match the Row count with the number of rows in the file received * Other internal error checks |
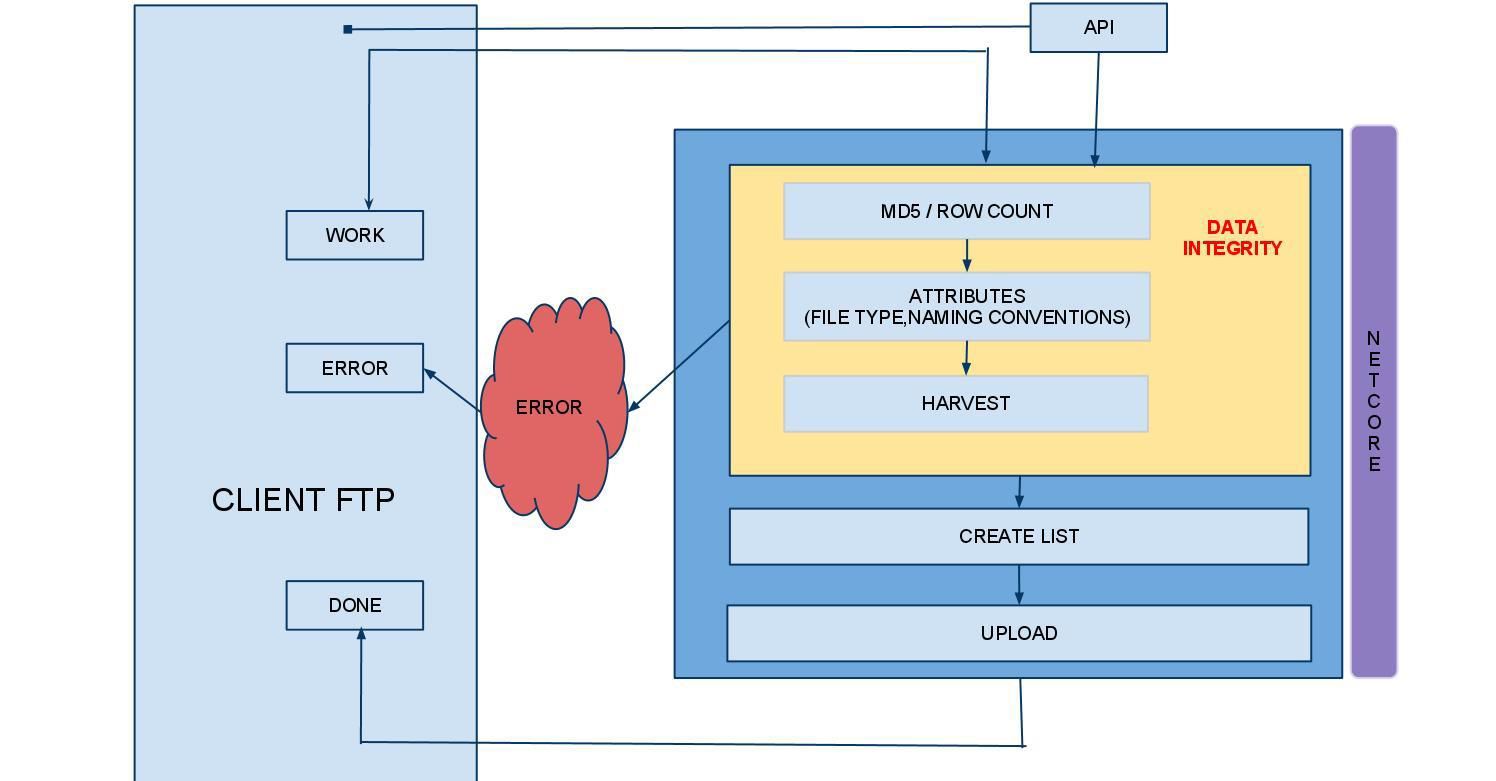
| 2 | If file passes all of the above checks,it will be successfully uploaded on the Netcore's interface,then the file will be moved to "DONE" directory and a successful notification mailer will be sent to Admin as shown in figure (Architectural Flow of Auto Upload) |
| 3 | If any of the above error is found than the processing of the file will not be done further and file will be moved to ERROR folder in FTP area and a notification mailer will be sent to Admin(Depending on the type of error) |
| 4 | Filename provided by Admin will be considered as "ListName” e.g. if the file name is new_Mumbaiusers.csv, then the List name will be “Mumbaiusers”.Every Time Admin will upload a file with a new name so that listname will be always unique.If the filename is repeated, then the upload will not start and an automated email alert will be sent to the respective admins. |
| 5 | Attribute of Campaign should be predefined on the tool by Admin. If new attributes are required inside the file, then it should be first added on Netcore's EMM panel. |
| 6 | Netcore will keep history of all Upload and this history will be available on the frontend |
| 7 | Also these files from FTP will be removes as per client requirement. |

Architectural Flow of Auto Upload
Notifications Alerts
Success and failure (where applicable) notifications will be sent throughout the processing of each file to the email id’s mentioned (Netcore will configure the Admin’s email ids on which such alerts are required to be sent)
Notifications will include following email alerts
Successful upload
Subject: list upload successful for [file name]
Body:
Request ID: [JobID]
File name: [Target File name]
Total Records: [Total count of users]
Successful upload: [Successfully uploaded users ]Invalid record notification alert
Subject: list partially uploaded for [file name]
Body:
Request ID : [JobID]
File name : [Target File name]
Total Records : [Total count of users]
Invalid Records : [count of invalid email records ]
Successful upload : [Count of Successfully uploaded users ]
Link : link will be provided to download the invalid recordsHarvest file alert
Subject: list upload failed for [file name]
Body:
Request ID: [Job ID]
List name : [List name]
File name: [Target File name]
Total Records: [Total count of users]
Reason: File contains Harvested data
Process Flow for Auto Upload and Schedule
In this process csv is auto fetched from FTP and uploaded. Also the respective campaign is auto scheduled in the Netcore interface. Here all types of campaigns including slicing campaign can be auto scheduled.
It includes:
- Basic campaign
- Birthday Campaigns
- Follow up Campaigns
- Split AB Campaign
- Dynamic Content Campaign
| Step # | Steps for Auto Schedule |
|---|---|
| 1 | Admin will compose a campaign on Netcore interface and an MID will be generated (the campaign status has to be in draft state.) |
| 2 | This MID will be used while creating the file in FTP |
| 3 | Admin will upload csv and keep it in FTP, Netcore will ping the FTP location in every 10 mins and extract the file and perform the basic validation checks: Check for the Mandatory/Optional parameters Within the same MessageID, UniqID should not repeat Match the Row count with the number of rows in the file received Other internal error checks |
| 4 | Netcore will enable the autoschedule parameter |
| 5 | Netcore will then match the campaignid parameter and process the campaign |
| 6 | Admin can check the status of the campaign by logging into the Netcore Interface |
| 7 | If the campaign due to any reason does not get executed, adding a new file to the existing list will add the email ids of the existing list. And a single list will be maintained. |
| 8 | If the campaign does not get executed for any reason, and 2 different lists are created, then both the lists will co-exist. |
| 9 | For re-sending the campaign, the csv files can be uploaded using app_campaignid_filename format |
| 10 | Netcore will upload the file and resend the campaign |
| 11 | Alerts for data uploading and campaign status will be sent to Admin |
Appendix
How to create a CSV file?
Creating the *.csv file for uploading the email ids
| 1 | Open new Excel sheet |
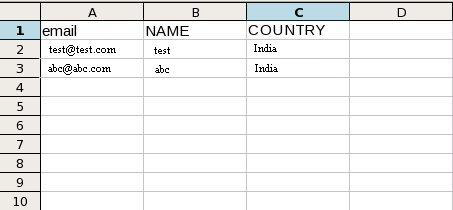
| 2 | Provide Attribute as below email(Compulsory):Provide Email-ids below EMAIL header NAME(Optional attribute):Provide respective name below NAME header * COUNTRY(Optional attribute):Provide country name below COUNTRY header |
| 3 | Number of attributes can be added in csv file but it should be in uppercase |
| 4 | Save the file with a simple name, without any special characters in CSV format. e.g new_testfile1.csv |

Format of csv file which is to be uploaded
In case of any queries, please contact [email protected]
Updated over 7 years ago
