Passing Data form Website
This guide will help you step by step as to how your website form details can be sent over to Smartech.
STEP 1 - Add your website on Smartech Platform. Click here for details about the same.
STEP 2 - List on the Smartech platform
Form Data captured will be visible in the List Created. Follow the steps mentioned below to create a list :
- Go to Data > Contacts > All Contacts> Lists > Create List
- Enter the details in the Create New List dialog box
- Click Create List
STEP 2 - Add JavaScript code to Your website. Click here for details about the same.
STEP 3 - Enriching details of a Contact
Initially, contact is always Anonymous on your website. This means the contact doesn't contain any identifiable information and you will not be able to reach out to the user.
You can enrich the details of your contact by capturing multiple details like Email, Mobile Number, First Name, Last Name, etc.
However, it is mandatory before you proceed ahead with Js level implementation of passing the attributes, the same needs to be defined on your Smartech panel, without which the system will not be able to map the values passed from the website.
You can do this by heading over to Data > Contacts > Attributes > Create new Attribute for creating a new attribute.
Below is an example of how to pass the details.
Copy and Paste the below JavaScript code in the footer section of your website.
<script>
smartech('contact', 'LIST IDENTIFIER', {
'pk^customerid': {{Replace Unique customer identifier value here}},
'email': {{Replace email value here}},
'mobile': {{Replace mobile value here}},
'FIRST_NAME': {{Replace First_Name value here}},
'LAST_NAME': {{Replace Last_Name value here}},
'COMPANY_NAME': {{Replace Company_Name value here}},
'DESIGNATION': {{Replace Designation value here}},
'PRODUCT': {{Replace Product value here}}"
});
</script>
Normally when a form is triggered an event/activity is triggered along with it as well. The same can be done using the following code as an example:
<script>
    smartech('contact', 'LIST IDENTIFIER', {
    'pk^customerid': {{ Replace Unique customer identifier value here}},
    'email': {{Replace email value here}},
    'FIRST_NAME': {{Replace First_Name value here}}
    },
    function() {
    smartech('identify', {{ Replace Unique customer identifier value here}} );
    smartech('dispatch', 'Register', {
    'email': {{Replace email value here}} ,
    'FIRST_NAME': {{Replace First_Name value here}},
    });
    });
    </script>
Primary Key, Email, Mobile should be in lowercase.
Mandatory to insert 'pk^' for Primary Key.
Attributes being captured in the JS require a similar attribute to be created in your Smartech panel for mapping. Head over to Data > Contacts > Attributes > Create new Attribute for creating a new attribute.
In addition to adding contacts from your website using JavaScript, we also provide API to add the contacts.
Step 4 - Verifying the details
Once you copy-paste the codes as shown in the previous step, follow these simple steps to verify the process of integration:
-
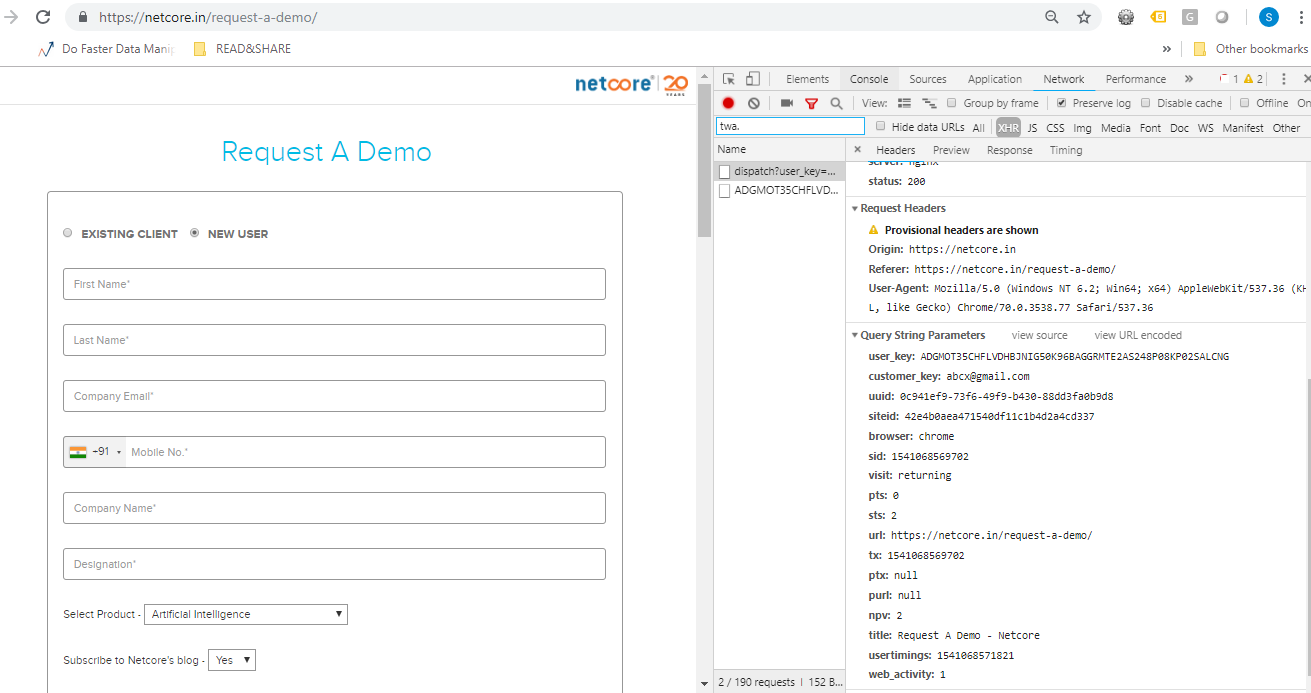
Open your website in Chrome browser and open Developer Tools from the browser menu or by pressing keyboard shortcut key F12. A panel (Dev Tools) will appear in your browser window.
-
Click on 'Network' tab. Please select “Preserve Log” checkbox. Fill the form and click on “ CTA”.
-
Now search “twa.“ in the filter box to filter out Netcore’s form call.
-
We would be able to see “Form“ Smartech functions in the debug window. You may check the correctness of relevant information/attribute being passed to Smartech system by clicking on Dispatch/Form function.

- You can also see this data populating in the 'List Identifier' section on the Smartech platform.
Updated almost 5 years ago
