
Custom HTML
Learn to create in-app message using our custom HTML editor.
Customize your in-app messages with HTML, CSS, and JavaScript for enhanced control and unique branding. Use custom HTML to create messages that perfectly match your brand and engage your app users seamlessly.
The following features are supported with HTML in-app messages:
- Use HTML templates to display messages within your app.
- Support for both Landscape and Portrait modes in in-app message campaigns.
- Upload custom HTML templates as a code file or directly paste your HTML code when creating in-app message campaigns.
Pro TipUse the custom HTML feature for in-app messaging to enhance gamification experiences. Create engaging elements like timers, wheels of fortune, scratch cards, self-hosted or third-party feedback surveys, and customized multi-page in-app messages.
Note
- Ensure your HTML file contains JavaScript to use your custom HTML creative.
- Direct URL option under Custom HTML works on the following SDK versions and onward: iOS SDK version 2.4.3, Android SDK versions 2.0.11 and 2.2.12 (Android X compatible).
Create Campaign with Custom HTML
To create an In-app message campaign using HTML, follow these steps:
- Choose any position under the Content section when you create your campaign.
- Select the Custom HTML option to create the content for your campaign using our Code Editor.
Refer to the table below to learn more about all the Positions.
| Position | Description |
|---|---|
| Sticky Header | A banner message that sticks to the top of the screen. |
| Sticky Footer | A banner message that sticks to the bottom of the screen. |
| Half Interstitial | A message that covers half of the screen, typically centered. |
| Interstitial | A full-screen message appears over the entire screen temporarily. |
| Cover | A message that fully covers the entire screen, requiring user interaction. |
As you proceed, you see a Customise HTML screen. When creating your in-app message in the code editor, you'll find these options:
a. HTML file: Provide the code or upload HTML to create an in-app message.
b. URL: Provide the valid URL where your custom HTML is hosted.
- Go to the Code Editor section on the left pane and add your HTML code to the box.
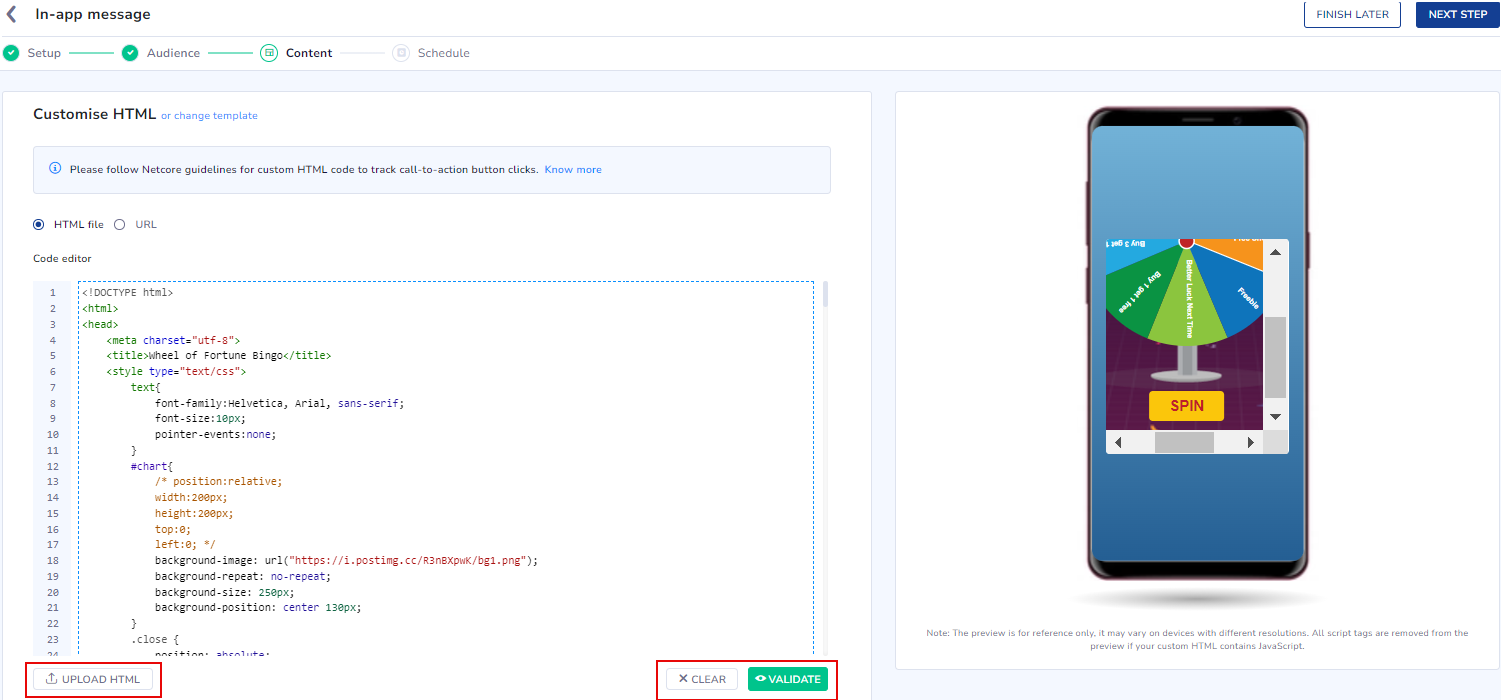
Customise HTML for In-App Campaign
- Press the CLEAR button to delete any existing code if needed. Our Code Editor also gives a Validate option, which verifies the correctness of the code you've entered.
- Add a custom key value if required. Toggle the Custom key value button to add
Custom key-value: A custom key-value pair is a simple data structure that sends extra information with your in-app message. This lets you personalize the user experience and trigger specific actions within the app when the message is received. This data becomes available whenever an in-app message is clicked or dismissed.

Add a custom key value
- Set custom key-value data for specific Android or iOS apps, or both.
- Add up to 50 custom key-value pairs.
- Once enabled, you must add at least one key-value pair. Duplicate key names are not allowed.
- Only these characters are allowed: a-z, A-Z, 0-9, -, _, ., @, :, ', /, {,}.
- Only these characters are allowed: a-z, A-Z, 0-9, -, _, ., @, :, =, &, +, %, ?, #, ', /, {,}, [, ].
- On the right pane, view your in-app message based on the code you entered.
Refer here to Schedule and Save your web message campaign.
Guidelines to Create Custom HTML (when UCE is Enabled)
Important NoteCustom HTML is applicable only when UCE is enabled in your Netcore CE dashboard.
Enhance user experience with engaging in-app messages. Use custom HTML to add dynamic elements like gamification features and personalized messages. This guide shows you how to use HTML and JavaScript to create interactive in-app messages. When creating an in-app message in the HTML editor, follow these guidelines.
Quick Start Guide
If you are looking to create In-App Messages, refer to the steps given below.
<!-- Add the Smartech App SDK JS to your HTML -->
<script src="https://cdnt.netcoresmartech.com/smartech-app-sdk/scripts/prod/smartech-app-sdk.js?v=1.0.0"></script>

<!-- Initialize with basic configuration -->
<script>
    SmartechAppSDK.init();
</script>
Integration and Configuration
Adding Smartech App SDK JS
<script src="https://cdnt.netcoresmartech.com/smartech-app-sdk/scripts/prod/smartech-app-sdk.js?v=1.0.0"></script>Initialization and Configuration
<script>
    SmartechAppSDK.init();
</script>
The SDK must be initialized with the appropriate configuration settings to ensure smooth functionality. Below is a complete breakdown of the available options.
SmartechAppSDK.init({
    forceEnableLogs: false,             // Enable detailed logging for debugging
    deferShowInAppInSDK: false,         // Control when messages appear
    showInAppOnLoad: false,             // Show after all resources load
    showInAppOnDomLoad: true,           // Show after DOM loads (recommended)
    enableDefaultPersonalization: true  // Enable dynamic content personalization
});
Configuration Options
The following table outlines the configurations that can be passed when initializing the SDK.
| Sl No. | Parameter | Datatype | Default Value | Description |
|---|---|---|---|---|
| 1 | forceEnableLogs | boolean | false | smt-debug=1 to your URL |
| 2 | deferShowInAppInSDK | boolean | false | Controls whether in-app messages should be shown automatically or manually. When false: In-app messages are shown automatically based on When true: In-app messages won't show automatically; you must call |
| 3 | showInAppOnLoad | boolean | false | deferShowInAppInSDK is true. |
| 4 | showInAppOnDomLoad | boolean | true | DOMContentLoaded event |
| 5 | enableDefaultPersonalization | boolean | true |
|
Implementing User Interactions
Adding Message Interactions
The SDK uses data attributes to handle message interactions. It means you can track and manage user actions with minimal JavaScript. This approach enables you to track key interactions effectively without cluttering your code.
The table below outlines the four primary action types supported by the SDK.
| Action Names | Description |
|---|---|
SMTInAppClick | Tracks message click events. |
SMTInAppClose | Tracks message close events. |
SMTInAppTrackEventViaSDK | Tracks custom events. |
SMTInAppProfilePushViaSDK | Updates user profile data. |
Passing Data From In-App Message To The App
Using Data Attributes
The table below provides a comprehensive list of available data attributes.
| HTML Attribute Name | Description |
|---|---|
data-smt-action | This attribute is required for any interactive element you want to track. Allowed Values |
data-smt-deeplink | This attribute is used to specify a deep link URL that should be opened when the element is clicked. Useful for directing users to specific screens or sections in your mobile app. |
data-smt-payload | This attribute allows you to pass additional JSON data with the click event. This data will be included in the event tracking and can be used for analytics or other purposes. |
data-smt-eventName | The event name that you want to track via the Smartech SDK. |
Tracking Click Event & Passing Data
<button
    data-smt-action="SMTInAppClick"
    data-smt-deeplink="sales_offer_screen"
    data-smt-payload='{"campaignId": "summer_sale_2024"}'>
    Track In-App Click Event
</button>
Tracking Close Event & Passing Data
<button
    data-smt-action="SMTInAppClose"
    data-smt-payload='{"campaignId": "summer_sale_2024"}'>
    Close Message
</button>
Tracking Events
<button
    data-smt-action="SMTInAppTrackEventViaSDK"
    data-smt-eventName="add_to_cart"
    data-smt-payload='{"name": "iPhone X", "price": "135000.00"}'>
    Add To Cart
</button>
Update User Profile
<button
    data-smt-action="SMTInAppProfilePushViaSDK"
    data-smt-payload='{"company_name": "Netcore Cloud", "location": "Thane"}'>
    Update Profile
</button>
Data Attribute Summary
| Action | Valid Data Attribute(s) | Valid data-smt-action Values | Sample Button Code |
|---|---|---|---|
| Track In-App Message Click | data-smt-action, data-smt-deeplink, data-smt-payload | SMTInAppClick | <button data-smt-action="SMTInAppClick" data-smt-deeplink="sales_offer_screen" data-smt-payload='{"campaignId": "summer_sale_2024"}'> Track In-App Click Event ` |
| Track In-App Message Close | data-smt-action, data-smt-payload | SMTInAppClose | `<button data-smt-action="SMTInAppClose" data-smt-payload='{"campaignId": "summer_sale_2024"}'> Close Message |
| Track Custom Event | data-smt-action, data-smt-eventName, data-smt-payload | SMTInAppTrackEventViaSDK | `<button data-smt-action="SMTInAppTrackEventViaSDK" data-smt-eventName="add_to_cart" data-smt-payload='{"name": "iPhone X", "price": "135000.00"}'> Add To Cart |
| Update Profile Push | data-smt-action, data-smt-payload | SMTInAppProfilePushViaSDK | `<button data-smt-action="SMTInAppProfilePushViaSDK" data-smt-payload='{"company_name": "Netcore Cloud", "location": "Thane"}'> Update Profile |
Using JavaScript Methods
Tracking Click Event & Passing Data
let deeplink = "https://www.google.com";
let payload = {
    "campaignId": "summer_sale_2024"
};
SmartechAppSDK.trackInAppClick(deeplink, payload);
Tracking Close Event & Passing Data
let payload = {
    "campaignId": "summer_sale_2024"
};
SmartechAppSDK.trackInAppClose(payload);
Tracking Events
let eventname = "add_to_cart";
let payload = {
    "name": "iPhone X",
    "price": "135000.00"
};
SmartechAppSDK.trackEventViaSDK(eventname, payload);
Update User Profile
let payload = {
    "company_name": "Netcore Cloud",
    "location": "Thane"
};
SmartechAppSDK.trackProfilePushViaSDK(payload);
Personalization Guide
Personalization in Netcore CE enables the creation of dynamic content that adjusts based on user data and behavior.
The personalization syntax follows a structured format, helping the SDK understand what data to retrieve and how to handle cases where certain data might be missing.
Basic Personalization
Event Payload Personalization
Use the following format to personalize content using event payload data. If the specified event property is unavailable, a fallback value will automatically be used.
Syntax[%__payload-property$event_name$default_value__%]
User Attribute Personalization
Use the following format to personalize content with stored user attributes. If the specified attribute is unavailable, a fallback value will be used.
Syntax[%__user_attribute$netcore_user_attribute$default_value__%]
Syntax Breakdown
Every personalization expression is enclosed within special markers and contains three essential components. Let's break down the structure.
Enclosing Markers
- Each signature must start with
[%__ and end with __%]. - These markers indicate that the content needs to be processed dynamically.
Component Separation
- The signature contains three components, separated by the $ symbol.
- All three components are required for a valid signature.
Component Details
| Component | Description |
|---|---|
| User Attribute Property | Specifies which event property or user attribute should be retrieved. |
| Attribute Type Identifier | |
| Default Value |
By following this structure, you can easily integrate and personalize In-App Messages while ensuring a seamless experience.
Examples
Event Payload Example
[%__purchase_amount$order_completed$0.00__%] (Inserts purchase_amount from order_completed event, defaults to 0.00 if missing)
User Attribute Example
[%__first_name$netcore_user_attribute$User__%] (Displays user's first_name, defaults to User if missing)
Advance Personalization
If you want to carry out your own personalization without using the above default signature, you must follow the following steps.
Initialize SDK With Custom Configuration
SmartechAppSDKHandler.init({
    deferShowInAppInSDK: true,
    enableDefaultPersonalization: false
});
Here, we are instructing the SDK to defer displaying the In-App Message to the user, as we are disabling the default personalization performed by the SDK.
Must RememberYou need to call
SmartechAppSDK.showInAppMessageInSDK()after completing personalization; otherwise, the In-App Message will not be visible.
Get Event Payload
This method retrieves data for specific events previously tracked by the SDK. The SDK stores the last 200 events performed by the user. You can fetch event payloads by specifying the event names.
let eventNames = ["add_to_cart", "remove_from_cart"];
let payload = SmartechAppSDK.getEventPayloadFromSDK(eventNames);
console.log(payload);

// Sample Data
{
  "events": [
    {
      "eventName": "add_to_cart",
      "payload": {
        "product": {
          "prid": 100,
          "name": "Apple iPhone X - 256 GB",
          "price": 76900,
          "currency": "₹",
          "url": "https://cdnt.netcoresmartech.com/smartechapp-sdk/inapp-message/img/iphone-x.webp",
          "company": "Apple",
          "color": "Space Gray",
          "category": "Electronics",
          "quantity": 2,
          "description": "Meet the iPhone X - the device that's so smart that it responds to a tap, your voice, and even a glance. Elegantly designed with a large 14.73 cm 5.8 Super Retina screen and a durable front-and-back glass, this smartphone is designed to impress. "
        }
      }
    },
    {
      "eventName": "remove_from_cart",
      "payload": {
        "product": [
          {
            "prid": 100,
            "name": "Apple iPhone X - 256 GB",
            "price": 76900,
            "currency": "₹",
            "url": "https://cdnt.netcoresmartech.com/smartechapp-sdk/inapp-message/img/iphone-x.webp",
            "company": "Apple",
            "color": "Space Gray",
            "category": "Electronics",
            "quantity": 1,
            "description": "Meet the iPhone X - the device that's so smart that it responds to a tap, your voice, and even a glance. Elegantly designed with a large 14.73 cm 5.8 Super Retina screen and a durable front-and-back glass, this smartphone is designed to impress. "
          },
          {
            "prid": 101,
            "name": "Apple AirPods",
            "price": 18900,
            "currency": "₹",
            "url": "https://cdnt.netcoresmartech.com/smartechapp-sdk/inapp-message/img/airpod.webp",
            "company": "Apple",
            "color": "Space Gray",
            "category": "Electronics",
            "quantity": 1,
            "description": "AirPods with Wireless Charging Case.More magical than ever. The new AirPods-complete with Wireless Charging Case-combine intelligent design with breakthrough technology and crystal clear sound. Powered by the new Apple H1 headphone chip, AirPods now feature hands-free access to Siri using just your voice. And up to 3 hours of talk time on a single charge."
          }
        ]
      }
    }
  ]
}- Accepts an array of event names as input.
- Returns an object containing payloads of the last occurrences of these events.
- Useful for personalizing in-app messages based on a user’s past actions.
Get User Attribute Payload
This method fetches user profile attributes stored in the SDK. The attributes are synced with the Netcore CE dashboard.
let userAttribute = SmartechAppSDK.getUserProfileFromSDK();
console.log(userAttribute);

// Sample Data
{
  "events": [
    {
      "eventName": "netcore_user_attribute",
      "payload": {
        "FIRST_NAME": "First Name",
        "LAST_NAME": "Last Name",
        "AGE": 45
      }
    }
  ]
}- Retrieves all available user attributes.
- Attributes may include name, email, location, preferences, or any other custom fields set in the Smartech Panel.
- Ideal for customizing in-app messages based on user demographics or behavior.
Get SDK Level Data
This method provides insights into SDK-specific details.
let userAttribute = SmartechAppSDK.getSDKData();
console.log(userAttribute);

// Sample Data
{
  "appVersion": "1.0.9.32",
  "deviceWidth": "1080",
  "platform": "app",
  "appBuild": "10932",
  "deviceHeight": "2340",
  "osVersion": "10",
  "screenOrientation": "portrait",
  "identity": "",
  "countryCode": "in",
  "appId": "bebb79a53a2bf5190bad9420f1a449c8",
  "appBundleId": "com.netcore.smartech.java.podtwo",
  "smtSrc": "smartech",
  "lat": "13.9166253",
  "lng": "79.8522568",
  "appJsSdkBuildCode": 1,
  "deviceMake": "huawei",
  "timeZone": "GMT+05:30",
  "osName": "android",
  "pushToken": "fHE9YwGcQAmzVnq2LOwRg9:APA91bFa0p5UVls0Kg80cyxblifIS2neixssOFKwQbXyMi0dMGX-j01cG8dzvFWixnuIKsKZYE7--aQKvLGoGYbCnngceDXkl5z8YPpE_3_nstw-dvZLjtw",
  "advertiserId": null,
  "bod": 2602,
  "guid": "b42b604a-631a-4bb6-b316-d98ad95403e4",
  "deviceModel": "stk-l22",
  "sdkVersion": "3.6.0",
  "enableJavaScriptLogsInSDK": true,
  "deviceLocale": "en"
}- Fetches metadata about the SDK’s tracked events.
- Useful for using any SDK specific data in the In-App Message.
Get App Level Data
Retrive the data on javascript which the app sets to SDK:
This method retrieves custom application data stored within the SDK which is passed by the developer.
let userAttribute = SmartechAppSDK.getAppData();
console.log(userAttribute);
Integration step to set the App Data from the App:
The below integration can be used to set any data from the app to SDK, which can be utilized in the inapp message for personalization.
HashMap<String, Object> data = new HashMap<>();
data.put("secret_token", "algaldkgtjasdlnalsk4364634sgdfg4ewt");
data.put("wallet_balance", 5000);

Smartech.getInstance(new WeakReference<>(context)).setInAppAppData(data);
val data : HashMap<String, Any> = HashMap()
data["secret_token"] = "algaldkgtjasdlnalsk4364634sgdfg4ewt"
data["wallet_balance"] = 5000
Smartech.getInstance(WeakReference(context)).setInAppAppData(data)NSDictionary *data = @{
@"secret_token": @"algaldkgtjasdlnalsk4364634sgdfg4ewt",
@"wallet_balance": @5000
};
[[Smartech sharedInstance] setInAppAppData: data];let data: [String: Any] = [
"secret_token": "algaldkgtjasdlnalsk4364634sgdfg4ewt",
"wallet_balance": 5000
]
Smartech.sharedInstance().setInAppAppData(data)- Use this to pass specific data to the In-App Message beyond event data or user attribute data.
Guidelines to Create Custom HTML (when UCE is Disabled)
Important NoteIf your pannel has disabled UCE, only the this is applicable.
Enhance user experience with engaging in-app messages. Use custom HTML to add dynamic elements like gamification features and personalized messages. This guide shows you how to use HTML and JavaScript to create interactive in-app messages. When creating an in-app message in the HTML editor, follow these guidelines:
Essential Scripts: Include JavaScript in your HTML to enable custom functionalities. Use the following scripts:
| Javascript | Use |
|---|---|
| https://cdnt.netcoresmartech.com/smartech-app.js | To add interaction to your HTML creative and the Smartech SDK (in-app click and in-app close). |
| https://cdnt.netcoresmartech.com/smartech-iam-personalization.js | This script is required for any personalization of the HTML creative. |
| https://code.jquery.com/jquery-3.4.1.min.js | jQuery is needed to support the smartech-app.js |
<script src="https://code.jquery.com/jquery-3.4.1.min.js" integrity="sha256-CSXorXvZcTkaix6Yvo6HppcZGetbYMGWSFlBw8HfCJo=" crossorigin="anonymous"></script>
<script src="https://cdnt.netcoresmartech.com/smartech-app.js"></script>
<script src="https://cdnt.netcoresmartech.com/smartech-iam-personalization.js"></script>
Adding Interaction to HTML
- Using Predefined Classes: Assign click events to buttons with predefined classes. Refer to the table to learn the class names and their functionalities.
| Class Name | Functionality |
|---|---|
.smt-click | Assign this class to enable the button's click event and let the Smartech SDK capture the In-App Message Click Event. |
.smt-close | Assign this class to enable the button's click event to close the In-App Message and capture the Close Event with the Smartech SDK. |
To enable interactive functionality with buttons, use the following HTML:
Assigning Click Event to Buttons
<button class="smt-click">Click Me</button>Assigning Close Event to Buttons
<button class="smt-close">Close</button>Using JavaScript Methods
In certain scenarios, you may need to interact with HTML programmatically.
| Class name | Functionality |
|---|---|
smartechTrackInAppMessage() | Triggers a Click interaction, sharing it with the app and capturing the In-App Message click event using the Smartech SDK. |
smartechCloseInAppMessage() | Triggers a Close interaction, closing the in-app message and capturing the in-app message close event with the Smartech SDK. |
Passing Data From In-App Message to the App
Using Attribute Data: Pass values back to the app using the following custom attributes.
| Class name | Functionality |
|---|---|
smt-click | Passes the deep link value back to your app. |
smt-data | Passes additional key-value pairs back to your app. |
<button smt-click="https://www.google.co.in" smt-data='{"name": "Netcore"}' class="button smt-click">Open Url</button>When clicked, this button will open the URL https://www.google.co.in and pass the additional data {"name": "Netcore"} to your app. Refer to the table to learn about some referencessmt-clicks.
| Action | smt-clicks |
|---|---|
| Send an SMS to a number. | <button smt-click="sms:9860130363&body=Hello" class="button smt-click">Send SMS</button> |
| Call a number. | <button smt-click="tel:9860130363" class="button smt-click">Call a number </button> |
| Send a Message via WhatsApp. | <button smt-click="whatsapp://send?text=hello everyone"class="button smt-click">Whatsapp message</button> |
| Send an email. | <button smt-click="mailto:[email protected]?subject=Hello&body=This is Email" class="button smt-click">Email</button> |
Using JavaScript Method
You can call smartechTrackInAppMessage() with a deep link value and custom key-value pair.
function openDeeplinkWithCustomDataLocalFunction(){
		var deeplinkValue = "smartech://image";
		var person = {
		  firstName : "John",
		  lastName  : "Doe",
		  age     : 50,
		  eyeColor  : "blue"
		};
		var payloadValue = JSON.stringify(person);
		smartechTrackInApp(deeplinkValue, payloadValue);
	}
Refer to the table below for the sample values for smt-click or smt-c2a attribute.
| Attribute | Sample Value |
|---|---|
| Open URL | https://www.google.co.in |
| Send SMS | sms:9899999999&body=Hello |
| Call this number | tel:9899999999 |
| Deep link | www.google.co.in |
| whatsapp://send?text=hello everyone | |
| [email protected]?subject=Hello&body=This is Test Email |
Event-based Payload Personalization in Custom HTML
Personalization is supported in Android SDK version v3.2.30 onwards. Use the classes NC_RECO_SHOW and NC_RECO_HIDE accordingly.
This setup ensures that personalization based on event product_view and key company displays Apple as the default value if the company doesn't have a value.
Example:
[%__company$product_view$apple__%]
NC_RECO_SHOW: This class should be used for the element that contains the personalization syntax.
NC_RECO_HIDE: This class should be used in older SDK where personalization is not supported.
This means this personalization’s event name is product_view, and the key for personalization is company; if the company key does not contain any value, the default value will be displayed.
<span class="NC_RECO_SHOW" hidden=true>[%__company$product_view$apple__%]</span>
<span class="NC_RECO_HIDE">The message the older SDK/app users will see.</span><span class="NC_RECO_SHOW" hidden=true>[%__company$product_view$apple__%]</span>
<span class="NC_RECO_HIDE">The message the older SDK/app users will see.</span>Updated 29 days ago