Geofences
Today, marketers have lots of customer data, like name, age, gender, past purchase, product preferences, location, and so on. Using this data to reach the right customers with the relevant offers or multi-channel campaign is important. One data point that is often overlooked is location.
There are two main ways marketers use location data:
Geolocation-based Targeting
Geolocation-based targeting is the primary technology used to tailor offers or engage customers from specific geographic locations. It excels when segmenting and targeting customers based on broader location criteria such as country, state, or city, as well as the last known available location of the user.
In the Netcore CE platform, you can access geolocation-based targeting through the last known location attribute in Segments section.
To learn more, refer to the Segments section.
Geofencing
The Geofencing feature creates virtual territories around specific locations, targeting customers within proximity using GPS data.
Key Points to Note
- Geofence functionality is supported from Android SDK v3.1.11 and iOS SDK v3.1.3 onwards. Ensure to integrate location tracking steps for Android and iOS.
- Implement location permission on the app side to get both foreground and background location permission.
- If your app includes the location permissions in the manifest when uploading the APK to the Play Console, you must inform Google why your app needs them.
Google requires clear justification for using these permissions. If the reason is not valid, your app may be rejected.- This feature is available for Native, React Native, and Flutter platforms.
- Event tracking is available only for Android SDK.
Prerequisites for Creating Geofences on the Panel
When setting up geofences on the panel, consider the following to ensure optimal performance:
-
Precise location: Make sure to pinpoint the exact location for your geofence. If it's even slightly off, it might not work correctly. For example, if you're monitoring a store but your geofence is placed slightly next door, it won't trigger accurately.
-
Boundary-crossing basis: Geofences operate based on boundary-crossing basis. Your device only updates its status when it enters or exits the geofence area. If your device is off when you exit the geofence, it won't register until you turn it back on and cross the boundary again.
-
Consider Geofences size: It's crucial to set an appropriate size for your geofences. If it's too small, your device might not accurately detect entering or leaving. This can lead to frequent false notifications, especially if you're not moving much. Aim for a minimum radius of at least 150 meters to ensure reliable performance.
-
Consider mandatory Android device specification:
- WiFi or mobile data must be turned on.
- Location must be turned on and in high accuracy mode.
- Location permission must be allowed all the time.
- Airplane mode must be turned off.
- Consider other factors for Android device:
- Avoid applications that may prevent Geofences from working.
- Check if applications are put to sleep if not opened in a while. For example, Samsung device use the Smart Manager to put our application to sleep. To add our application to the unmonitored list on a Samsung device, go to Setting > Battery > Unmonitored Apps and add your application to the list.
- Power saving mode can affect Geofences.
- Avoid apps installation on the SD card.
- Consider mandatory iOS device specification:
- Location permission must be allowed for allowed all the time.
- Ensure power saving mode is disabled.
- Consider other factors for iOS devices
- Ensure 'Background App Refresh' and 'Cellular Data' are enabled for the application.
- Consider battery optimization settings. iOS offers functionality to help extend battery life. This can limit how often location changes are reported to apps by the mobile device, as well as how often apps are allowed to communicate in the background with the internet. For the Geofence feature to work, the app must both be informed of significant location changes by your iOS device and be able to promptly communicate with the Smartech servers to take action on your Geofence settings.
Create Geofence Group and Geofence
To create Geofence, you can do the following steps:
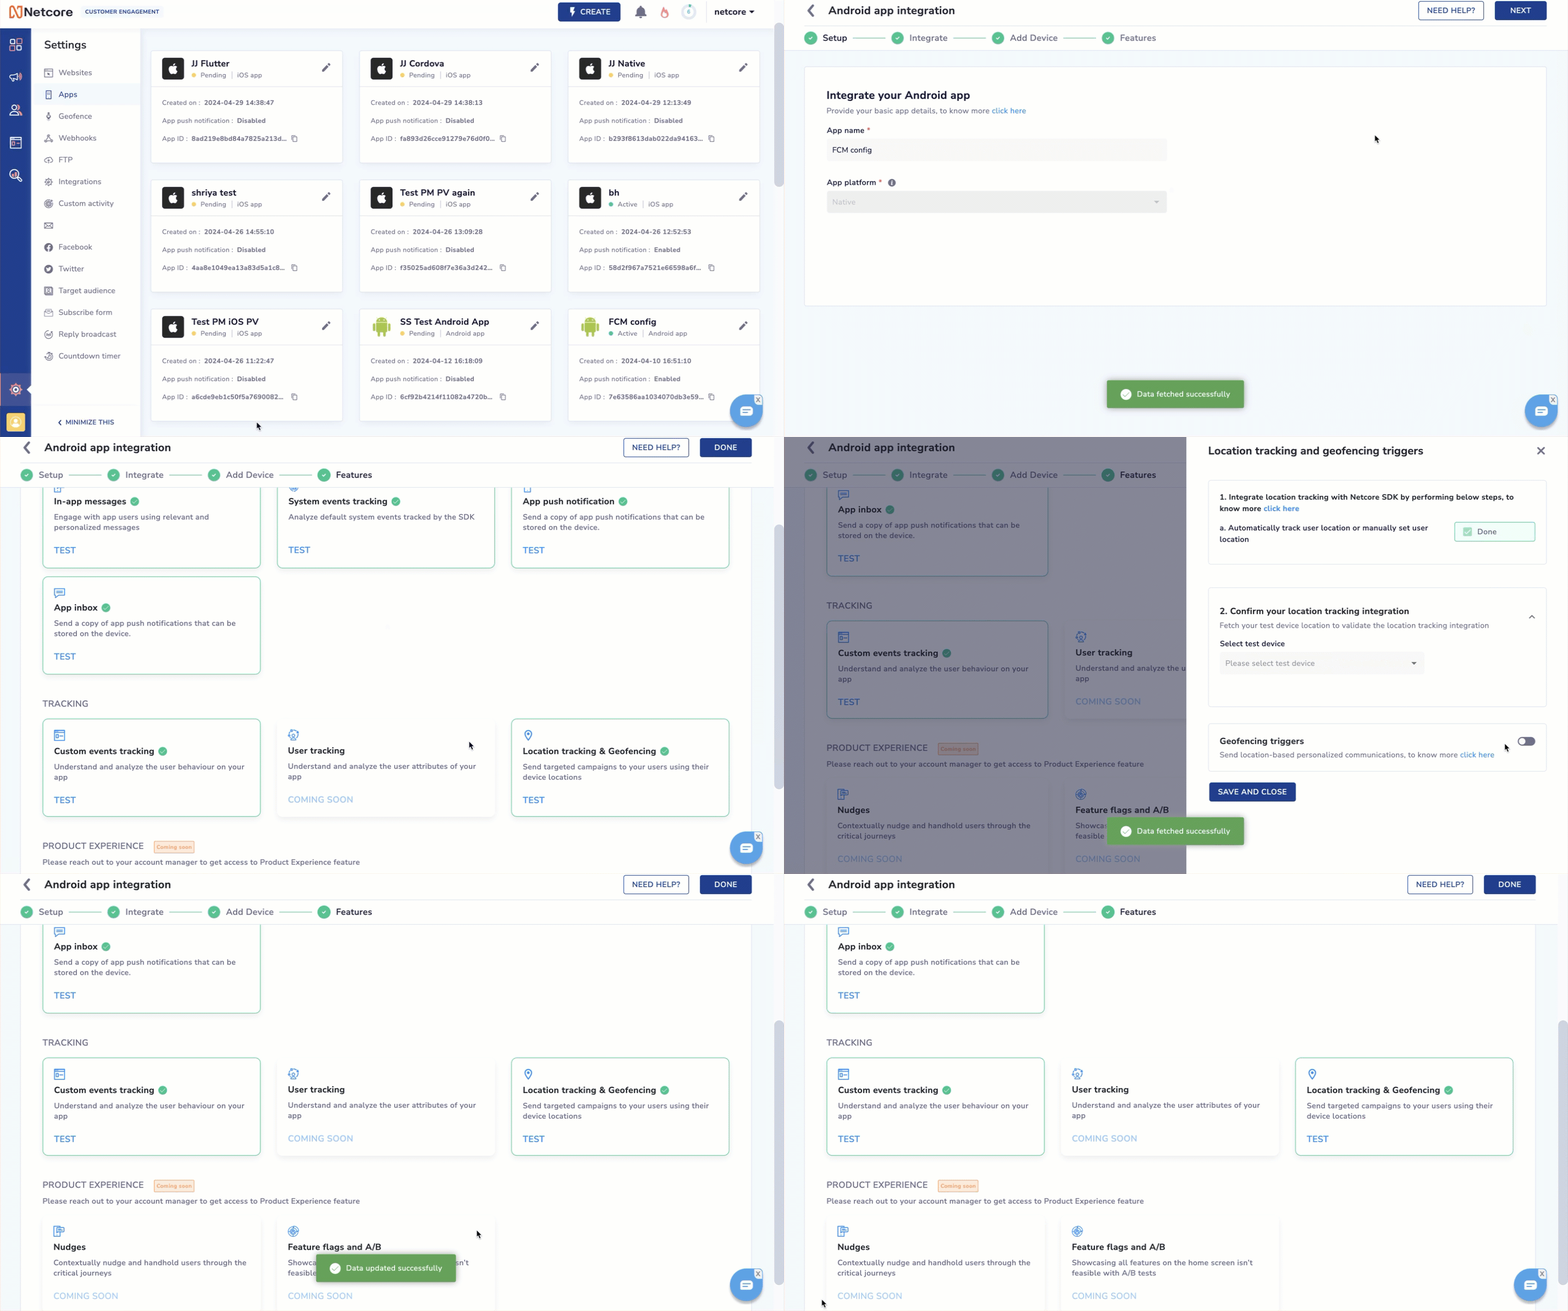
- From the Netcore CE dashboard, navigate to Settings > Apps to enable Geofencing for Android/iOS application platform. Enable the Geofence trigger toggle for any platform.

Enable Geofence for Apps
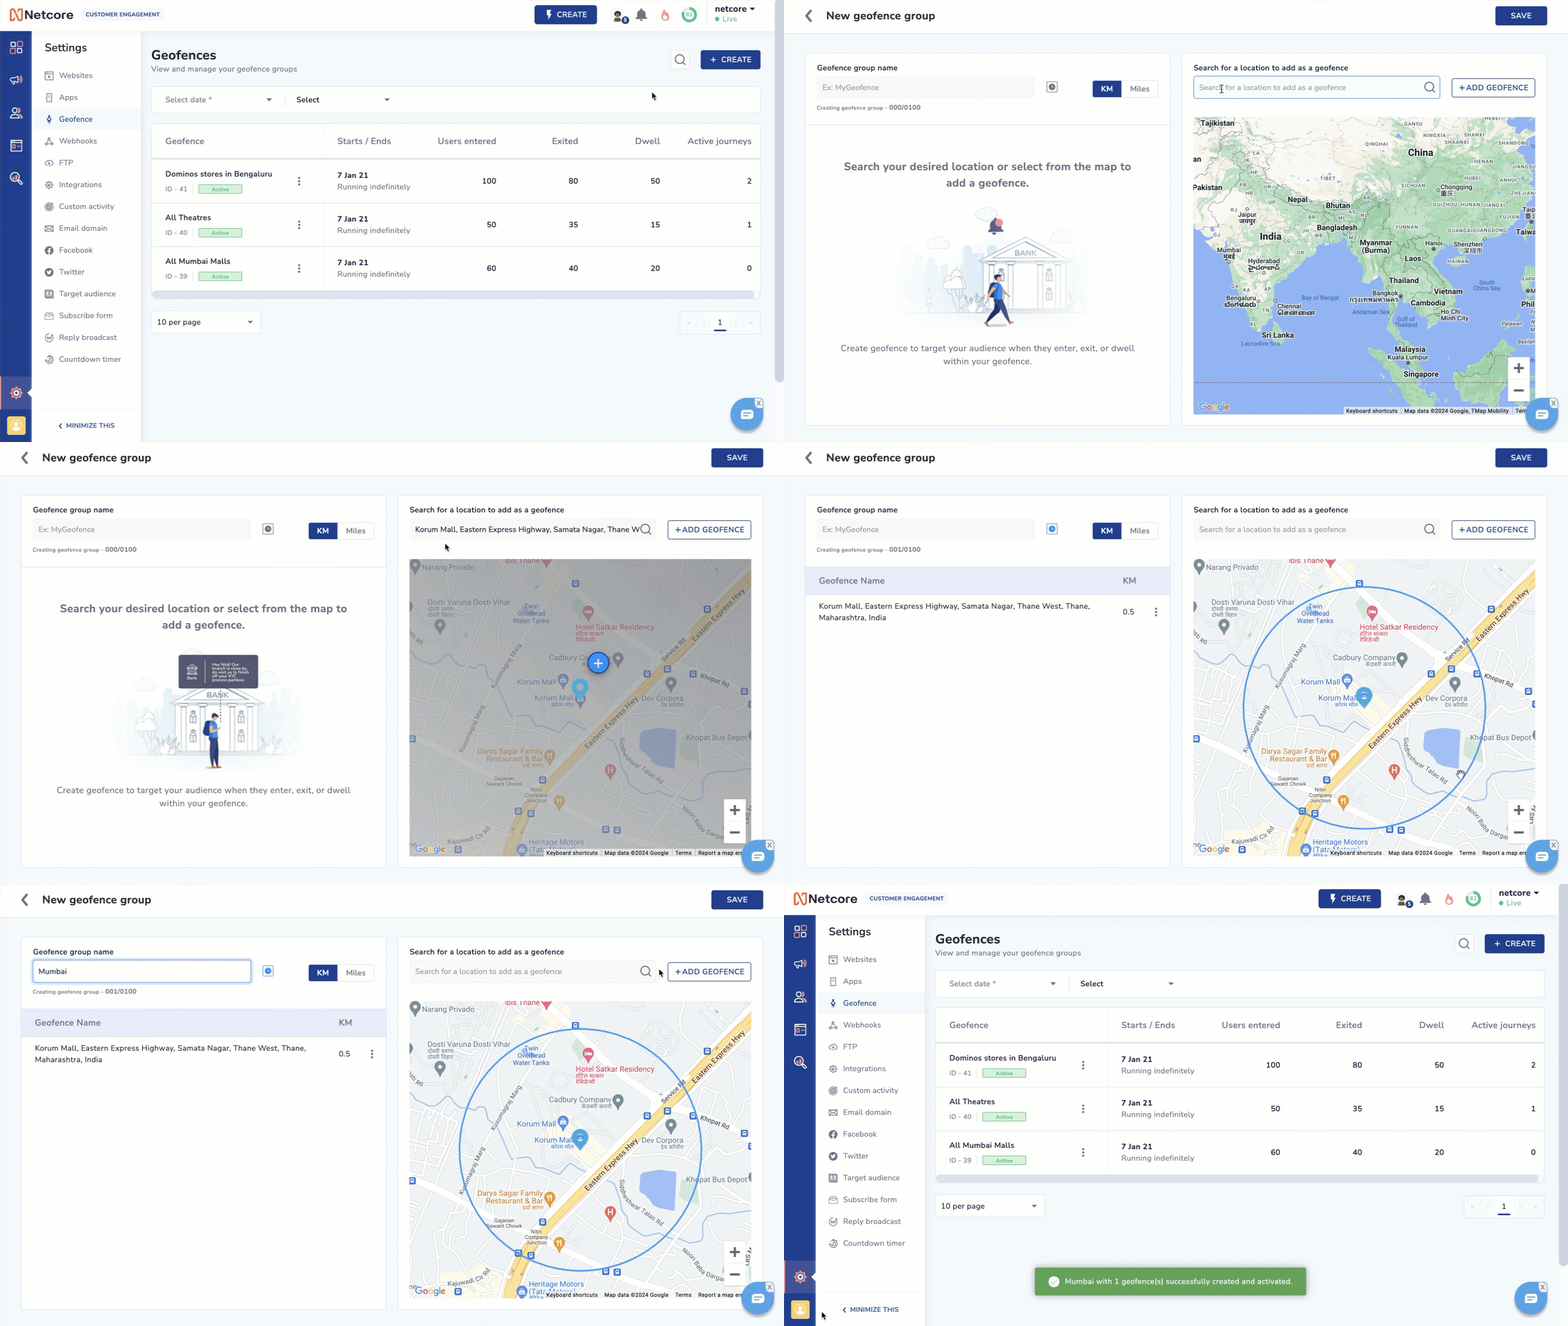
- Select Geofence to create, view, or edit your geofence groups.
- Click +Create in Geofences page to create a geofence group and add geofence.
Click +Add Geofence button to add your geofence to a Geofence group by searching for a location. You can provide a name and define the radius in km or miles for each geofence. Each geofence group can contain maximum 100 geofences.

Create Geofence and Add Geofence
You can also set your dwell time and duration for which your geofence group should be active. The default set value for Dwell time is 15 minutes.
- Click Save to save the Geofence group and its defined Geofences. Once the Geofence is saved our Netcore CE SDK starts sending geofence entry, exit and dwell events for added geofences.
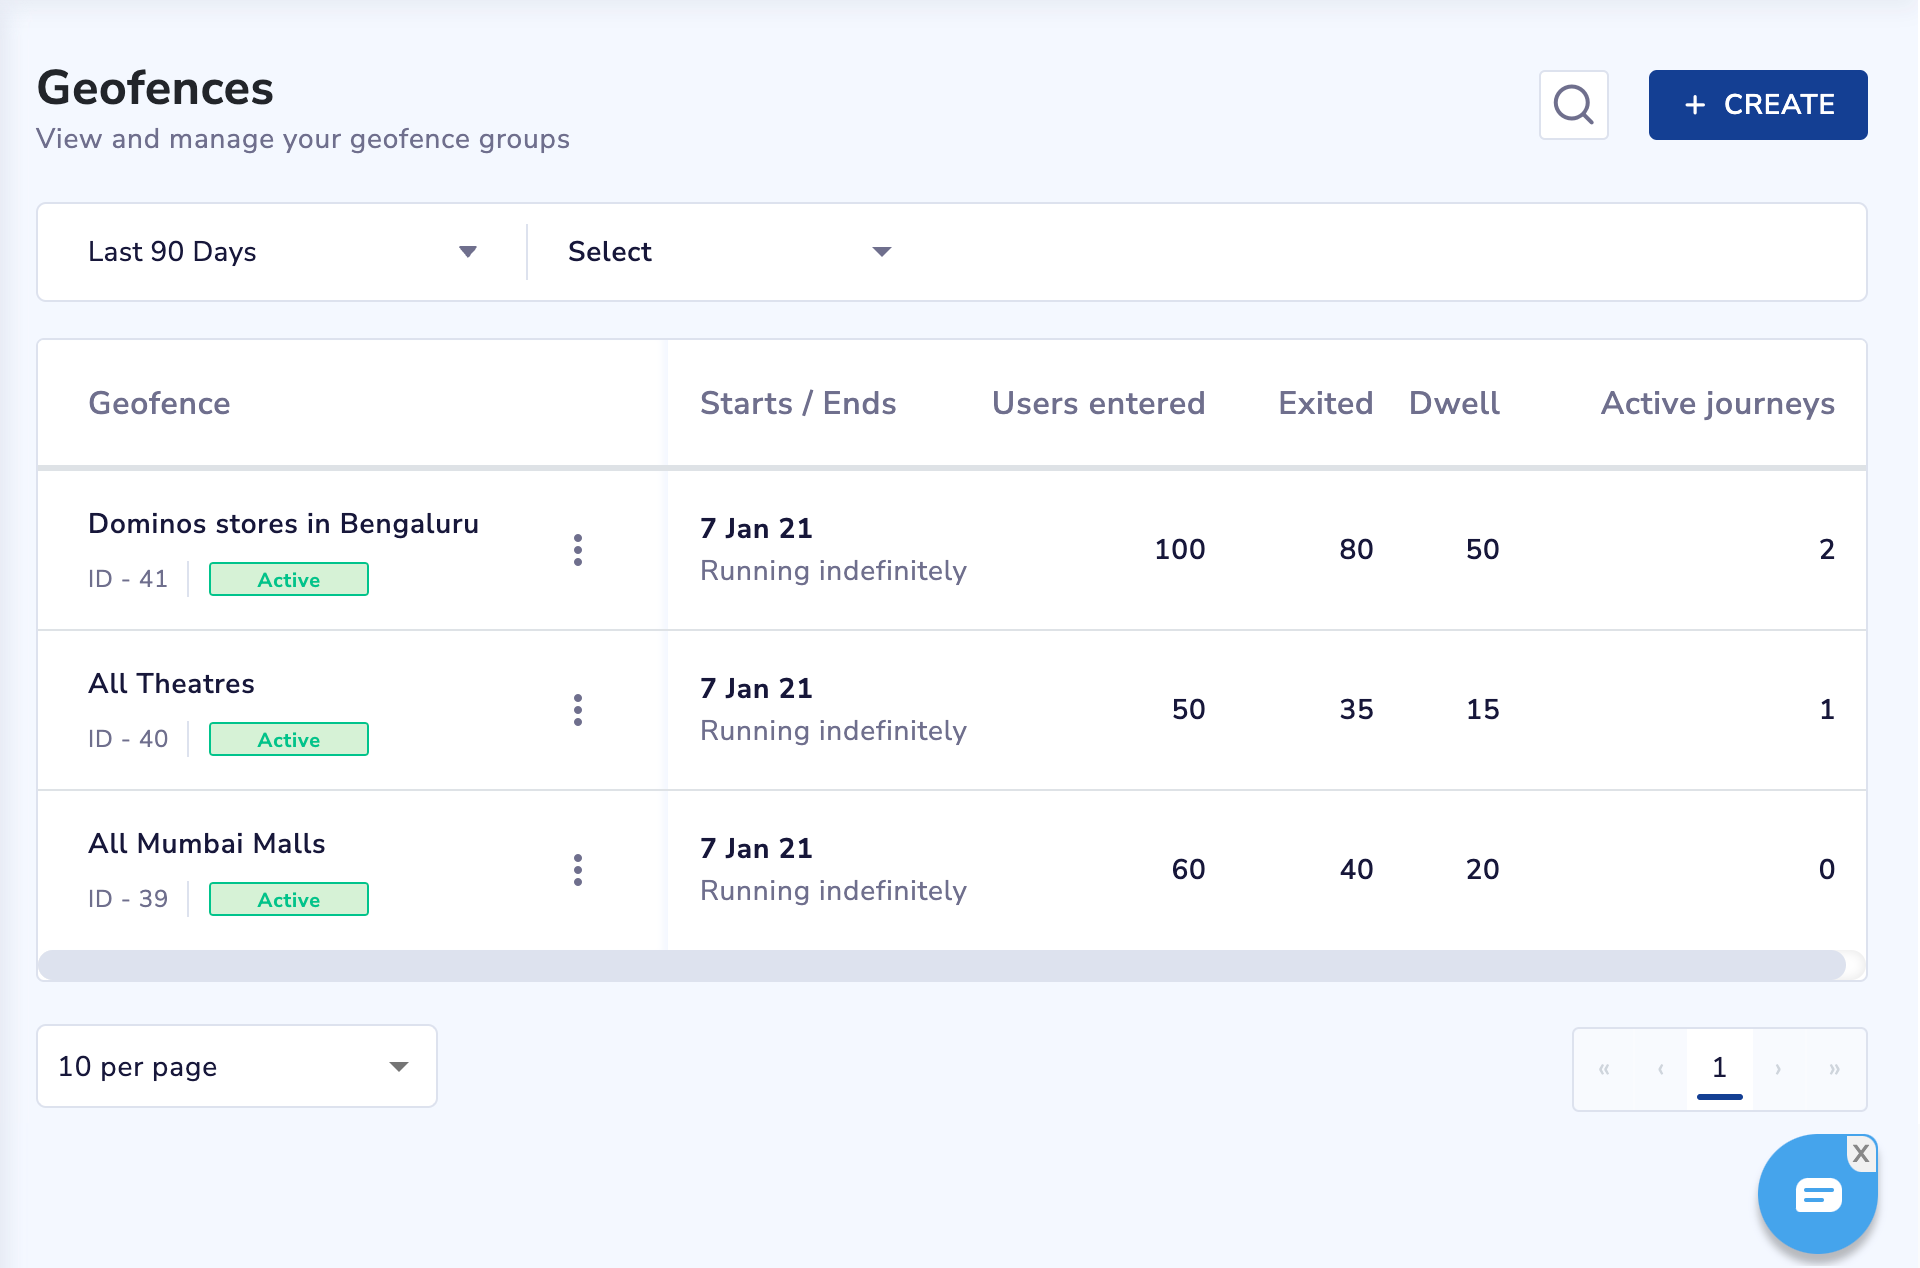
- You can view the metics such as geofence entry, exit, dwell event counts, and how many journey campaigns are running for given geofence in the Geofence page.

Geofence Metrics
Set Up Geofencing Triggers for Journeys
To setup geofencing triggers for Journey, do the following steps:
- Drag and drop Geofence trigger node to the canvas when you create a journey.
Geofence Trigger Node
- Select any Geofence activity from the drop-down list. The Activity drop-down option has Entry, Exit, and Dwell options.
- Select the geofence group and individual geofences for your journey from the Geofence Group section.
Add Geofence Group and individual Geofence
- Add Push Notification, Email, or SMS node to you Geofence trigger node to trigger your messages.
Geofence Notification Delays
Notifications triggered by Geofences may experience delays or may be received outside the Geofence location in some scenarios:
Network Connectivity Issues:
- The SDK may be unable to send Geofence events to the server due to low or no network connectivity.
- In such cases, the SDK queues the Geofence events and sends them to the server once connectivity is restored, even if the device has moved out of the Geofence location in the meantime.
GPS Callback Inconsistencies:
- Android versions 6, 7, and 8 may exhibit inconsistent GPS callback behavior from the operating system to the SDK.
Updated 12 months ago
