How to create Predictive segments?
Predictive segments is a modern approach of categorizing customers based on their likelihood of performing a specific action. Currently the method of classifying customers is by dividing them based on age, gender, geographical location or other such factors known as descriptive segmentation. Predictive segments is a technique that understands the propensity of a user to perform a task and can be used for upselling/cross-selling, increasing customer engagement, personalization and a lot more.
Note: This document pertains to the current beta version only.
There are 2 types of predictive segments:
Campaign independent predictive segments
Campaign-dependent predictive segments
Let us start with campaign independent predictive segments.
Understanding the details and framework of the campaign independent predictive segments-
To create an independent campaign segment, click on the “Audience” tab located on the menu of your panel and navigate to the “Predictive Segment” section.
The predictive segment page will be displayed. This page will contain all the segments that you have created. You can search for the campaigns using the search button. You can also choose to filter the list of campaigns based on your preferences.
You can create a new segment by clicking on the “Create New” button.
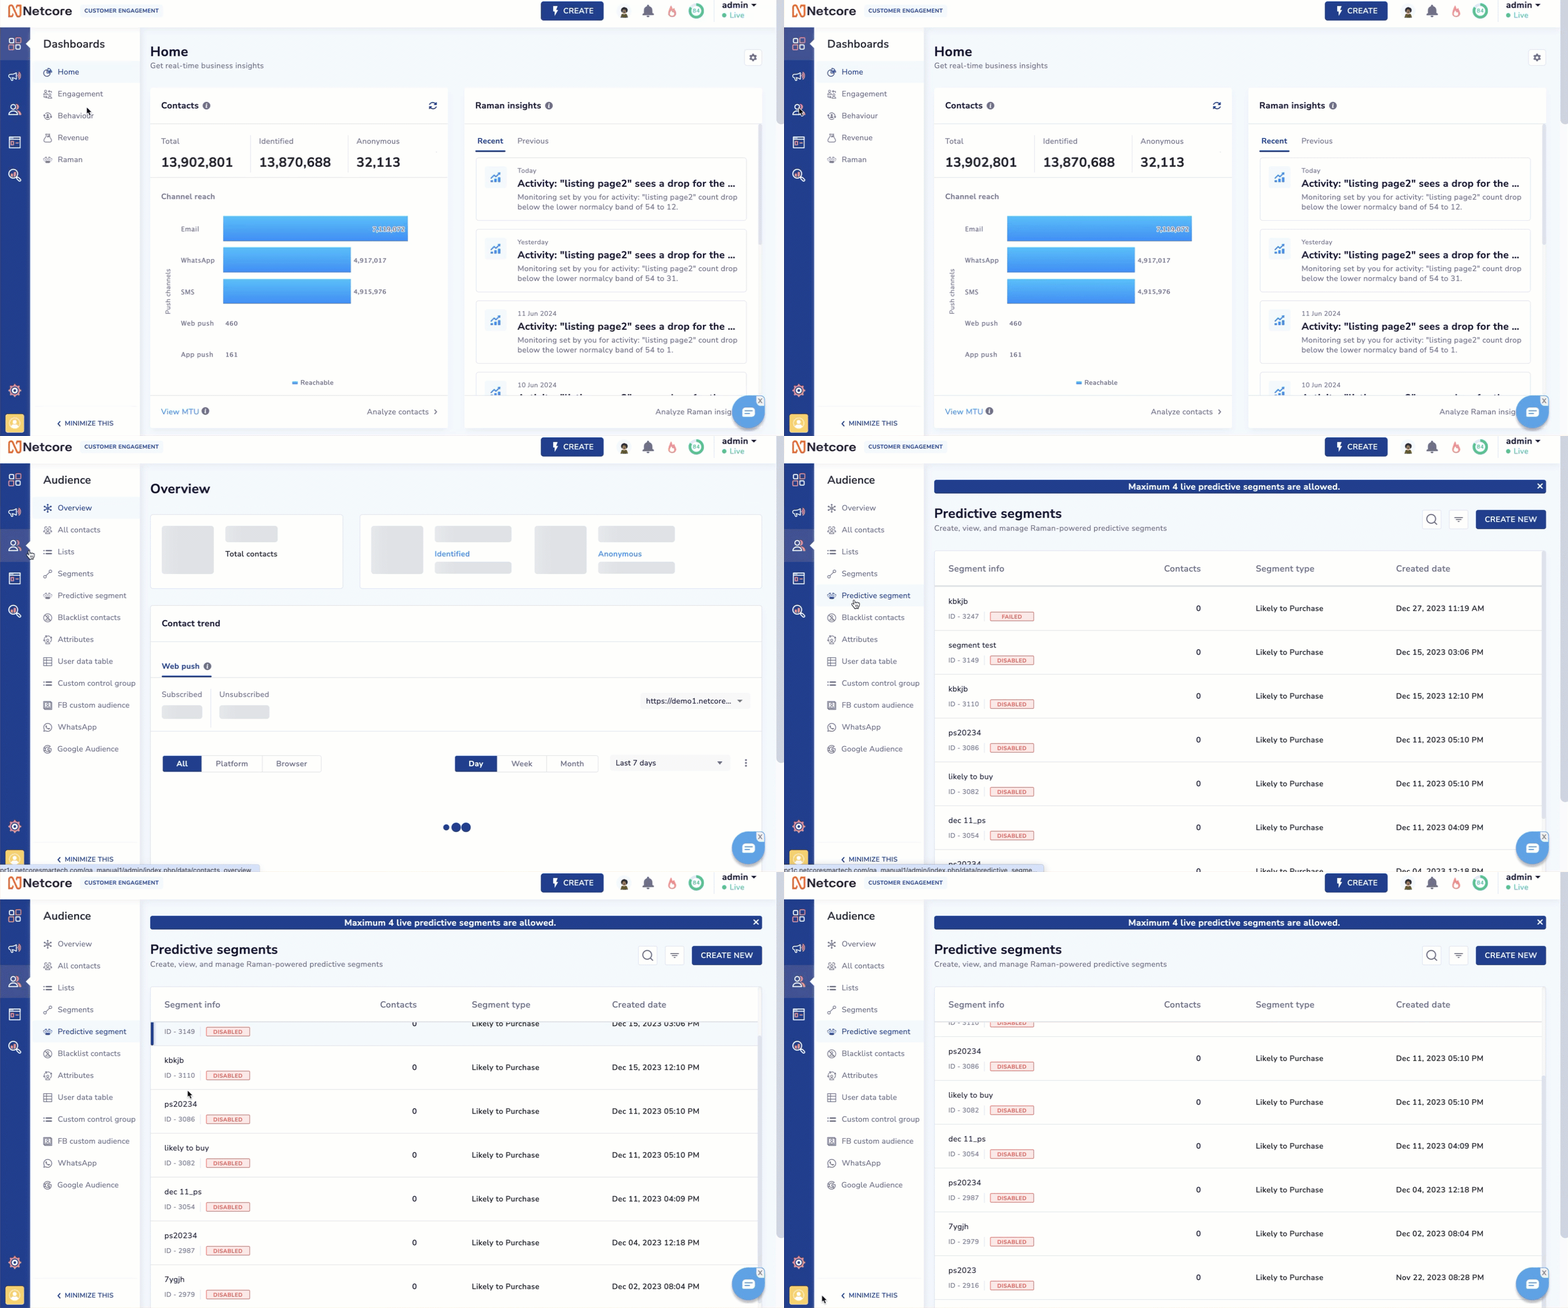
Navigate to the Predictive Segment
For a first time user who does not have any segments created, the page will look like this-
Once you have requested a segment, it goes into In-Progress status, and after 72 hours, it goes into Enabled status.
The status of the segments will be shown below the name of the segment along with its ID. There are 4 possible statuses to a particular campaign;
Enabled
Disabled
In-progress
Failed.
The status will display “Enabled” when the segment is live. Status will display “Disabled” when the segment is deactivated. It takes 72 hours for a created segment to go live, during that period, the segment status will be displayed as “In-progress”. And for any reason if the generation of a particular segment has failed, the status will display “Failed”.
The number of contacts in a segment will be shown in the “Contacts” column of the table. The segment type, along with the date that a segment was created (and its last refreshed date below it), is also displayed in the adjacent columns.
By clicking on the additional options (3 dot button) beside the segment name you can create a campaign, modify or disable the segment.
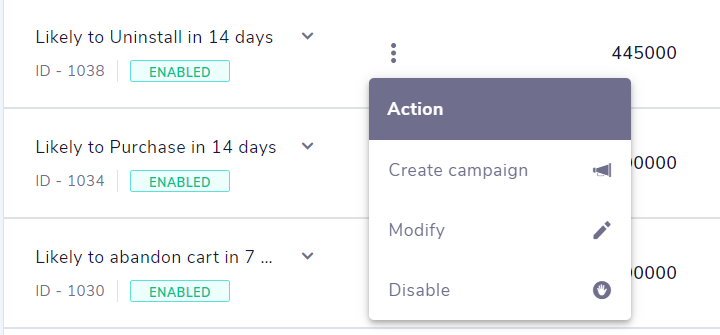
On selecting “Create Campaign” you will be asked to choose which micro-segment you would like to create the new campaign for and the channel for the campaign.
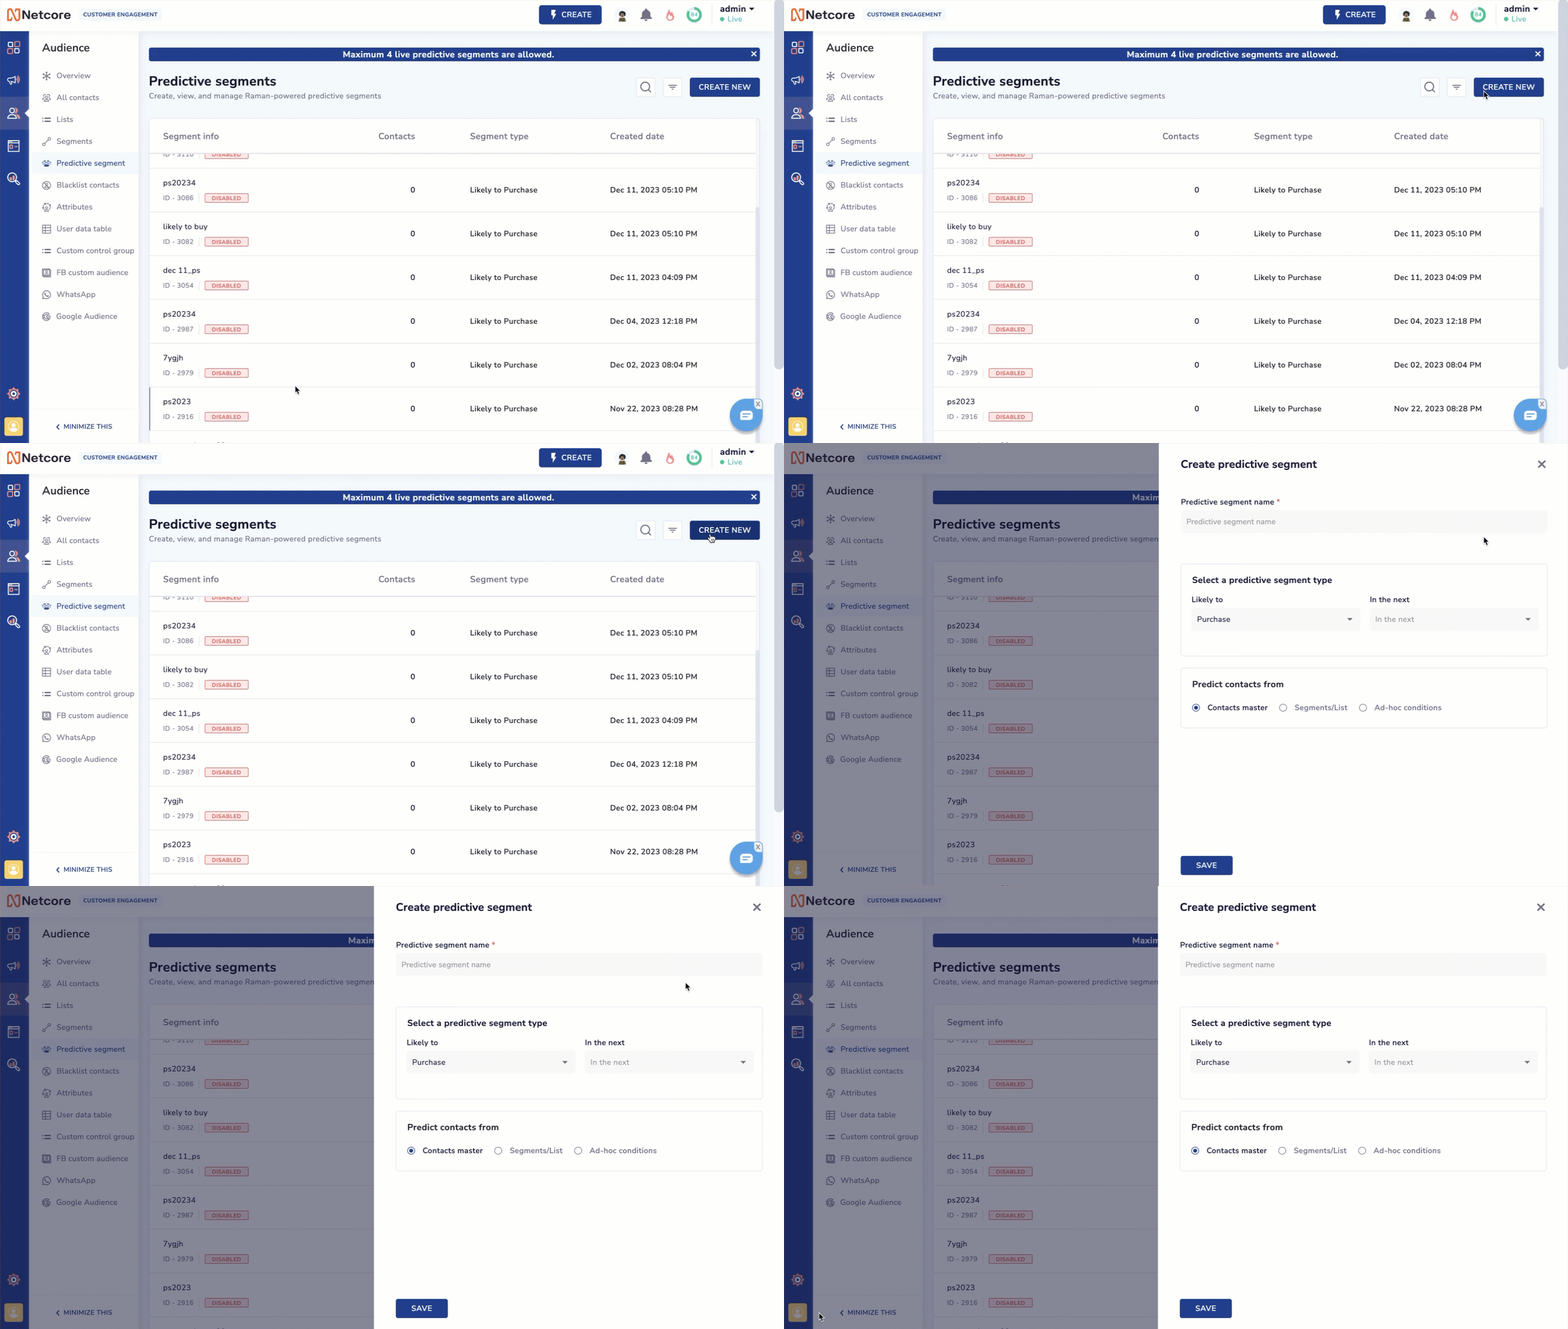
Create Predictive Segment
- If you click on "Modify" you will be asked for a confirmation.
- If you click on “Disable”, you will be asked for a confirmation to disable.
Note: If a segment is disabled, it cannot be enabled again.
Note: If a segment is modified, the current segment is disabed and the modifications is considered as a new request and it will again take 72 hours for the segment to be created and enabled.
Note: In the beta phase, there is a limitation to the number of campaign independent predictive segments that can go live at a time. Currently only 4 predictive segments can go live at a time.
Each segment is a combination of 3 different micro-segments of that segment type based on propensity:
Most likely - Users who have the highest probability of doing the targeted activity
Fairly likely - Users who have moderate probability of doing the targeted activity
Less likely - Users who have the least probability of doing the targeted activity
Creating a campaign independent predictive segment-
Now that we have understood the listing page, let's understand how to create a new segment. To begin creating a new segment, click on the “Create New” button at the top right of the dashboard.
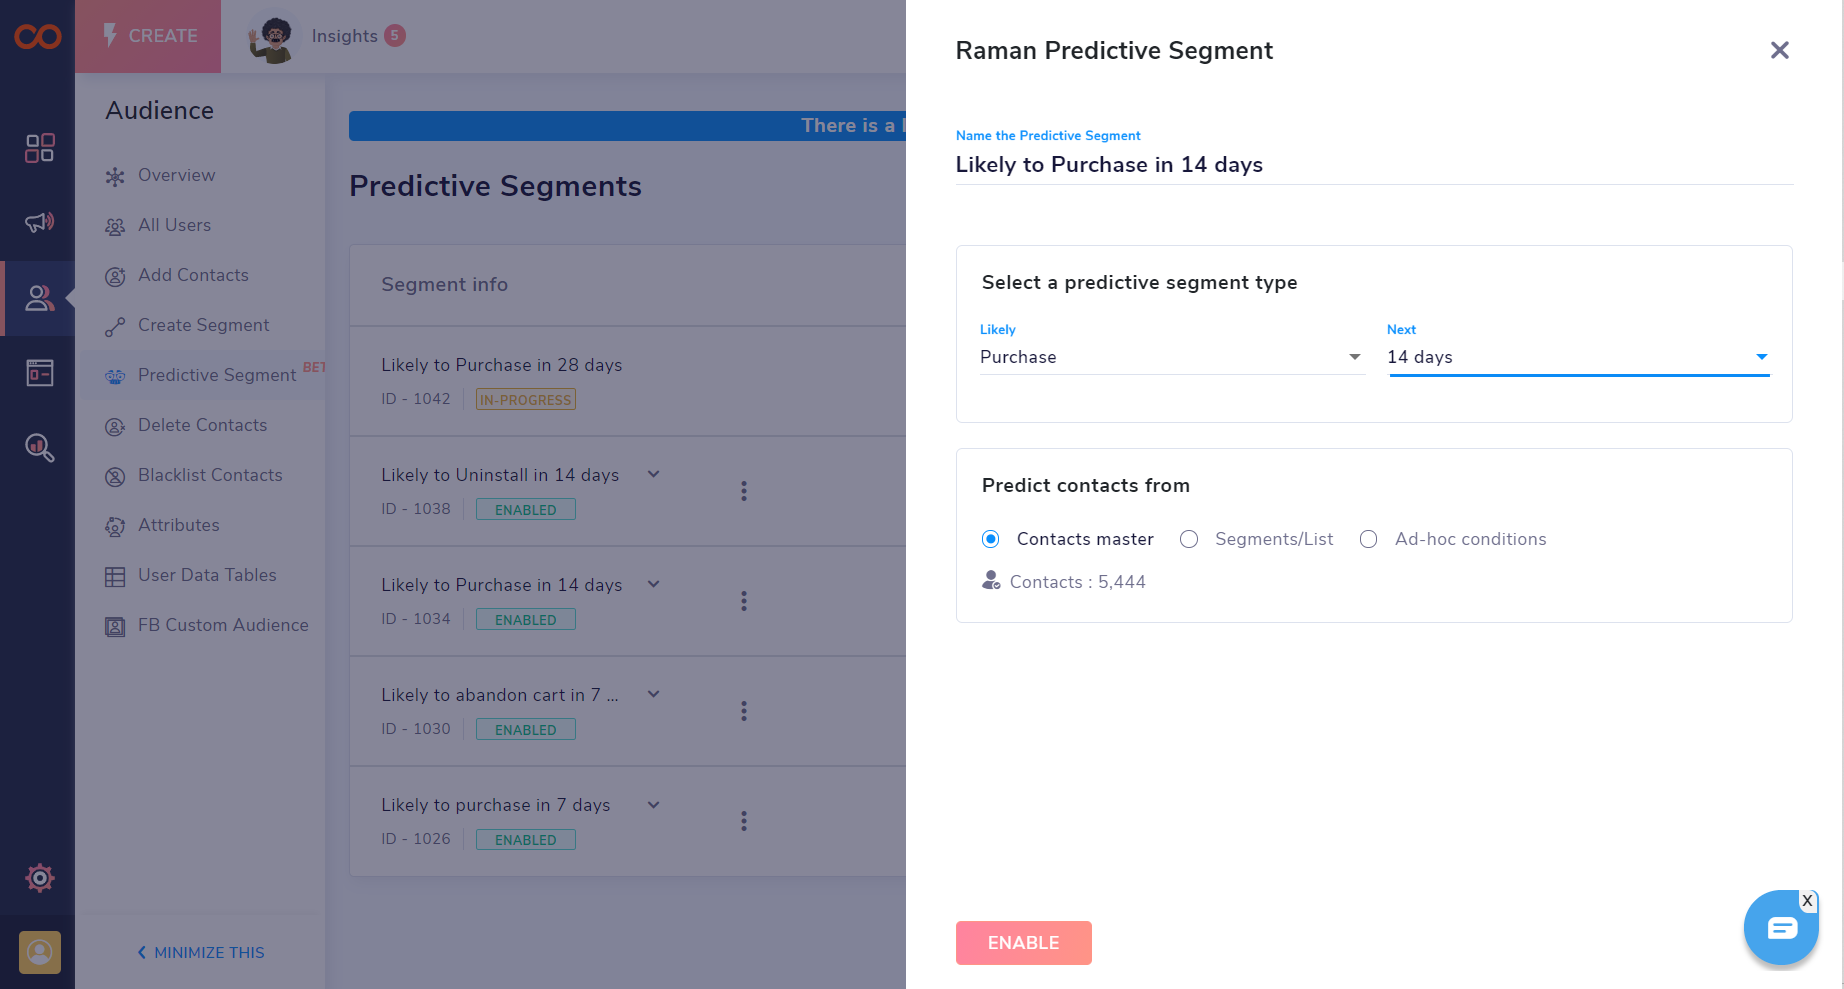
There are 4 things to be considered in creating a segment: The name that you decide to give to your segment, the target activity type of the segment, what is the duration of the segment to predict, and the base on which the prediction segment is to be created.
The name of the segment can be selected as per the user’s choice.
The type of segment currently contains only purchase as an option in the beta version, more types (like uninstall, cart abandonment, etc) will be added in the final release.
The “Next” section represents the prediction period (How long the user wants the prediction for). In the current beta release, we only have 3 options (those being, 7, 14, and 28), but in the later versions, it will be converted into a flexible duration.
The “Predict contacts from” section basically defines where the user wants the prediction to come from; the entire contacts master (Complete user base), any particular list or segments (new sign-ups, frequent buyers, repeat buyers, etc), or Ad-hoc conditions.
If “Contact master” is selected, the prediction comes from the total identified user base.
If “Segments/List” is selected, predictions come from the selected segments or list. You can select your desired list or segment from the drop-down.
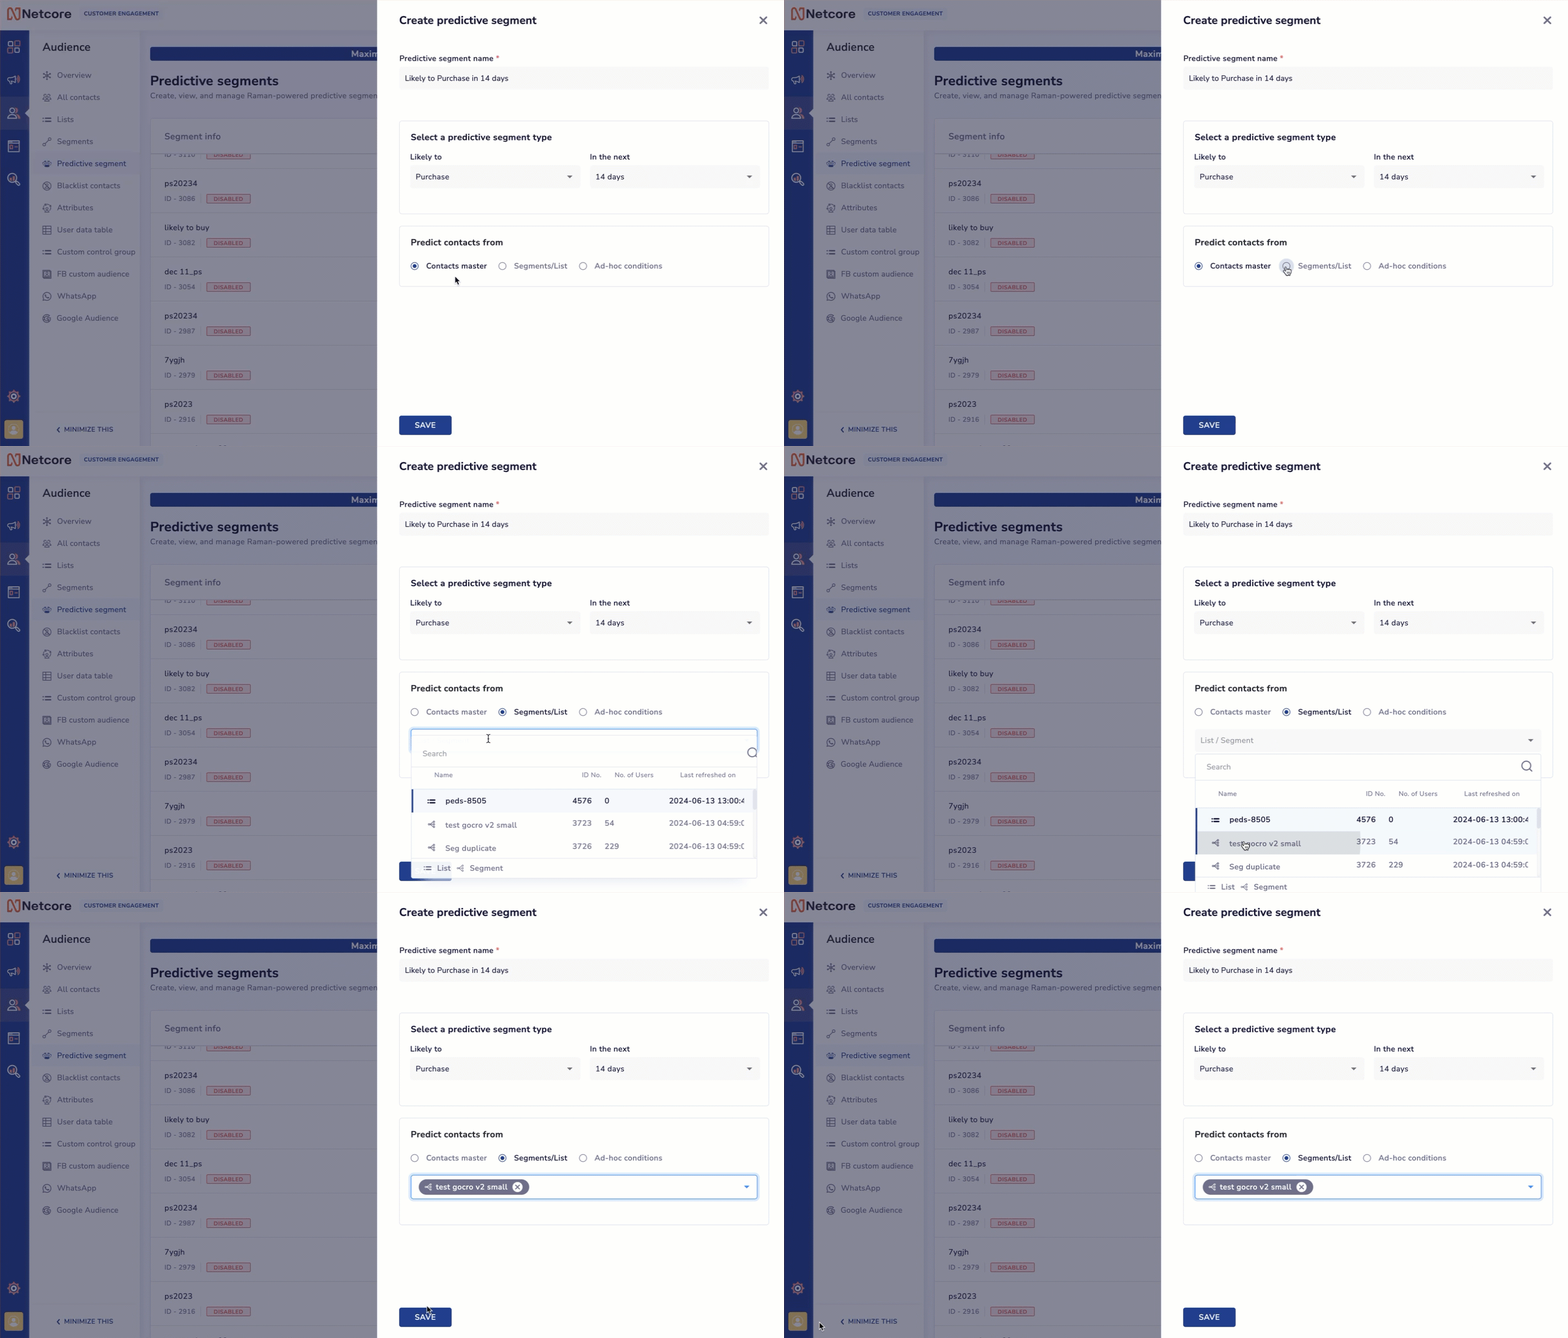
Add Segment/List to your Predictive Segment
If the user does not have a defined list or segment already, the user can select the “Ad-hoc conditions”. After clicking on the Ad-hoc conditions, click on the “Add conditions” button. A pop up will be displayed. The user can create a segment in this by defining the “Contact type”, selecting lists and then defining the conditions that the segment must follow. If the user wants a segment that strictly follows all the conditions, then the toggle must be kept on “All,” or if only one or more conditions can be acceptable, then the toggle must be kept on “Any”.
There can be multiple sets of conditions that a user can select from, some of which are shown here:
After all of the above fields are filled with the requirements, the user can then click on “ENABLE”.
Once the enable button is clicked, it takes 72 hours for a segment to be created. So while the model is being trained, the status of the segment is “In-Progress”. After the segment is ready, the status is turned to “Enabled”.
Campaign-dependent predictive segments-
Now that we understand how to create a campaign-independent predictive segment, let's move on to the other type of predictive segment: campaign-dependent predictive segments.
Campaign-dependent predictive segments work only on emails, and this is how you can create them. Campaign-dependent predictive segments are available on the email 2.0 campaign editor. You can directly click on the create button (IA 2.0), or you can go to email and enter the audience section.
To create a campaign-dependent predictive segment (available on Email 2.0), the user must click on the “Engage” tab on the menu (IA 2.0).
After getting on the list of campaigns page, filter the list for the channel “email”. To check the predictive segments on any of the campaigns, the user will have to look in the “Audience” section, which can be easily navigated through breadcrumbs in a campaign.
Now under “Select contacts”, one can look for the predictive segments. “All Contacts” would not have the option, since the campaign is targeted directly to the whole audience. Predictive segments can be found in the Segments/List category.
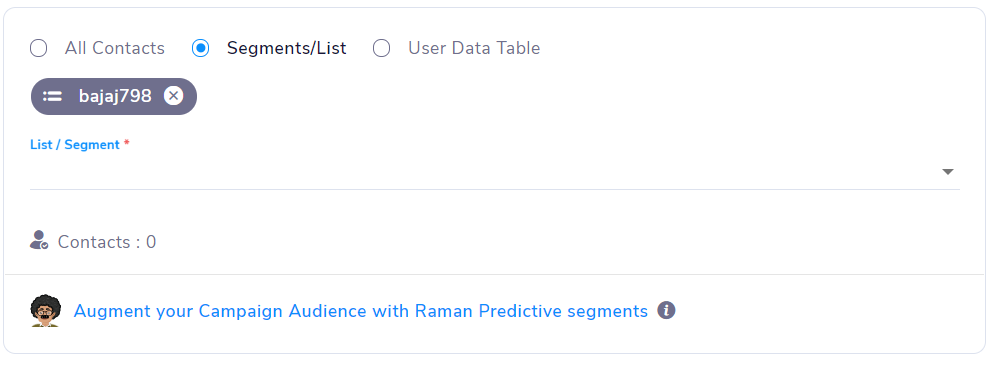
After selecting a list or segment, the user can click on “Augment your Campaign Audience with Raman Predictive Segments” to create a campaign in the “Select contacts from” section. This section contains three options: contact master, segments/list, and ad-dependent predictive segment. A dropdown menu will allow the user to select the type of segment (Likely to...); it has three options: open, Click, and Purchase.
Below that will be the “Select contacts from” section, which contains three options: contact master, Segments/list, and Ad-hoc conditions.
The “Predict contacts from” section basically defines where the user wants the prediction to come from: the entire contacts master (Complete user base), any particular list or segments (new sign-ups, frequent buyers, repeat buyers, etc.), or Ad Hoc conditions.
If “Contact master” is selected, the prediction comes from the whole identified user base. In Contact Master, the user can limit the number of contacts in the segment according to their Needs.
If “Segments/List” is selected, predictions come from the selected segments or list. There is a drop-down to select from existing segments and lists.
If the user does not already have a defined list or segment, the user can select the “Ad-hoc conditions”. After clicking on the Ad-hoc conditions, click on the “Add conditions” button. A pop-up will be displayed. The user can create a segment in this by defining the “Contact type,” selecting lists,s and then defining the conditions that the segment must follow. If the user wants a segment that strictly follows all the conditions, then the toggle must be kept on “All,” or if only one or more conditions can be acceptable, then the toggle must be kept on “Any”.
There can be multiple set and ad-hoc conditions) are similar to the campaign- of conditions that a user can select from, some of which are shown here:
All these options (Contact master, segments/List, & Ad-hoc conditions) are similar to the campaign independent predictive segment setup explained above.
The request for the segment is not sent after this setup is done; it is sent after the campaign is scheduled.
Note: After the request is sent, the segment will take 48 hours to generate.
Note: In the beta phase, the number of campaign-dependent predictive segments that can go live at a time is limited. Currently, only two campaign-dependent predictive segments can be sent per week.
Updated over 1 year ago
