Journey Builder
What are Journeys?
Journey is a feature in Netcore CE that helps you create multi-channel automated workflows. These workflows can replace the repetitive marketing tasks like sending communication messages through different channels, checking the contacts’ reaction to content you send them and sending communication based on their actions etc. Journey building is simple, easy to use, and requires no coding skills to build them. You can convert complex business cases to a sequence of actions and conditions. It is basically based on the concept of IFTTT (If-This-Then-That).
What is the use of Journey?
Journeys help in:
- Sending the right communication to the right customers at any point of the customer lifecycle.
- Making your marketing activities fast
- Making your efforts more effective and efficient
- Organising your marketing activities
The Journey feature is available in the Left Navigation Panel under the Campaign Tab, The Journey listing page will show all the previous journey created by you with journey status.
What are the Key Features of Journeys in CE?
Journey Listing Page
The Journey Listing Page displays all of your previously created journeys, along with their statuses, reports, start-end dates, and journey statistics.
You can use the search bar to look for a journey and filter them by Date Created, Journey Duration, and Last Edited by.
You can also navigate through the different journey status options to access the Journey depending on their status.
Conversion & Revenue Goal
On the listing page, you can monitor the journey's success by setting conversion and revenue targets.
You can set conversion and revenue goals for journeys where goal conversion is used when creating the journey. By clicking on 'Set Goal' in the conversion and revenue goal, you can add a goal target.
Various Status of Journey in CE :
| Status of a Journey | Description |
|---|---|
| Draft | Journey has been created but has not been put to action. You can edit it if required, and can also make a copy of it. |
| Deploying | Journey is being prepared for implementation. You can edit as well as copy it. |
| Failed | The journey failed to get deployed. You can edit the journey and re-deploy it again. |
| Ongoing | Journey is live in action. You can edit the automation, make a copy of it for reuse, and can also force stop it if required. |
| Completed | The journey has reached the end date, and hence, has ended. You can edit the journey, and can also copy it. |
| Stopped | The Journey that has been halted manually but has not been completed yet. You can activate and edit the journey, and also can copy it. |
| Copying | The journey is being copied from an existing journey. |
| Scheduled | The Journey that has been scheduled to start at a set date and time. |
| Archived | The Journey has been archived and save for future reference. You can archive completed, stopped or draft journeys only. |
You can also view the journey reports by clicking the "View" icon in the report column. It will take you to the report summary page of that particular journey.
Smart Journeys
Based on the industry verticals selected on your panel, Journey 2.0 have a gallery of Smart journeys for you. You can easily select and see the preview of the journey, once selected and saved the complete journey nodes will load in the journey builder canvas.
You can configure the node, add or remove nodes, edit the details with these Smart Journeys.
How to Create a Journey ?
Mention the Journey Details and Set Journey Goal
To create a Journey, you need to mention the Journey Name, Journey Start-End Date and Time, Journey Goal (optional).
Journey Goal: The activity that the user should perform which would be counted towards the success of the campaign. You can select this option to track the effectiveness of your campaign. You can select the Goal Activity from the drop-down menu.
Also, along with the Goal activity, the marketeer can set the Conversion window for the journey to set the attribution window for the conversion activity for all the communications through the journey.
Also, you can select the Product Collection option to send out email communication having collection of multiple products based on their activity. The Journey will behave in a different manner when the product collection option is selected in terms of instances of the user. More details on Product Collection in Journey 2.0 and product collection is available here .
Click “Save” to save the details and start building the journey. You can edit the journey details using the edit icon on the top left side.
Advanced Options
In the Advanced Options, you can choose to enable Frequency Capping for the particular journey. The Global settings of Frequency Capping will be applied in the journey.
Important Point to Remember
After a journey is marked as completed or if end date is reached, some users may still receive communications based on the configured flow. This occurs if users have not finished all steps in the journey due to set wait times or delays.
Journey Builder Canvas
All the Journeys in the CE Journey Builder comprises of the following categories based on their functionality :
- Trigger : It defines the condition that would kick start the flow of actions that you have defined.
- Actions : It defines the action that would be taken on the user i.e sending communication messages, updating attribute values, waiting, etc.
- Conditions: They are the decision boxes in the business workflow which are translated to check conditions in CE.
- Flow Control : These nodes help in defining the condition/activity in a particular duration for the user to perform, which will decide the subsequent flow of the user in the automation.
Trigger
- Activity
- Segment
- List
- Contact Master
Start of a Journey
You need to Drag and Drop one of the Trigger element from the left-panel to start the journey and to add subsequent nodes.
Activity
Activity is a real-time event that can start the journey.
For example, as soon as a contact clicks a link in the email you had sent, start the journey workflow.
The triggers can be of many types:
- Contact Activity - Whenever a contact is added to CE or any of the properties being updated, the journey is triggered.
For instance, as soon as someone signs up, the contact is added to the list. And this event would trigger the welcome series journey.
If the contact's location attribute value is changed to "Mumbai", trigger the "Mumbai Offers" automation. - Email Activity - When a contact opens an email that you sent, clicks a link in it, or the email got bounced, then the journey is triggered.
For example, you sent an email with new products range, and the contact clicks the "books" category link in it, then trigger the "Books offers"journey. - SMS Activity - Similar to email activity, when an SMS gets delivered to contact or fails to get delivered due to the number being on NDNC, the journey is triggered.
- Web/App Activity - In CE, you can track the website/App activities of contacts. Journey can start whenever a contact does activity on the website/App.
For example, if he adds items to cart, but does not proceed to buy, then trigger the "Cart abandonment" journey. - Push Notification Activity - Journey is triggered based on whether the contacts received or did not receive the push notification, or opened the notification.
- Web Push Notification Activity - Journey is triggered based on whether the contacts received or did not receive the web push notification, or opened the notification.
- Web Message Activity - Journey is triggered based on whether the contacts viewed or did not view the web message or clicked on the web message.
Optional Settings
Frequency : You can select if you want the journey to get triggered each time the real-time event happens, or just when it happens for the first time.
Specifying Captured Parameter : You can specify maximum up to 5 parameters along with the trigger activity.
Segment
- You can start a journey with Segments.
- You can create segments out of the complete contact database, across multiple lists, as well as from one list.
- Segmentation conditions can be based on Activity of the Contacts, their Attributes, and the devices they use.
You can select a particular segment from the list and choose the repeat frequency for the trigger.
List and Contact Master
You can also select a List and the Contact master as Trigger of the journey.
Actions
The Actions section contains all the actions to be performed based on the activity of the previous node.
Following are the various Action items possible in CE Journey Builder :
- SMS
- Web Push
- App Push Notification
- Voice
- Webhooks
- Update Attribute
Conditions
You can insert checks to decide the course of actions in the journey using the condition nodes. Refer to this document to learn more about the condition nodes.
Flow Control
The Flow Control helps in regulating the communication to be sent out based on the organic behavior of the user.
Wait for an event: This node will wait to capture an event/activity of the user for the set time duration and accordingly have the "Yes" and "Timeout" flow.
Conversion Window in Journey
Journey Conversion Window, helps the marketeer configure the attribution window for their conversion based on various marketing campaigns that they are targeting to their users.
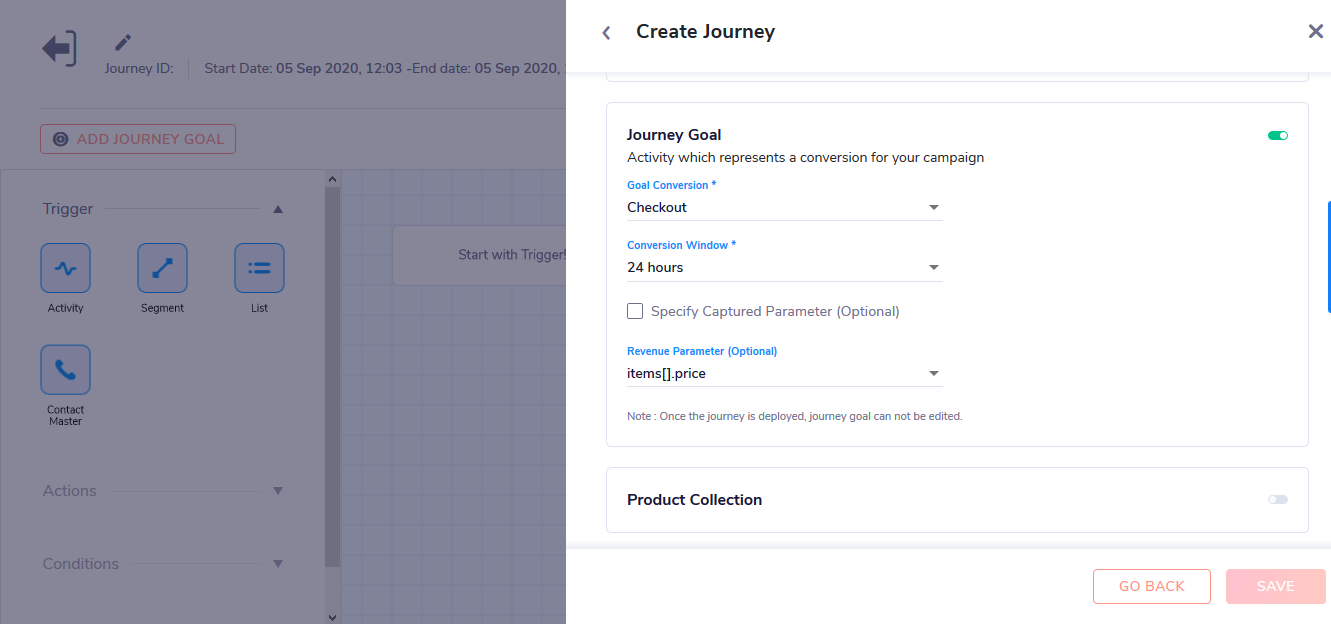
Some of the important point on conversion window in Journey 2.0 :
- Once the journey is deployed journey goal cannot be edited
- Conversion will be calculated on the basis latest click before conversion activity
- Total conversions will be shown in journey reports
- The conversion numbers will be shown on the basis of sent date of the communication.
5 . In case the user selects common conversion goals for multiple journeys that are running parallel to each other and if a customer falls under the conversion window selected by the user, there is a possibility that conversion and revenue will be attributed to multiple journeys.
Lets understand different scenarios with some examples :
Examples on Goal Conversion and Conversion Window
Scenario 1 : Single Journey, Multiple Nodes: Conversion window 24 hrs
APN Sent at 9 AM : Clicked at 9.15 AM : Purchased at 9.20 AM Rs. 200 :
Attribution: Conversion 1 and Revenue is Rs. 200Email Sent at 12 PM : Clicked at 2 PM : Purchased at 3 PM Rs. 300 :
Attribution: Conversion 1 and Revenue is Rs. 300Scenario 2: Multiple Journeys: Conversion window 24 hrs
Journey 1: Email Sent at 9 AM : Clicked at 10 AM : Purchased at 12 PM Rs. 400 :
Attribution: Conversion 2 and Revenue is Rs. 900Journey 2: Email Sent at 2 PM : Clicked at 4 PM : Purchased at 6 PM Rs. 500 :
Attribution: Conversion 1 and Revenue is Rs. 500Scenario 3: Multiple Journeys: Conversion window 24 hrs
Journey 1: Email Sent at 9 AM : Clicked at 10 AM : Purchased at 9.30 PM Rs. 400 :
Attribution: Conversion 2 and Revenue is Rs. 900Journey 2: Email Sent at 2 PM : Clicked at 3 PM : Purchased at 9.30 PM Rs. 500 :
Attribution: Conversion 2 and Revenue is Rs.900
Product Collection Emails in Journey 2.0
The feature of Product Collection allows the marketeer to show a collection of product/items in respect to an end-user. Let's understand this with an example :
ECommerce Brand Product Collection Example
You are an ECommerce Brand, users at your platform are scrolling through multiple product, adding some of them to the cart but are not making an purchase within a certain time period a day.
Now as a marketeer to get these window shoppers and convert them to buyers you would like to target such customers with items they have shown interest for along with a series of recommended products.
So, we target such user using journeys, while creating the journey toggle on the Product Collection option in the details page, here is a quick view on how to create such journeys :
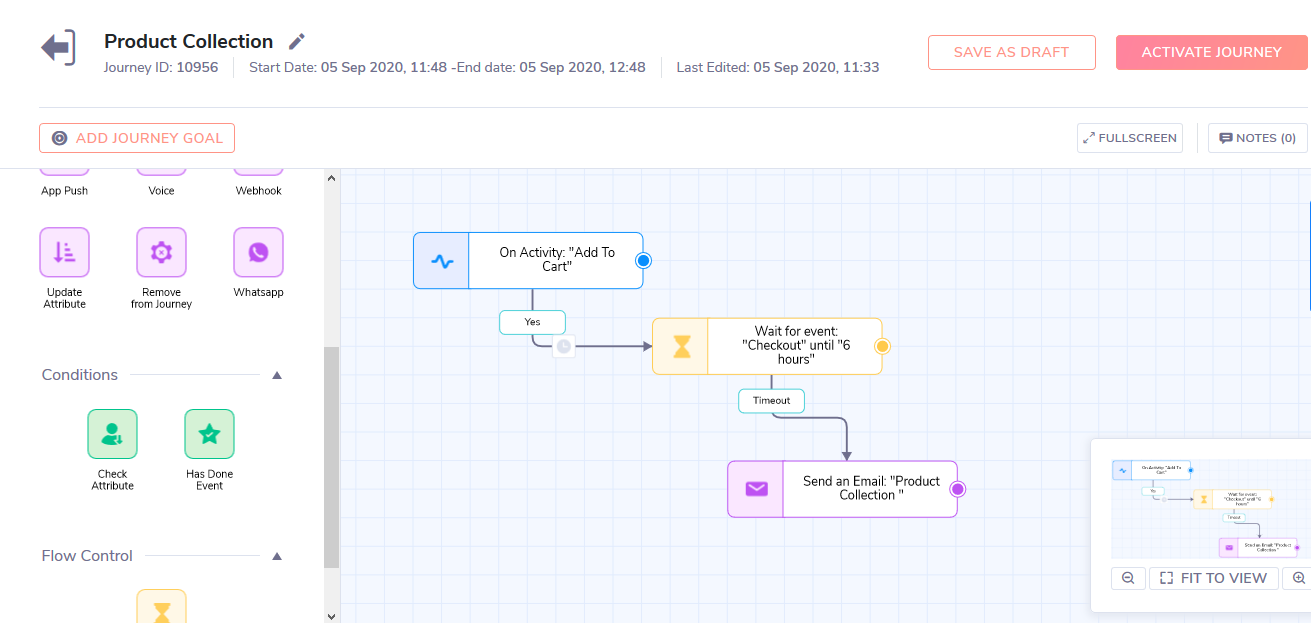
Points to be noted while using Product Collection in Journey :
- Product Collection will work only on Activity Trigger.
- Multiple occurrences of the activity by the same user will be combined as one.
- prid or items[].prid is compulsory for product collection, in absence of which no email will be sent.
- Payload personalisation will work with Product Collection.
Once we are ready with our journey node, we need to configure the email node by selecting the respective Product Collection template and selecting the Claim and Abandon Activity, in the example above the claim activity will be "Checkout" and the Abandon activity will be "Add to Cart".
Please find more details on creating a product collection template here.
Latest Activity Personalisation
The latest activity personalization feature helps in selecting a particular activity to personalize with the latest payload parameters of that activity performed by the user.
Example: A user has added a Shoe to his cart and entered the journey with the trigger activity "Add to Cart", now while being a part of the journey, he next added a pair of Jeans to his cart.
Now while sending out the communication, the marketeer would like to target the user with the latest product that he has added. Here, the marketeer can use the Latest Activity Personalization as an option to personalize the content with the latest event that the user has performed.
Steps :
- Select the Latest Activity Personalisation checkbox.
- Select the activity that you like to fetch the payload for.
Please Note : The email content must contain the personalization syntax which can be found here.
Preferred Channel Node
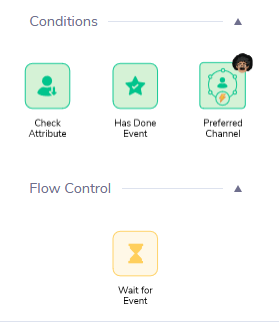
Use Case
A marketer has launched a new product and wants to reach out to his entire base with an intention of high engagement. If he uses all the channels to all the customers, he might end up spamming and there is a risk of unsubscribing (Email), Uninstall (App), Block (Web Push).
A solution to the same is - if the marketer targets the users on the channels that they are highly engaged there is a high engagement ratio with quick TAT and less spamming. Also, because these are preferred channels of the users there is a low risk of unsubscribing or uninstalling.
With help of the Co-marketer, the predicted preferred channels of the end-users will be identified in CE. Marketers will be able to target the users on their preferred channel of engagement.
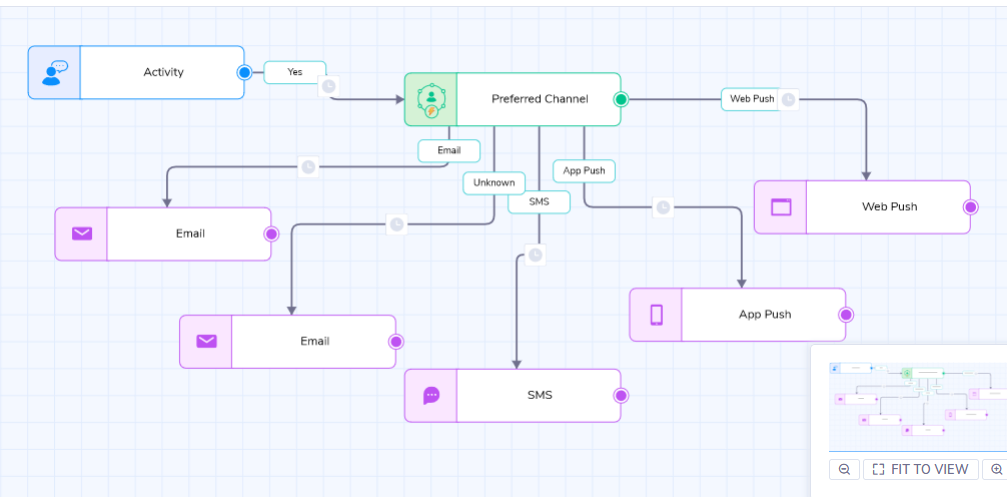
Once the Preferred Channel node is dragged & dropped on the canvas, users can link respective channel branches to respective communications.
Important points for Preferred Channel
-
If the preferred channel is unidentified. The same will be shown as ‘Unknown’ on the branch.
-
Count of users as per their preferred channel will be visible only for dataset (list/segment). The same won’t be available for activity.
-
Preferred channel node can be used multiple times in the journey, but user count will be shown as per list/segments selected.
Criteria for enabling AIML based Preferred Channel
Criteria 1: At least two channels should be enabled or at least automation should be enabled.
Criteria 2: At Least 1000 contacts such that they have received minimum 5 communications on each of any two channels, as well as the contacts, have responded twice (minimum) any one channel in the duration of past 6 months.
Reachable Channels
It is important for a marketer to ensure that each communication delivered is received by the intended recipient. A potential customer spend might be triggered by any communication received by the end user. By leveraging reachable nodes in CE, you may strategically optimize your user journey.
When you know how many users are reachable on each channel, the reachable node can help you improve engagement and save time.
If you know you can reach 70 users via email, 40 via SMS, and 50 via APN, for example, you may optimize your journey by leveraging a reachable node and targeting your users first via email, then via APN, and finally via SMS. This manner, you may save money on SMS while increasing email engagement.
Here’s how you can apply reachable node in your Journey:
- Click on create journey
- Start a fresh journey
- Choose the list or segment or activity from trigger
- Under condition you will find the reachable channel node
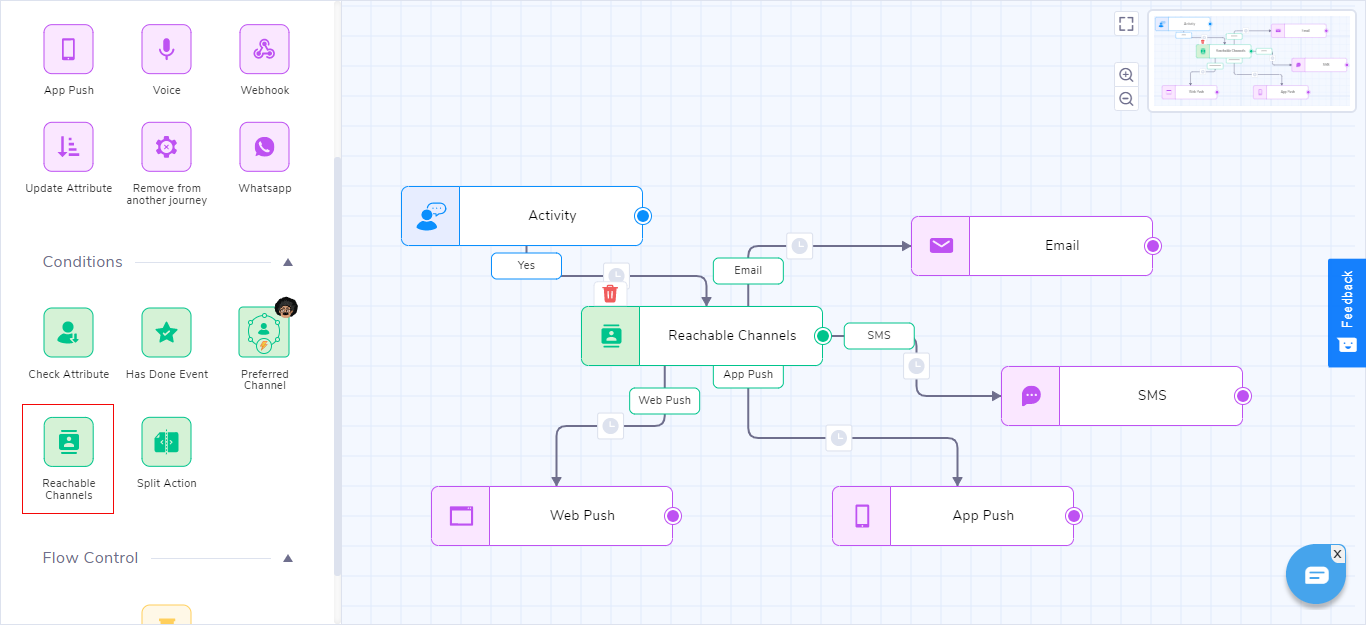
Note:
- Reachable channel count can be displayed by clicking on reachable channel node for list and segment
- Reachable channel count won’t be available for activity trigger as the journey won’t get to know the count in advance but channels priorities will be followed as per set in the journey
Split Action
We've implemented split action in the journey, so that you can see which combination of variants works the best out of all the possibilities. This will enable you to fine-tune the details of your AB test findings by evaluating multiple items at once and implementing various variations of each element.
With a split action, which test scenarios can you effectively test?
- Subject line
- Content/template
- Channel
- Wait time
- Schedule time
- Journey flow
Note:
- The best practice is to always test one/two scenarios at a time.
- There are maximum of 5 variants available in split action to test the journey flow
Here's how to apply split action in a journey step by step:
- Login into Netcore CE dashboard.
- Click on the CREATE button available on the panel on the top left hand side.
- Select Engage with users.
- Select Journey
- On create journey page click on proceed to start with the new journey
- Add journey details and save
- On the fresh journey canvas, you can choose any trigger option from list, segment, business triggers etc
- From the condition option you can choose a split action.
- Start creating the journey by using different variant branch outs.
- The distribution of end users will always be equal, you can change the percentage distribution for each variant by clicking on the split node.
Note:
- In the case of list & segment, the user will be distributed as per the percentage selected for each variant
- In the case of triggers, the users will be distributed randomly but once the user enters in any of the variants and the journey is on repeat mode the user will always remain in that variant. Eg. On 1st the users X & Y enter in the journey and are distributed between A & B variants respectively and again on the next day they enter then the same variant will be maintained. If either of the 2 entered the next day or any following day they will be distributed in the same variant as 1st.
- You can edit the journey and change the variant distribution percentage and this will be applicable post deploying. The logic of the split test will change and each action will be based on a new distribution. But no guarantee that the same communication would go to those users who have already entered in the journey previously . i.e If any user entered in variant A and got an email from variant A flow, after the variant addition/variant removal/change in the distribution, the same user may enter into different variant than A and can get different message from the new variant
- Distribution percentage will be always added to 100%
Reporting:
Channel wise reporting is available
Node wise reporting is available, where in you can see unique user count entered in particular variant and nodewise open, click and conversions
Use cases
1. Split test with different subject lines:
- Personalization vs Non-Personalization: You can send a personalized subject line in variant A, such as s to engage , welcome to ers on the bas. In variant B, for example, you can send a non-personalized subject line. Welcome to vity if the ma and then the marketer can analyze which variant worked well for them.
- Use of Statistics vs Without Statics: The marketer can test the subject line by sending one communication with a statics in it, such as "pick of the week- potential upside 25%," and another communication with a subject line that does not have a statics in it, such as" Here is the pick of the week for you" and check which one worked well for them
- Question vs Statement: Marketers can see which subject lines performed well for them the one with question, such as "have you registered for the webinar?" or one that includes the statement, for example "Webinar on user a, register now, or one with a question and a statement, such as 'have you registered for the webinar?' If you haven't already, here's the link:"
2. Split test with content:
- CTA: Marketers can see which content worked best for them: the email with a single CTA or the email with multiple CTAs, in which you provide the recipient with a CTA after each paragraph. He can use this to determine which content is generating the most clicks.
- Email content size: The marketer can determine which email received the most engagement, one that was short and to the point, or one that was lengthy and detailed, and plan his next step accordingly.
3. Wait Time: After sending the first communication, the marketer can see if he sent the second communication right away and if it worked, or if he waited an hour and then sent a communication that worked well. For example, if an email communication was sent to the recipient upon sign up, the marketer may want to send another email about the products they have. Here, he can either send the product-related communication right away or wait an hour and then send the second communication to see where the engagement rate is higher.
4. Wait for an event: If a marketer has sent an email communication and wants to target the recipients who haven't opened the email yet with another email communication, he can put a condition wait for an event and set a duration in variant A as if the recipient hasn't opened the email within 2 hours send him an email and in variant B set the time for 4 hours and check which email received more engagement.
5. Different wait time: The marketer can experiment with different times of day. For example, he can see which communication received the most engagement: the one he sent in the morning, the one he sent in the afternoon, or the one he sent in the evening.
6. Different Channel: The marketer can use multiple channels at the same time to see which received the most engagement and conversion. For example, if he sent an offer communication via email, SMS, APN, and WPN, he can see which channel received the most engagement.
7. Different Journey Flow: Each variant can have a different journey flow, and the marketer can analyse which journey flow worked best for them and use that journey flow in the future for better engagement and conversion. In variant A, for example, he could send an email, then an SMS, and finally an APN. In variant B, he can send an APN, then an SMS and an email.
Business Activity Trigger
Business Trigger helps marketers to engage with their users on the basis of the occurrence of various business events.
Eg. On the basis of certain user activity if the marketer wants to send the communication related to a certain business event by creating Journey in Journey 2.0
Use Cases:
| E-commerce | Travel | Ed-Tech | OTT/Media |
|---|---|---|---|
| Back in stock | Price drop | New course added | New episode added |
| Price drop | Flight rescheduled | New tutorial added | New season added |
| New arrival | Flight delayed | New instructor added | New series added |
| Stock running out | Rooms running out | New center launched | New film added |
Example 1:
A customer searched for a Xiaomi phone on Flipkart but the phone was out of stock. Now, Flipkart asked a customer whether they would like to be notified whenever the phone is back in stock in the near future. The customer agreed to be notified. Now, whenever the phone is back in stock, Flipkart would like to send a notification or a series of notifications using multiple communication channels such as email, app push, etc. Now, these particular notifications will be triggered based on the trigger event i.e. Product Back in Stock which is a business event.Example 2:
If there is a new movie added on Hotstar say Ice Age 3. Now, Hotstar wants to send a notification to the users who have watched Ice Age 1 & Ice Age 2. So, on the basis of the user activity, Hotstar wants to notify about the new movie released. Similarly, Hotstar may want to send to not only viewers of Ice Age 1 & 2 but to the users who have watched some other Disney movie. There will always be a better engagement when the user base is targeted on the basis of proper segmentation.
So, in both the above examples marketer wanted to communicate their users on the basis of certain business events.
What are Business Events?
So far we have come across 2 types of User Events on CE.
System events- Events that are automatically identified and pre-created on the panel such as App installed, opt-in for web push, email opened, SMS clicked
Custom events- Events that are created by the marketer with respect to their business. Eg. for e-commerce the Custom events are Lead submitted, Product search, Product view, Add to cart, Checkout, etc
Business events are one more such type of events that are created by marketers that covers the series of actions happening at the business’ end. All the listed use cases above are examples of Business events.
How to create a Business Activity?
We understand your business requirement and for a better user experience, some of the business activities are already created by default on the panel for you.
Marketers can also create Business activity as per their requirement
Similar to user activity, Business Activity also has parameters and respective data types.
| Parameter | Data Type | Example |
|---|---|---|
| Movie_Name | Text | Ice Age |
| Genre | Text | Cartoon film |
| Season | Integer | 3 |
| Release_Date | Date | 2009-07-01 |
Getting Started:
There is a simple 3 step process to create a Business Trigger.
1. Create a Business Activity:
You will be able to find an option under Assets >> Custom Activity >> Create Activity
2. API integration to trigger Business Activity
As soon as you save the Business activity, immediately you will get the API details on the same page itself. Click the CTA, ‘Click here for API details’ to get Business Activity API details.
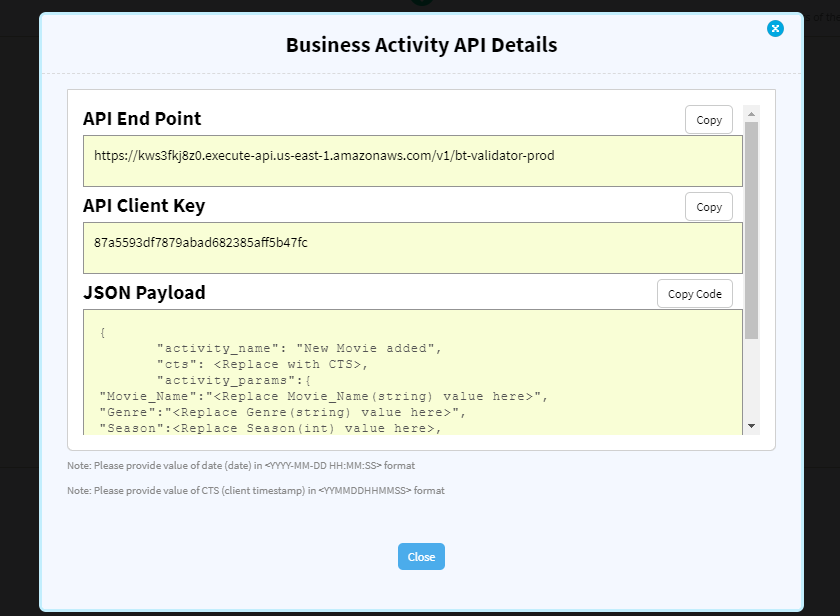
Sample API:
{
"activity_name": "New Movie added",
"cts": 210211101010,
"Activity_params": "Ice Age",
"Genre": "Cartoon",
"Season": 3,
"Release_Date": "20090701"
}
3. Create a Business Trigger Journey using drag and drop Journey builder
There is a separate node for Business Activity in Journey 2.0
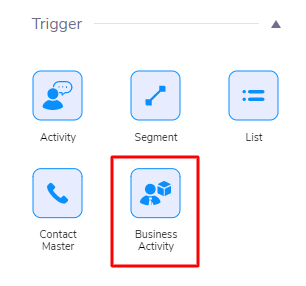
Post selecting specific Business Activity needs to select a condition for the target audience.
Context mapping is very important here while targeting specific users on the basis of their activities.
Eg. Hotstar wants to send the users who have watched Ice Age earlier so the Business Activity parameter should be equal to the user activity parameter.
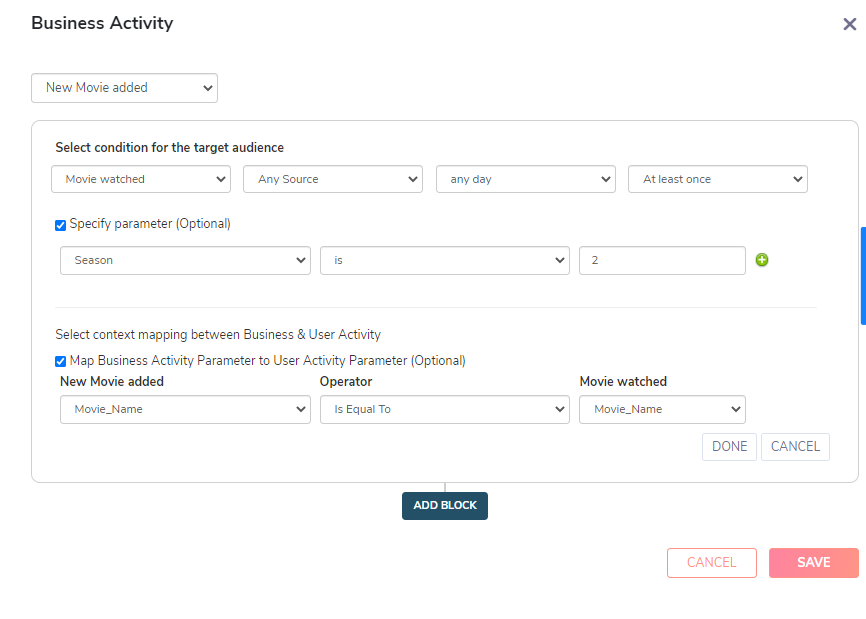
Business Trigger set up video is added here for your reference
Business Trigger journey
Once the Business Activity is set, the user can add required channel nodes to communicate with their customers.
Control Group & reports
What is a control group?
A control group is a statistically significant portion of users in an experiment that is excluded from the journey.
Why is it important?
To acquire an objective measure of the impact which your marketing campaign has on your users. Aside from answering important questions, control groups offer additional benefits including:
- Calculating your ROI
- Staying focused on KPI’s that matter
- Making a data-based decision with confidence
How to determine?
The users in the control group are randomly selected to ensure the validity of the results.
How to measure?
When measuring the success of the marketing campaigns, you will measure the difference in responses between the control group and the rest of the segment to whom the marketing campaign was targeted
Example:
For instance, if you were to launch a marketing campaign for 1,000 customers and give them a 10% discount for a week, with 10% of the customers serving as a control group, the campaign's outcome would have looked like data points in the above example.
Despite not getting the discount, 14% of your customers made a purchase, resulting in a 2,100 spending. Customers who took advantage of the promotion spent 36,000. A total of 38,100 has been spent. So, if the campaign had not been launched, the real spend for 1000 customers would have been 21,000
Now it's time to assess the campaign's real success. The difference in responses between the control group and the remainder of the segment for which the marketing campaign was designed will be measured. For example, (38,100-21,000)=17,100. The campaign's real profit is 17,100.
How to set up a control group in Journey 2.0?
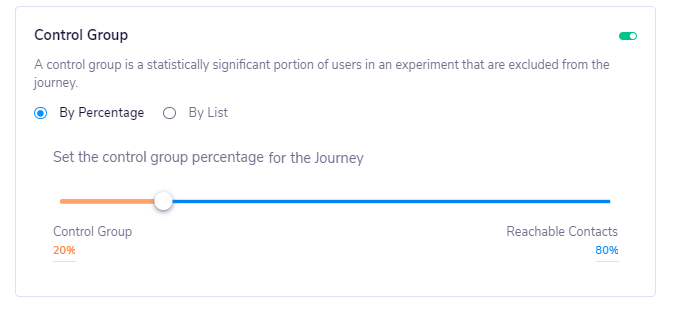
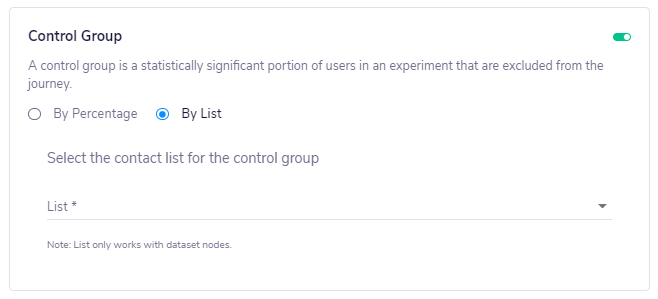
There are 2 methods to set up a control group in Journey 2.0. You can use either of the methods.
- By percentage: Where the system will randomly choose the control group as per the percentage defined by you.
- By list: You can upload the list of users that you want to add to a control group
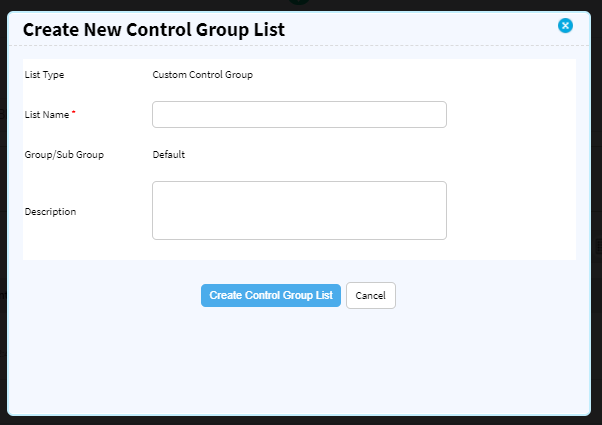
How to add a Control Group list?
To add a custom control group, go to Contacts >> Custom control group >> Create control group
Do Not Disturb (DND)
DND (Do Not Disturb) is a new feature in Journeys. This feature enables end-users to set up DND hours and control when they want to receive notifications or messages. This documentation explains how to set up and enable DND in Journeys.
Setting up DND hours
To set up DND hours, follow these steps:
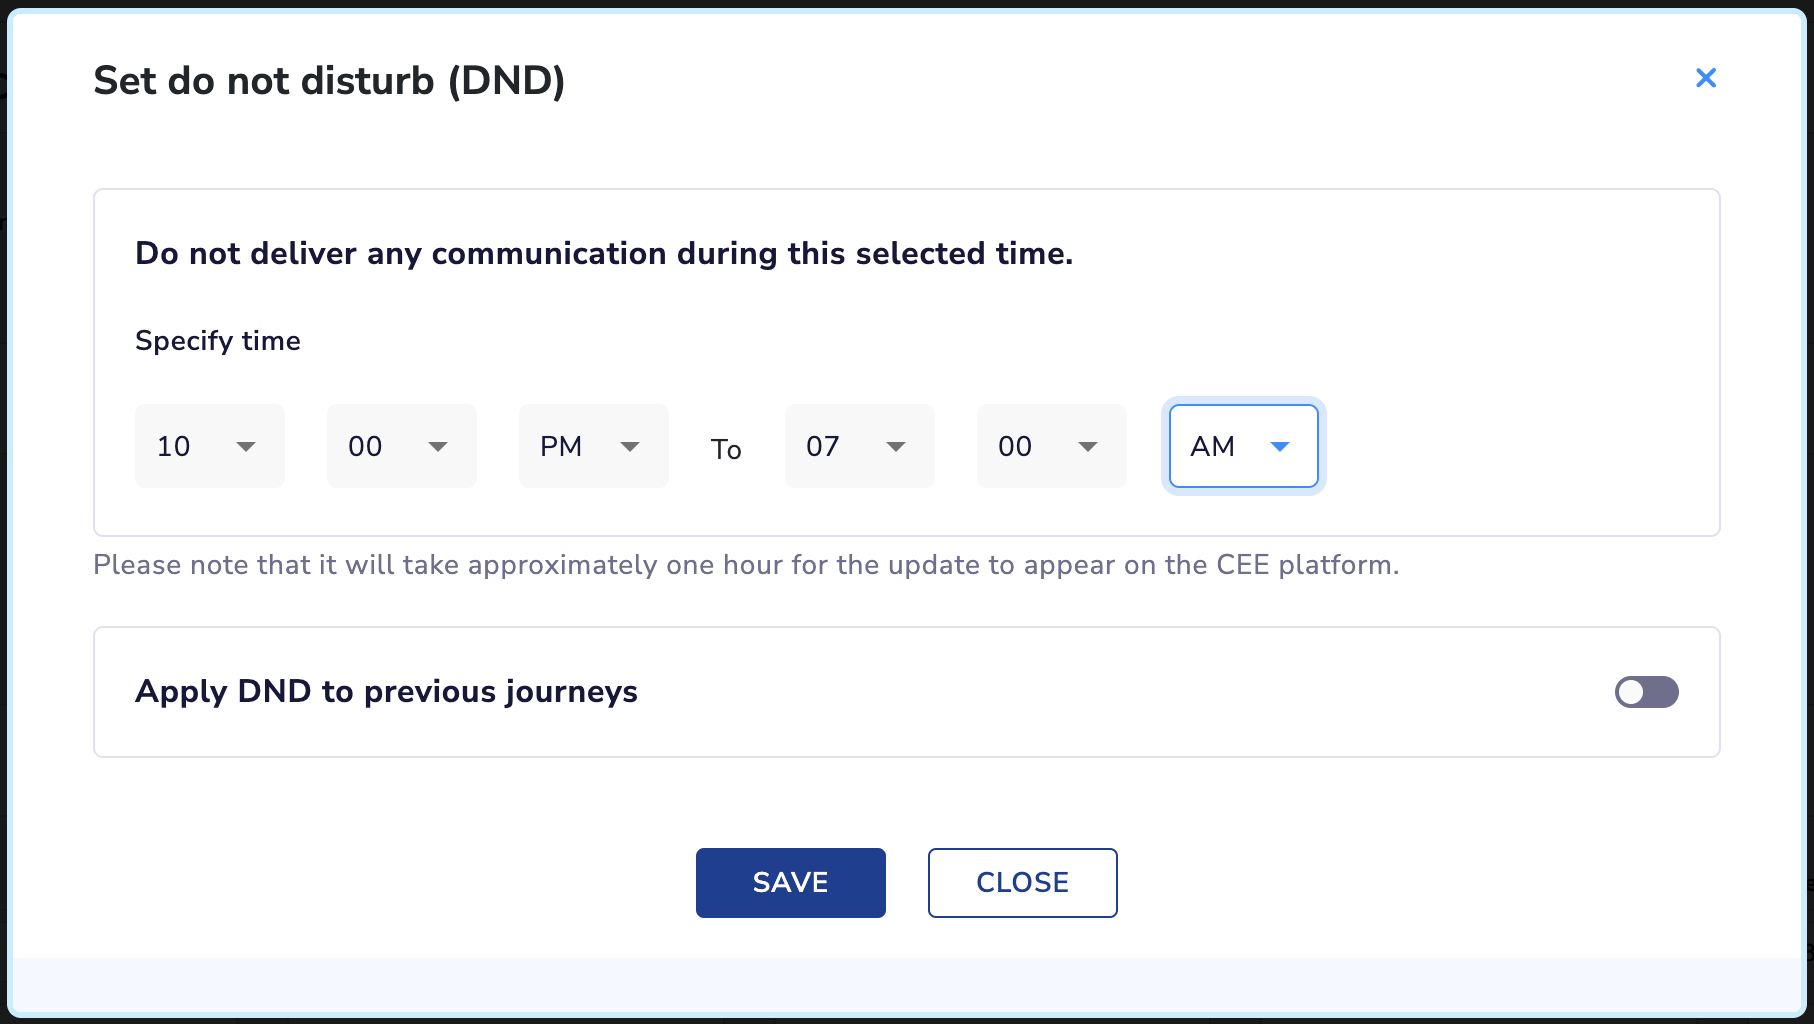
Log in to your account and go to the Account configuration page in profile .
Search for (DND) Do not disturb.
You have further two options: You can either select to apply DND for all journeys or else only the newer journeys.
Enabling DND in Journeys
To enable DND in Journeys, follow these steps:
- Go to the Journeys page and select the journey you want to enable DND for.
- Click on the Journey Settings tab.
- Scroll down to the DND section and toggle the switch to enable DND for the journey.
- Save the changes.
Conclusion: The DND feature in Journeys allows end-users to set up DND hours and control when they want to receive notifications or messages. With this feature, end-users can now take control of their communication and manage it as per their convenience.
Updated 9 days ago
