Learn to create an Email using the Netcore CE dashboard.
Emails directly engage users, and the Netcore CE dashboard helps you easily create and optimize your campaigns.
📘
Prerequisite
Have your domain name added and verified on your Netcore CE dashboard. Refer to Domain Settings to know more.
Steps to Create an Email
Follow the steps to create an Email campaign.
Navigate to Engage > Campaigns and click the Create button to create your email campaign.
Select Engage with users > Email. Select the email type you want to create. The available email types are Regular campaign, AMP, A/B Campaign, and Split.
Create Email
Provide basic details about your campaign in the Setup section
Setup
Refer to the table below for details on the sections available under Setup.
Field Name
Description
Campaign name
Enter a unique name for this campaign.
Add tags
Add relevant tags to organize and categorize this campaign. You can select up to five tags.
The Advanced section has the following features:
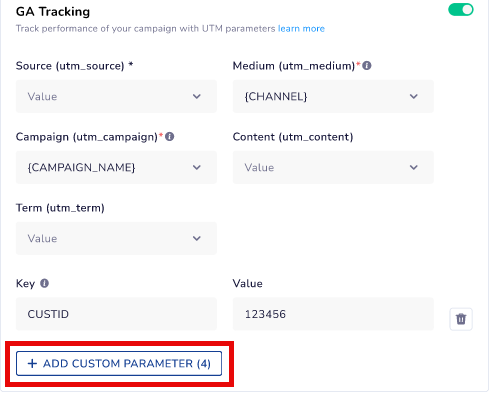
Google Analytics Tracking You can track your campaign performance to measure traffic and conversion. Toggle Google Analytics tracking on to monitor campaign performance via Google Analytics.
📘
Prerequisite
You need to ensure to set default values for Google Analytics tracking and conversion goals in Global Advanced settings under Account configuration section in dashboard.
Track Email Performance via Google Analytics
You must add URL parameters to track campaign efficacy under Google Analytics campaign reports.
URL Parameters
Description
Source (utm_source)
Identify the origin of your traffic, such as a search engine or newsletter.
Medium (utm_medium)
Specify the marketing medium, like Email, social, or CPC (cost-per-click).
Campaign (utm_campaign)
Name the specific campaign, like a product launch or a seasonal sale.
Content (utm_content)
Differentiate specific campaign content or links. This is an optional field.
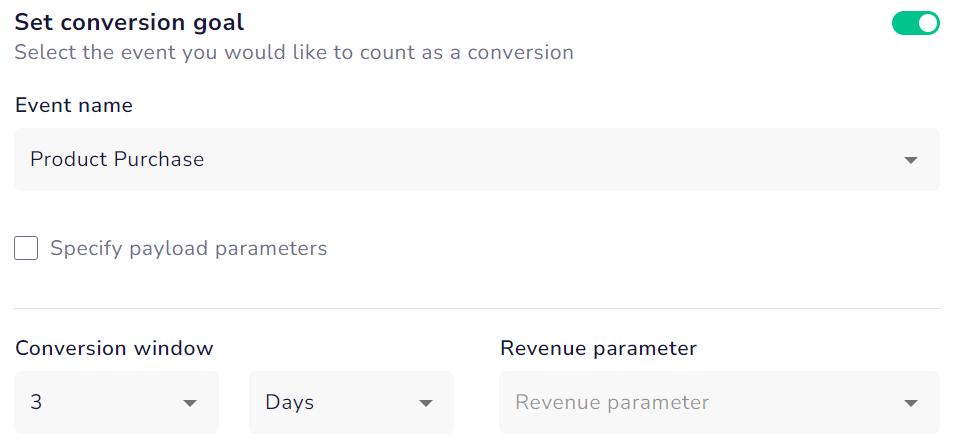
Conversion Goals Add conversion goals to monitor key business metrics and measure the success of your Web message campaign. You can track one conversion goal per campaign. Select any event as a conversion goal activity according to your objectives. For example, if you want to track the number of customers who have purchased shoes after your campaign was sent. (Event: Product Search, Product: Shoes).
Set Conversion Goal
Event name: Select the event you want to count as a conversion from the dropdown. For example, Product Purchase, add to cart, and so on.
Specify payload parameters: You can define the conversion event payload criteria and add up to five customizable parameters. For example, specify a Purchase event when the product price exceeds 10,000.
Conversion Window: This option defines the time frame for successful actions after interacting with your campaign.
Revenue Parameter: Select this option to assign a value to each successful action for tracking financial impact.
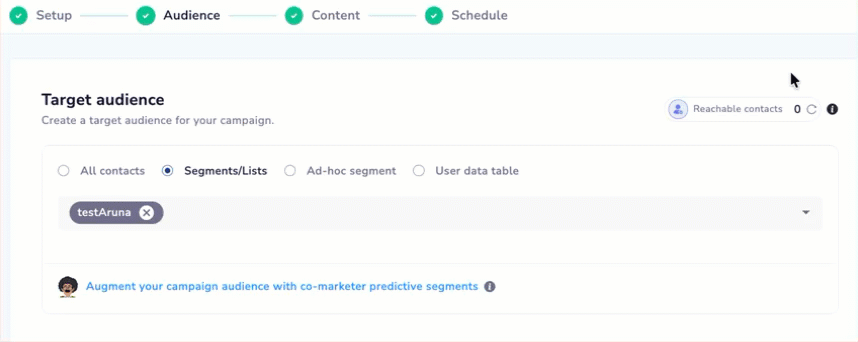
Define the target audience for your campaign in the Audience section.
Audience
The Audience section allows you to select who to target your Email. It has the following sections:
Target Audience
Select a specific segment or list to define the audience for the Email campaign. Pick up to five user segments or lists. Use for targeting based on historical behavior captured by server-side user segments. Target Audience has the following options:
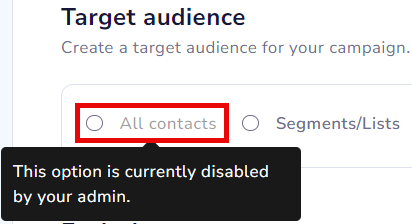
All Contacts: Target all users in your contact list when creating campaigns for broader outreach.
📘
All Contacts Setting
Admin users of the Netcore CE dashboard can disable the All Contacts option, if they prefer not to send a campaign to all contacts. This option is enabled by default, making the All Contacts option selection accessible. However, admin users can change it as needed.
To enable or disable the feature, navigate to Profile > Account Configuration > All Contact Enable/Disable >Active / Inactive.
Enable or Disable All Contacts option
Segments/List: Easily select from pre-defined lists or segments to target specific contacts. Search for the desired segment or list by name and add it to your campaign with a checkbox selection.
Ad-hoc segment: Create dynamic segments for specific campaigns by defining conditions. This lets you instantly create segments, view user counts, and integrate them into your campaign targeting.
Reachable Contacts
Locate Reachable contacts to view the approximate number of users who can receive this campaign. It excludes users who have uninstalled the app, opted out of notifications, or have stale tokens. The actual number can vary because of blacklists, suppressions, frequency caps, or other delivery rules applied at send time.
View Reachable Contacts for a Messaging Campaign
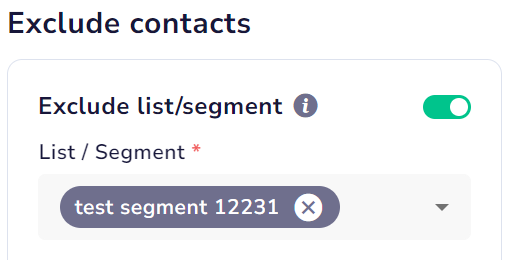
Exclude Contacts
Select suppression segments or lists to exclude specific users from campaign targeting. You can choose up to 15 segments or lists for exclusion.
Exclude Contacts from your Campaign
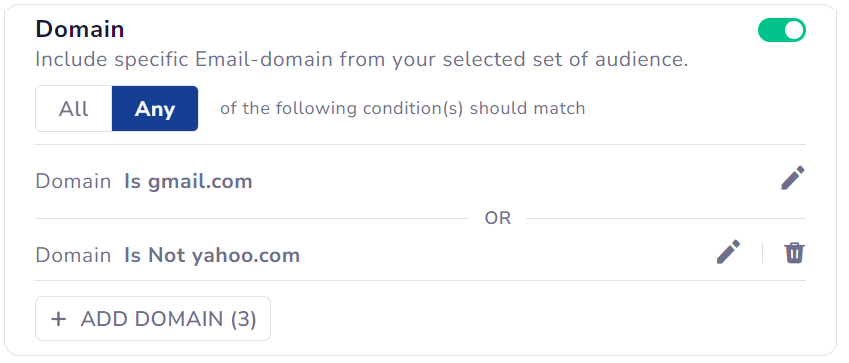
Domain
Include specific email domains from your selected set of audiences. You can add up to five domains.
Select condition type (All or Any)
All: All specified conditions (email domains) must match for the audience to be included.
Any: Requires that at least one of the specified conditions (email domains) must match for the audience to be included.
Add specific email domain
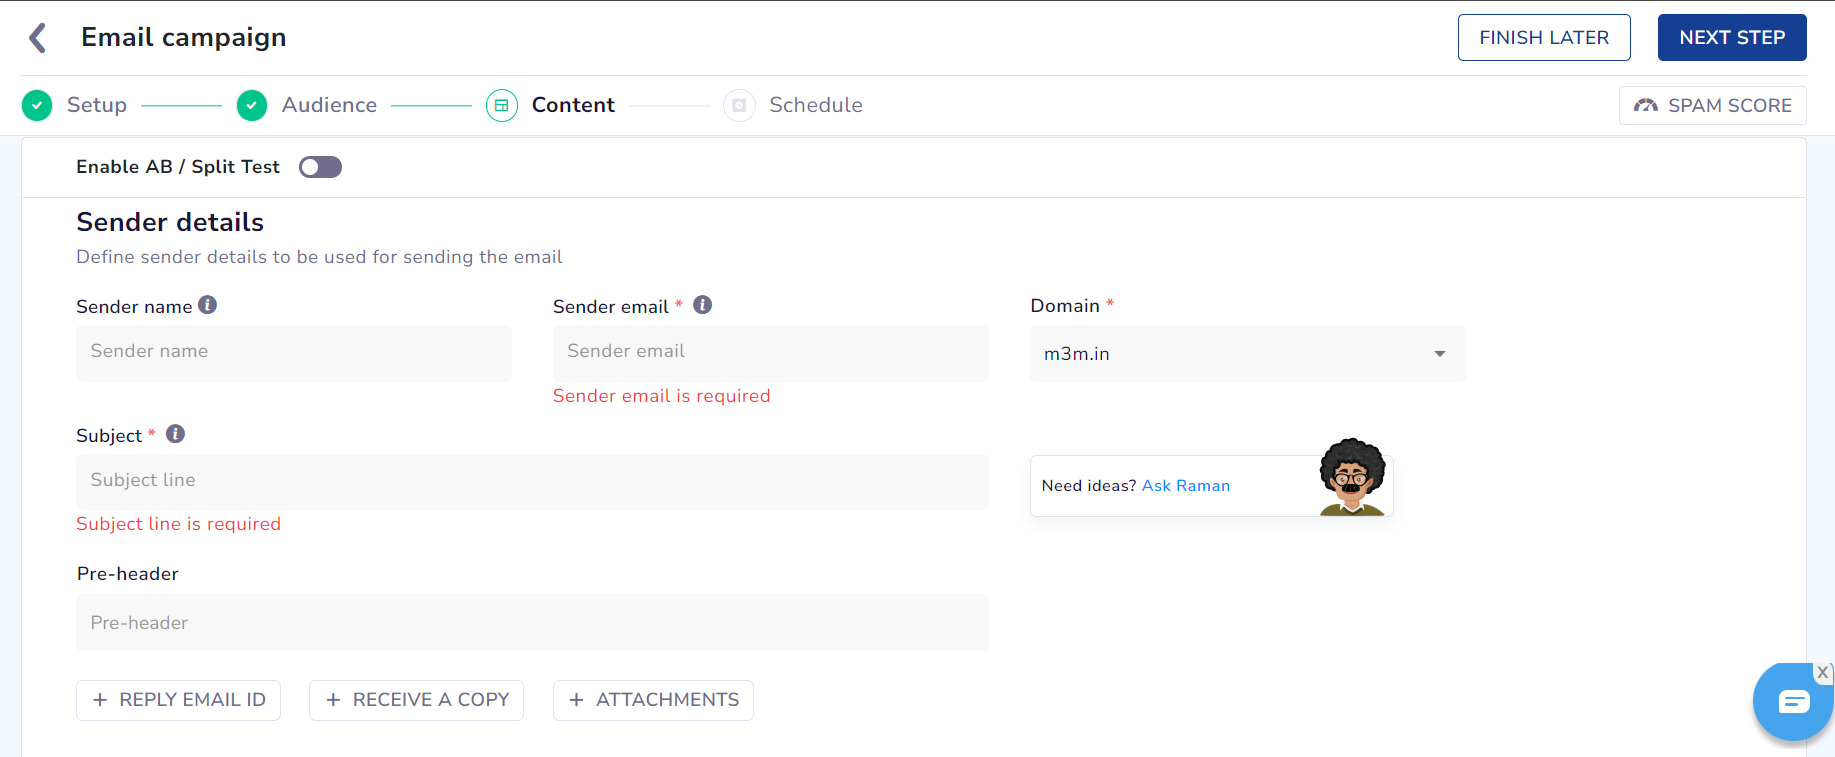
Create the content of the email under the Content section.
Content
After the basic Setup and defining the target audience, Content is the section where you can create your Email template and define your sender details for sending the email. You can create or edit your campaign using various templates in this section.
Sender Details for Email Campaign
Refer to the table below for details on the sections available under Sender details.
Field Name
Description
Sender name
Specify the name that will appear as the sender.
Sender email
Provide the email address from which the Email will be sent.
Domain
Select the domain to be used to send the Email.
Subject
Enter the subject line for the Email.
Pre-header
Add a pre-header text that will appear after the subject line.
Reply-To Email Address
Specify an email address where replies will be directed.
Receive a copy
Select email IDs to receive a copy of the Email.
📘
Configure CC at account level
The Receive a copy (CC) field lets you add CC recipients for this campaign. To set up CC globally for all email broadcasts, refer to Email Broadcast CC Settings under Account Configuration.
You can create the Email template once you have added the relevant details. You can use My Template or Create new functionality to create an Email template. We offer ready-to-use e-commerce templates. Explore this document to learn more.
Using My Template
Navigate to the My template option to use saved templates.
Click icon to edit any existing to Email template. You also have an option to preview the template on desktop, tablet, or mobile views.
Refer to the table below for details on the sections available under Sender details.
Field Name
Description
Header
Add the top section of an email template with branding elements like a logo and navigation links.
Footer
Add the bottom of an email template containing legal disclaimers, unsubscribe links, and contact details.
View in Browser
Preview your Email in a separate browser tab if the content doesn't load properly in your Email or web app.
View in Mobile
Preview your Email in a mobile view for an accurate mobile display.
View in Tablet
Preview your Email in a tablet view for an accurate tablet display.
Using Create New
Click Create New under the Email Body option to create a template from scratch. You can create a template using these three options:
Drag & drop: Use the drag-and-drop editor to create your email template using elements like text, images, and buttons in your design.
Three sections are available when creating an email template in the drag & drop editor. Drag and drop the elements on the canvas to create an email template.
Content
Refer to the table below to know the elements present in this section.
Element
Description
Image
Select this option to add images to your email template. You can upload, resize, and align images.
Button
Select this option to create a clickable button that can be linked to a URL.
Table
Select this option to organize content in a structured grid layout, which is ideal for displaying data, pricing, or comparison charts.
Divider
Select this option to insert a horizontal line that visually separates sections of your email.
HTML
Select this option to add custom HTML code
Social
Select this option to include social media icons linked to your profiles.
Video
Select this option to embed video content within your email.
Icons
Select this option to add icons to your email
Text
Select this option to add and format text blocks within your email.
Product Collection
Select this option to showcase a group of products, providing users with a preview of multiple items within your email.
Product Recommendation
Select this option to display personalized product suggestions based on user behavior or preferences.
Product Catalog
Select this option to present a detailed listing of products, complete with images, descriptions, and prices.
Rows
Refer to the table below to know the options present in this section.
Option
Description
Saved Rows
Select this option to reuse pre-designed rows from your saved collection.
Custom Rows
Select this option to create and save personalized rows
Empty
Select this option to drag and drop a blank row on the canvas
Settings
Refer to the table below for the general settings in this section.
Option
Description
Content area width
Select this option to adjust the content area's width in your email template.
Content area alignment
Select this option to align your content area to the left, center, or right within the template.
Background color
Select this option to set the overall background color of your email.
Content area background color
Select this option to change the background color within the content area.
Font
Select this option to choose the font style for the text in your email.
Link color
Select this option to set the color for hyperlinks in your email content.
HTML: Add HTML to create your email template for personalized layout and design.
Fetch URL: Import an email template by fetching the HTML content from a specified URL.
Enable AB / Split Test: Toggle Enable AB / Split Test to activate this feature and optimize your email campaigns based on performance data.
AB: Compare versions of your email to see which performs better. It involves sending different variants to segments of your audience to determine the most effective one.
Split: Similar to AB testing, this involves testing multiple variations of your email (more than two) to optimize factors like subject lines, content, or images. It helps identify the best-performing version before sending it to your full audience.
SPAM Score
The SPAM Score is a rating that shows how likely your email is to reach the users' inbox. This score helps you understand your email's chances of being marked as spam. A higher SPAM Score means a lower chance of your email making it to the inbox. Keeping your SPAM Score low increases the likelihood that your emails will be successfully delivered.
Refer to the table below for the other functionalities available when creating an email campaign.
Functionality
Description
Reply Email ID
Allows you to specify or create an email address where recipients can reply to your email campaign.
Receive a Copy
Allows you to receive a copy of the email once it has been sent to recipients.
Attachments
Allows you to include up to one file attachment with your email campaign.
📘
Content Attachment Requirement
Supported formats include CSV, XLS, XLSX, HTM, HTML, PDF, DOCX, JPG, JPEG, GIF, PNG, and ICS, with a maximum file size of 1024 KB.
Send Test Email
Select the Send Test Email option to preview your Email before sending it to recipients. Refer to the table below for details on the sections under Send Test Email.
Field Name
Description
Add Email IDs
Select this option to enter specific email addresses to send test emails.
Paste Email IDs
Select this option to paste email ids. The emails should be comma-separated.
Use Preset Test Email Addresses
Use the saved email addresses for testing purposes.
Search from history
Retrieve past email IDs using this option.
📘
Note
You can send the test email to a maximum of 10 email IDs.
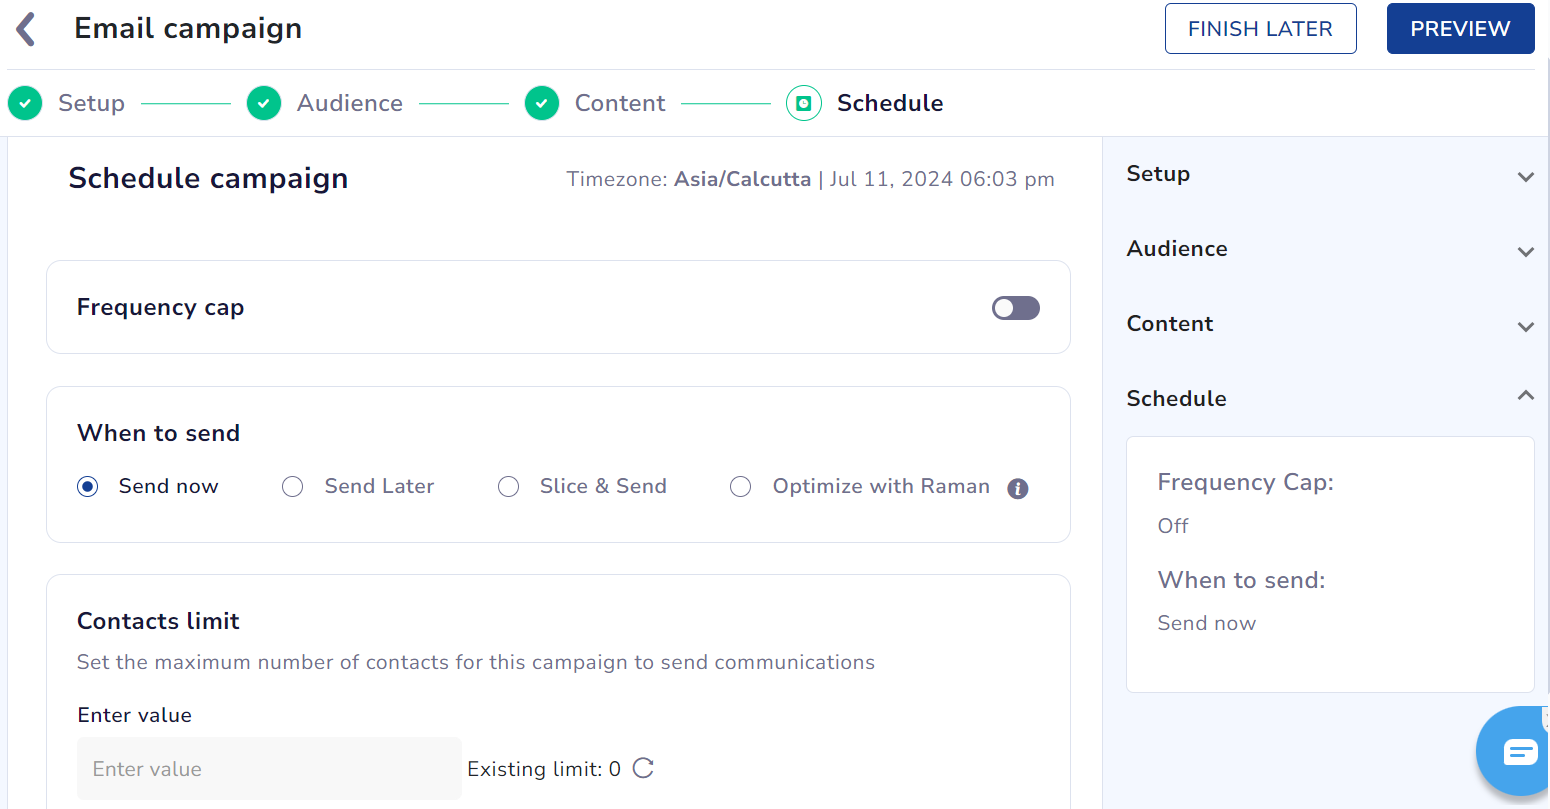
Define the campaign's delivery time and date under the Schedule section.
Schedule
You can create and preview your Email campaign and then schedule your campaign.
Schedule your Email
Refer to the table below for details on the sections under Schedule campaign.
Option
Description
Frequency cap
Toggle communication frequency settings to limit the emails a specific user can receive. Refer to frequency capping to learn more about the setting.
When to send
Select the options for when you want your email campaign to be sent.
Send now: You can immediately send the email campaign to recipients.
Send Later: You can schedule the email campaign to be sent at a specified date and time.
Slice & Send: You can use this option to send email to your contacts in batches.
Optimise with Raman: You can use our AI engine, Raman, to optimize the send time based on user engagement metrics.
Contacts limit
Set the maximum number of contacts for this campaign to whom to send emails.
📘
Important
Running two consecutive campaigns within 30 minutes, the time frame could bypass the frequency cap check due to data synchronization delay.
Click the Save and Preview option to save your campaign and preview the Email. Once you have checked the details and appearance of your entire email, click Save & Publish to publish it.
Email Rendering Considerations
Emails created in the UCE are optimised to render consistently across major inbox providers, like Gmail, Yahoo, Outlook, etc. However, a few design behaviours may vary in Outlook Desktop and Yahoo Webmail. These considerations help set accurate expectations and ensure designs are adapted effectively for each email client.
Border radius behaviour: Rounded corners may appear as square edges in Outlook Desktop, as it does not support border-radius styling.
Background images in Product Picker: Background images applied within the Product Picker are not displayed in Outlook Desktop because background-image support is limited.
Image padding in Product Picker: Padding applied to images may not render correctly in Outlook Desktop, as it does not support padding for image elements.
Product block height consistency: When text lengths vary across product fields, block heights may render unevenly in Outlook and Yahoo Webmail due to differences in layout handling.
Box-sizing in Yahoo Webmail: Yahoo Webmail does not support the box-sizing property, which can impact alignment when padding and borders are applied.
Custom HTML structure: In Outlook Desktop, custom HTML performs best when built using a table-based structure. Non-table layouts may lead to unexpected rendering behaviour.

 icon to edit any existing to Email template. You also have an option to preview the template on desktop, tablet, or mobile views.