Learn to create an RCS Campaign using the Netcore CE dashboard.
Steps to Create an RCS Campaign
Follow the steps to create an RCS campaign.
Navigate to Engage > Campaigns and click the Create button to create your email campaign.
Select Engage with users > RCS.
3. Provide basic details about your campaign in the Setup section
Setup
Refer to the table below for details on the sections available under Setup.
Field Name
Description
Campaign name
Enter a unique name for this campaign.
Bot name
Select the bot name from the dropdown.
Add tags
Add relevant tags to organize and categorize this campaign. You can select up to five tags.
The Advanced section has the following features:
Google Analytics Tracking
You can track your campaign performance to measure traffic and conversion. Toggle Google Analytics tracking on to monitor campaign performance via Google Analytics.
📘
Prerequisite
You need to ensure to set default values for Google Analytics tracking and conversion goals in Global Advanced settings under Account configuration section in dashboard.
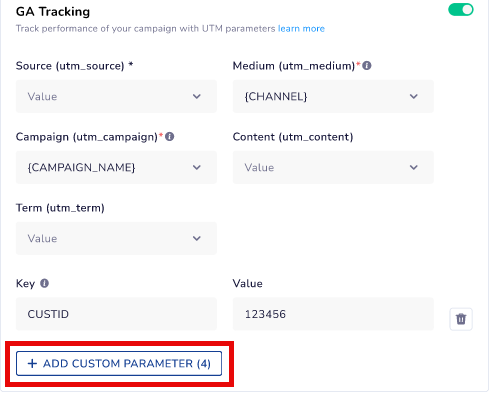
Track RCS Performance via Google Analytics
You must add URL parameters to track campaign efficacy under Google Analytics campaign reports.
URL Parameters
Description
Source (utm_source)
Identify the origin of your traffic, such as a search engine or newsletter.
Medium (utm_medium)
Specify the marketing medium, like RCS, social, or CPC (cost-per-click).
Campaign (utm_campaign)
Name the specific campaign, like a product launch or a seasonal sale.
Content (utm_content)
Differentiate specific campaign content or links. This is an optional field.
Conversion Goals
Add conversion goals to monitor key business metrics and measure the success of your Web message campaign. You can track one conversion goal per campaign. Select any event as a conversion goal activity according to your objectives.
For example, if you want to track the number of customers who have purchased shoes after your campaign was sent. (Event: Product Search, Product: Shoes).
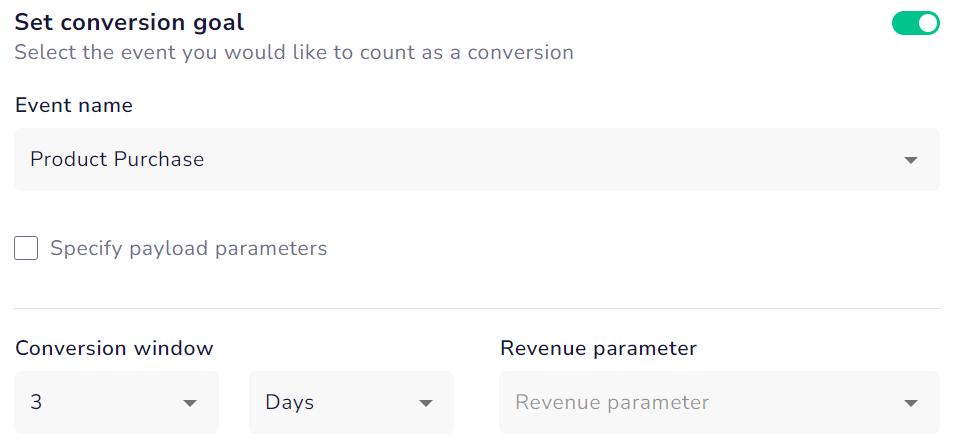
Set Conversion Goal
Event name: Select the event you want to count as a conversion from the dropdown. For example, Product Purchase, add to cart, and so on.
Specify payload parameters: You can define the conversion event payload criteria and add up to five customizable parameters. For example, specify a Purchase event when the product price exceeds 10,000.
Conversion Window: This option defines the time frame for successful actions after interacting with your campaign.
Revenue Parameter: Select this option to assign a value to each successful action for tracking financial impact.
Deduplication
Toggle on the Deduplication feature to remove duplicate messages from a campaign. It ensures that each contact gets only one message per RCS campaign. This feature automatically detects and removes duplicate entries in your contact list. It avoids annoying your contacts with repeated messages and optimizes your campaign's reach. You can enable or disable this option as needed.
4. Define the target audience for your campaign in the Audience section.
Audience
The Audience section allows you to select who to target your RCS campaign. It has the following sections:
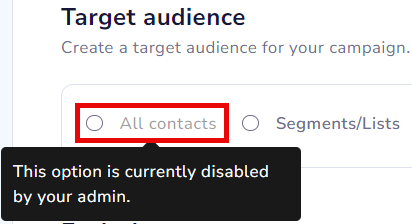
Target Audience
Select a specific segment or list to define the audience for the Email campaign. Pick up to five user segments or lists. Use for targeting based on historical behavior captured by server-side user segments. Target Audience has the following options:
All Contacts: Target all users in your contact list when creating campaigns for broader outreach.
📘
All Contacts Setting
Admin users of the Netcore CE dashboard can disable the All Contacts option, if they prefer not to send a campaign to all contacts. This option is enabled by default, making the All Contacts option selection accessible. However, admin users can change it as needed.
To enable or disable the feature, navigate to Profile > Account Configuration > All Contact Enable/Disable >Active / Inactive.
Enable or Disable All Contacts option
Segments/List: Easily select from pre-defined lists or segments to target specific contacts. Search for the desired segment or list by name and add it to your campaign with a checkbox selection.
Exclude Contacts
Select suppression segments or lists to exclude specific users from campaign targeting. You can choose up to 15 segments or lists for exclusion.
5. Create the content of the RCS under the Content section.
Content
After the basic Setup and defining the target audience, Content is the section where you can edit your RCS template.
Select the approved template for your RCS campaign from the dropdown. To personalize, you can map variables to attributes, payloads, texts, or events.
Send Test Message
Select SEND TEST MESSAGE to preview the final message before sending it. Ensure your numbers are part of the contract master, opted-in, and not blacklisted to ensure test message delivery.
📘
Points to Remember
RCS messages can only be delivered to Android devices that have Google Messages set as the default messaging app.
You can add up to five phone numbers.
6. Define the campaign's delivery time and date under the Schedule section.
Schedule
Refer to the table below for details on the sections under Schedule campaign.
Option
Description
Frequency cap
Toggle communication frequency settings to limit the emails a specific user can receive. Refer to frequency capping to learn more about the setting.
When to send
Select the options for when you want your email campaign to be sent.
Send now: You can immediately send the email campaign to recipients.
Send Later: You can schedule the email campaign at a specified date and time.
Time to live (TTL)
Set the period during which the campaign is active. Any messages not delivered during this campaign are revoked. Maximum of 30 days and a minimum of 60 minutes are allowed.
📘
Important
Running two consecutive campaigns within 30 minutes, the time frame could bypass the frequency cap check due to data synchronization delay.
Click the Save and Preview option to save your campaign and preview the campaign. Once you have checked the details and appearance of your entire RCS campaign, click SAVE & PUBLISH to publish it.