
Create Web Push
Learn how to create a web push notification campaign using the Netcore CE dashboard.
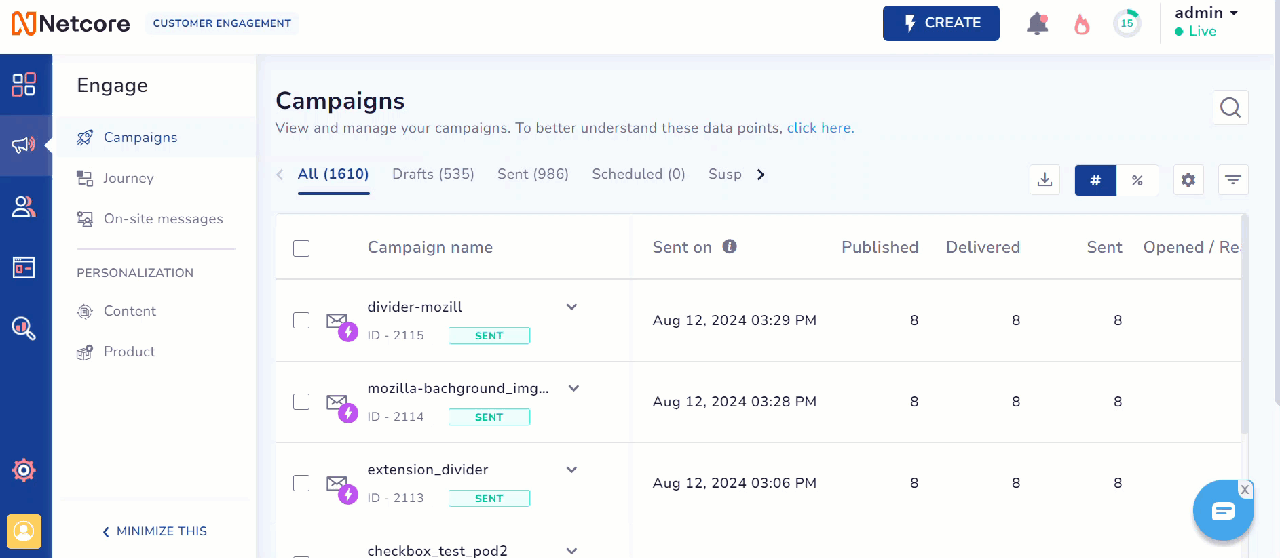
Steps to Create Web Push
There are six steps to create a Web Push campaign, and they are:
- Click the Create button on the dashboard homepage.
- Select Engage with users > Web Push under Campaigns.
Create Web Push Notification
3. Setup: Add the campaign details here.
Setup
Refer to the table below for the sections under Setup.
| Sections | Description |
|---|---|
| Campaign Name | Enter a unique name for this web push campaign. Max 255 characters and Alphanumeric, space, a hyphen, underscore, '&,' allowed. |
| Website | Choose the website where this notification will appear. |
| Add tags | Add relevant tags to organize and categorize this campaign. You can select up to 5 tags. |
Fill in all the required sections and proceed.
The Advanced details have the following features:
- Conversion goals
Add conversion goals to monitor key business metrics and measure the success of your web push campaign. You can track one conversion goal per campaign. Select any activity as a conversion goal activity according to your objectives.
For example, if you want to track the number of customers who have purchased shoes after your campaign was sent. (Event - Product Search, Product - Shoes).
- Payload parameters (Optional field): You can define criteria for the conversion event payload. Up to 5 parameters can be added for customization.
For example, specify a Purchase event when the product price exceeds 10,000. - Revenue Parameter: Select this option to assign a value to each successful action for tracking financial impact.
- Google Analytics Tracking
Enable tracking to monitor campaign performance via Google Analytics.
- Source (utm_source): Identify the origin of your traffic, such as a search engine or newsletter.
- Medium (utm_medium): Specify the marketing medium, like email, social, or CPC (cost-per-click).
- Campaign (utm_campaign): Name the specific campaign, like a product launch or a seasonal sale.
- Content (utm_content) (Optional field): Differentiate specific campaign content or links.
4. Audience: Define the target audience for the campaign.
Audience
The Audience section lets you select who to target your web push notifications. It has the following sections:
- All Users: Send web push notifications to all the subscribed.
- Lists/ Segments: Choose a specific segment or list to define the audience for the in-app message after the trigger event. Pick up to five user segments or lists. Use for targeting based on historical behavior captured by server-side user segments.
4. Content: Define the content of the web push notification to be sent.
Content
After the basic setup and defining the target audience, Content is the section where you can create your web push. In this section, you can create your web push using various editing options to make your notification stand out.
- Select from existing templates or Create a new push notification.
- Add content in the given fields. Refer to the table below to learn more about the options when creating your web push notification.
| Field | Description |
|---|---|
| Title | The main heading of the notification. |
| Message | The detailed text of the notification. |
| Landing page URL | The link users will visit when they click the notification. |
Points to Remember
- Title: Max 50 characters
- Message: Max 1000 characters
- Supported Image Formats: jpg, jpeg, png
- Recommended Large Image Size: 360px x 240px
- CTA URL Character Limit: 1000 characters
- Rich Media: Available only in Chrome, URL must start with https
- Aspect Ratio: Desktop WPN (3:2), Mobile WPN (3:1)
- Max Image Size: Icon image (25KB), Large image (40KB). For larger images, use self-hosted URLs.
-
Click
 to create a new variant or clone the variant A. You can create up to three variants. The default variant is A; others can be cloned or created from scratch.
 -
Toggle the box to include the GUID and primary key (if available) with the URL.
- GUID (Globally Unique Identifier): A unique identifier assigned to each user or event to ensure precise tracking and differentiation.
- Primary Key: A unique identifier for a record in a database used to maintain data integrity and facilitate easy retrieval.
-
Toggle on the box for Advanced Features to access additional customization options. Here is what you can customize:
| Feature | Option | Description |
|---|---|---|
| Rich Media | Icon Image | Upload a small image to serve as an icon in the notification. You can upload an image from your device or provide an image URL. |
| Large Image | Upload a larger image to enhance the notification's visual appeal. You can upload an image from your device or use an image URL. | |
| Action Button | Button Label | Customize the text displayed on the action button within the notification. |
| Target URL | Set the link to which users will be directed when they click the action button. Choose an image for the action button by either uploading it from your device or providing an image URL. |
- Click
 to change and optimize your web push with A/B test and Split test.
A/B Testing
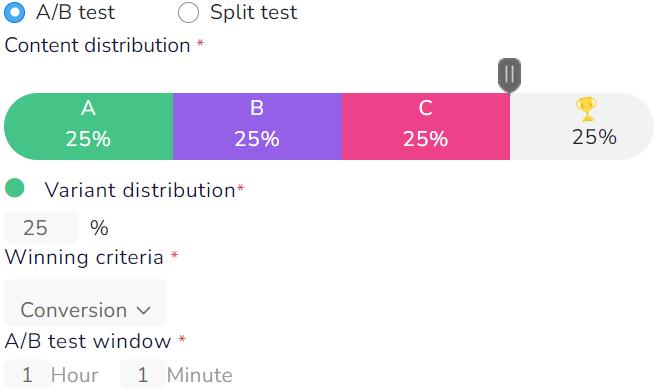
Enable A/B Test for Web Push
- Content distribution*: Choose the percentage of your audience for each variant and set a minimum of 10% per variant or winner.
- Winning Criteria: Decide how to determine the best-performing variant by the number of clicks or conversions. If using conversions, define the conversion goal at the start.
Clicks: The variant with the most clicks is considered the winner.
Conversions: The variant with predefined user actions (like purchases) wins. - A/B Test Window: This is the period during which different notification variants are tested to determine which one performs best. Set the time duration as per your preference.
Split Testing
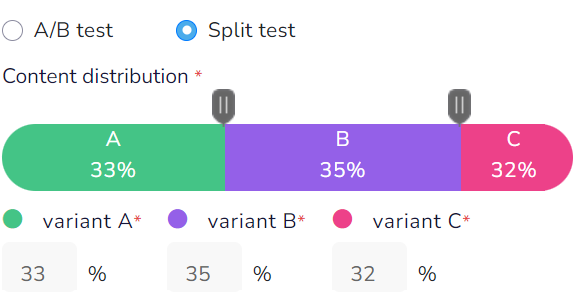
Enable Split Test for Web Push
- Content Distribution: Unlike A/B testing, no winner selection exists. Distribute the variants evenly among your audience, with a minimum of 10% for each variant.
Click on Save & Next when you have entered the content and other details of your preference.
Emoji Compatibility
To add emojis to your web push notifications, check how they appear across different platforms and browsers. This table shows emoji displays on Windows, Mac OS, Ubuntu Linux, CentOS Linux, and browsers like Chrome, Firefox, and Safari to ensure consistency and engagement.
| Browser/Platform | Windows | Mac OS | Ubuntu Linux | CentOS Linux |
|---|---|---|---|---|
| Chrome | Colored | Colored | B & W | B & W |
| Firefox | Colored | Colored | B & W | NA |
| Safari | NA | Colored | NA | NA |
6. Test Web Push
As you compose your web push, preview it in real-time. The  feature helps you preview the final message that your user will receive.
6. Schedule: Define the campaign's delivery time and date.
Schedule
Finish creating and previewing your web push, then schedule your campaign.
- Under Schedule campaign, select Send Now to send immediately or select Send later to send it on your desired date and time.
- Time to Live (TTL) sets how long your notification remains valid and how long FCM will try to deliver it. You can set TTL in two ways:
- Choose a specific date and time within the next 28 days for the notification to expire.
- Set TTL to 0 seconds for immediate delivery.
Toggle the box to Auto-hide notification after approximately eight seconds. This will make the notification disappear after eight seconds.
- Launch Campaign: Once you have checked how your entire web push looks, publish it by clicking the Save & Preview button. Once you have checked the details and appearance of your entire email, click Publish Campaign to publish it.