
App Push Templates
Learn to create an App push template using the Netcore CE dashboard.
The App Push Template section contains all the templates you have previously created for your campaigns. You can easily browse these templates or create new, customized ones to suit your specific campaign needs.
Log in to the Netcore CE dashboard and navigate to Content > App Push to create or use existing templates.

Navigate to App Push Template
Available Features
To filter, use, or edit the existing templates, refer to the table for the available options.
| Option | Description |
|---|---|
| Select Platform | Pick the specific platform ( Android, iOS), where the template will be used. |
| Select Category | Choose the relevant category for your template or select all the available categories. |
| Search | Search for existing templates |
| View | Hover over any available template to preview it before using it. |
| Use | Hover over any available template to use it directly in your campaign. |
| Edit | Hover over any available template to modify it. |
| Copy | Hover over any available template to make a duplicate of it. |
| Rename | Click on the kebeb menu of any existing template to rename it. |
Create New Template
Click CREATE NEW and the Create a new app push template section appears. There are two section to be defined:
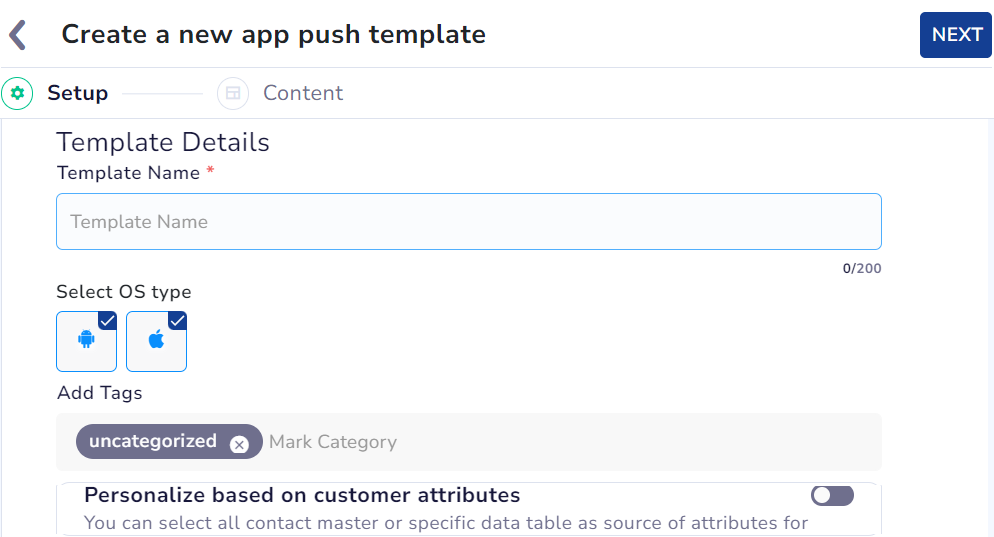
Create a New App Push Template
Setup
Set up your template details in theSetup section.
| Sections | Description |
|---|---|
| Template Name | Enter a unique name for this template. This is a mandatory field. |
| Select OS type | Select the platform you are creating the template You can select Androidor iOS or both. |
| Add tags | Add relevant tags to organize and categorize your template. You can add only one tag per template. |
| Personalize based on customer attributes | You can select the contact master or specific data tables(source of attributes) to personalize your template. |
Fill in all the required sections and proceed.
Content
Content is the section where you can create your template. You can Create new layout or select from the Advance layouts listed on this screen.
Use Your Active BrandkitEnsure you have a Brandkit enabled and active to use it while creating App Push campaign content. Refer here to learn how to enable and setup Brandkit.
Refer to the table below to check templates that suit your message and audience.
Important Point to Remember
- These layouts are available for Android & iOS SDK v3.3.0 and above.
- Image Layout Options: when uploading images for rich media push notifications on iOS, you have two configuration options to control how your visuals display:
- Recommended Size (Default): Applies the standard 2:1 landscape crop. Use this to ensure quick layout consistency across common device types.
- Original Size: Displays the exact image size uploaded without cropping. Use this option to bypass the layout cropper entirely and maintain your asset's native vertical, square, or panoramic layout.
| Layout | Description | Use Case |
|---|---|---|
| Overlay on image | Displays a message over an image | Promote a new product with a captivating image and a call to action. |
| Timer | Add a countdown timer to create urgency. To ensure delivery of time-critical notifications like live progress bars and scheduled alerts on Android 12 and above, please refer to our Exact Alarm Integration Guide . | Notify users that a flash sale will be ending soon. |
| Carousel (E2E) | Users can swipe through multiple images or messages | Showcase a series of related products or features. |
| Edge to Edge | Users can expand the notification to cover the entire width of the screen | Highlight a major update or announcement with maximum visibility. |
| Rating | Include a rating option for quick feedback | Ask users to rate their experience after completing a purchase. |
| Small Image | Show a small image alongside the notification text | Share a product image with a quick update or offer. |
| Progress Bar | Display a bar indicating progress toward a goal. To ensure delivery of time-critical notifications like live progress bars and scheduled alerts on Android 12 and above, please refer to our Exact Alarm Integration Guide . | Inform users of their progress in a download or achievement. |
| Multi-icon | Display multiple tappable icons(3-5) without text. Each icon acts as a quick-action button leading you to a specific link or app action. | Provide users with shortcut actions like "Track order", "Browse deals", or "Contact Support" directly from the notification. |
| Quick Reply | Enable users to respond to a message directly from the notification using predefined text replies. | Collect quick feedback or responses like "Yes," "No," or "Maybe later" without requiring users to open the app. |
| Product Set | Showcases product or content recommendations with images, text, and CTAs based on user behaviour or preferences. | To boost engagement and conversions, suggest relevant items such as "Recommended for you" products, new releases, or personalized offers. |
Using Timer and Progress Bar in JourneysEnsure to follow these points while using Timer and Progress Bar layouts.
- The journey end time must be less than or equal to the timer or progress bar end-time.
- The timer can run for a maximum of 28 days and minimum 1 hour. If the journey exceeds this, users may receive expired timer notifications.
- The TTL (Time To Live) must not exceed the timer or progress bar endtime. If it does, notifications may be delivered after the timer has expired, showing the timer end message to users.
Updated 29 days ago