Wordpress
Multi website (network WordPress) not supported
Please note that currently only one website is supported. Multi website support is not provided by Netcore CE
Setup
After installing CE wordpress plugin to your website it will automatically enable browser push notification, web message and will also capture page browse activity.
It’ll also capture contact form fill-up activity for wordpress plugin “contact-form-7”.
Integrate using plugin zip file
Download zip file of CE plugin from here.
You can install the plugin by following ways.
- If you have access to the server
- Extract the zip file directly to the ‘/wp-content/plugins’ folder of your asset.
- Now the admin can login to your wordpress admin panel.
- Then go to,
- Plugins
- Look for Smartech
- Click Install
- If you have access to admin panel only
- Login to your wordpress admin panel.
- Then go to,
- Plugins
- Click on add New
- Click upload plugin
- Upload the smartech zip folder
- And click Install Now
- Click Activate plugin
Contact Form 7 Plugin - How to use
Below are the guidelines of creating form and mapping with smartech.
- Primary key field of Smartech must be in the form fields.
- All the form field keys must be present on smartech panel as an attribute.
- Attribute will be saved to contact master and tagged to list saved on the configuration.
Events Captured
| Event Name | Event ID | Description | Parameters |
|---|---|---|---|
| Page Browse | 1 | Every time a user is browsing a page, this event is fired. | None |
Mentioned below are the details on how to Setup the Smartech plugin on your WordPress website
Basic Settings

This information is required to connect your WordPress website with the website defined in your smartech panel under the Assets section
- Web Tracking Id - This would be available in the Javascript code generate for your website in the assets section
- Site Id - This would be available in the Javascript code generate for your website in the assets section
- Smartech Primary Key - Please type the Primary key you have used for your Smartech Panel. Example - Email, Mobile Number, etc.
- Smartech List-Id - You can keep this field as default 0
- Enable Tracking - This will help you decide if you want Smartech to ask the user's permission to track their location and save the user's location for better targeting.
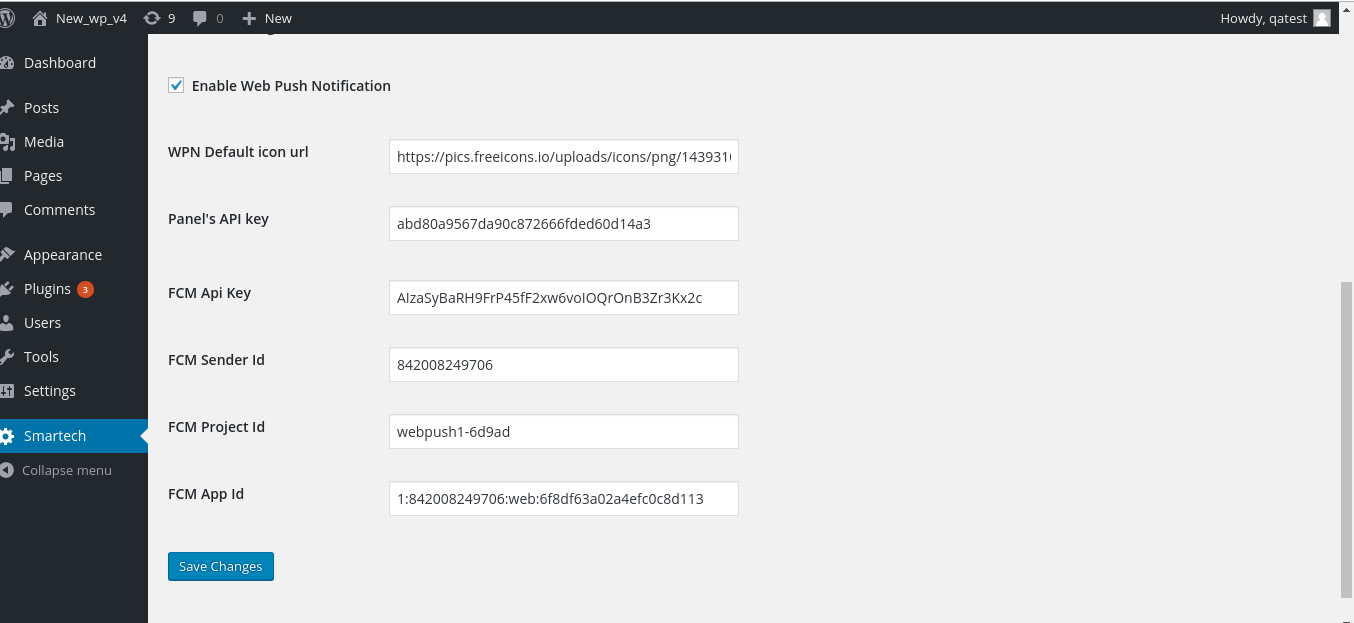
Enable Web Push Notifications

Web Push Notification
You can enable browser push notification by simply entering the FCM details, as shown in above screenshot.
Advanced Web Push Notification
You can enable this option if you want Smartech to send out a Web Push Notification campaign on publication of an article in your WordPress website. Enter below details along with FCM details to enable.
-
WPN Default Icon URL - Along with your Web Push notification you can include your logo as part of it. All notifications sent will include this logo by default. The ideal size for the icon should be 192 px X 192 px
-
Panel's API Key - This needs to fetched from the Smartech panel and added over here. This is the unique id of the Smartech Admin, against whose id the campaigns would be published.
Updated over 1 year ago
