
Setup Nudge Journey
View, create and manage journeys.
Overview
Nudge your users to the next action. Create a nudge journey to build the right context for each user to drive attention.
Listing Page
Refer to the table given to learn about the journey statuses on the listing page.
| Status | Description |
|---|---|
| All | Displays all nudge journeys. |
| Draft | Displays a nudge journey still being created. |
| Inactive | Displays a nudge journey that has been paused or ended. |
| Active | Displays a nudge journey currently live and being shown to users. |
| Scheduled | Displays a nudge journey scheduled at a later time. |
| Test | Displays a nudge journey being tested before making it live to all users. |
Nudge Priority
The Nudge Priority feature lets you define the priority for showing the different sets of nudges based on the eligibility of the consumer cohorts. This priority will be used to decide whether higher-priority nudges are shown or not or which nudge to show first whenever multiple nudges are competing for the same space. Refer to this link to know more.
Download Report
- Navigate to Nudge Journeys on the Netcore PX dashboard.
- Click
 Download report screen appears.
 - Select the Duration for which you want to download the report and click APPLY.
- Select the Journey name from the dropdown. To download reports for all active and inactive journeys, check the Select All box. To download a report for a single journey, check the box next to that journey name.
- Once done, click DOWNLOAD. The link to download the report is sent to your email address.
NoteOnce you have downloaded the report, allow up to 10 minutes to receive the report via email. Typically, the report will be delivered within 10 minutes.
Nudge Reports
Refer to the below table to know the types of reports in Nudge journey:
| Type of Report | Availability |
|---|---|
| 1. User Level Detailed Report | Available only for nudges that include at least one call to action button. |
| 2. Summary Report | Available across all nudge types. |
Download Report
UpdateWe have introduced user-level reports for all Nudges that includes at-least one unique click. This addition, alongside the six existing ones, brings the total count of Nudges to 29.
Sample Reports
This sheet includes sample reports (for User-Level Report ) for Nudges where at-least one call to action button is available.
Filters
View your preferred journeys according to their created or edited date. The options available under  are:
are:
- Created between: Filter journeys based on their created date range.
- Last edited between: Filter journeys by the date range of their last edit.
- Last edited by: Filter journeys by the user who made the most recent edit.
Click APPLY to view the journeys on the listing page.
Create Nudge Journey
Follow the steps to create a nudge journey.
- Navigate to Nudge Journeys and click the Create button to create your journey. New journey screen appears.
Refer to the table to learn about the fields available here.
| Field | Description |
|---|---|
| Journey Name | Add a unique name for the nudge journey. |
| Description | Add a brief summary of the nudge journey’s purpose or details. |
| Start Date | Add the date when the nudge journey will begin. |
| End Date | Add the date when the nudge journey will automatically stop. |
| Publish Immediately | Enable this option to make the nudge journey live as soon as it's saved. |
| Journey is Never Ending | Enable this option if the journey should continue running without an end date. |
| Set conversion goal | Set which activity you would like to count as a conversion |
Set Conversion Goals
Add conversion goals to monitor key business metrics and measure the success of your app push campaign. You can track one conversion goal per campaign. Select any activity as a conversion goal activity according to your objectives.
For example, if you want to track the number of customers who have purchased shoes after your campaign was sent. (Event: Product Purchase, Amount: is greater than Rs.1000/-).
- Select Event : Track specific events performed by users. The options available in the dropdown are:
- Total Event Count: The total number of times the specified event occurred across all users.
- Unique User Count: The number of distinct users who triggered the specified event at least once.
- Sum of Event Property: The total value of a specific event property across all event occurrences.
Once the details are finalized, click PROCEED.
Create Nudge Journey
Select your target audience
Define the audience for the nudge journey. Refer to the table to know the available options.
| Option | Description |
|---|---|
| All users | Display your nudge to all users in your contacts. |
| User segment | Display your nudge to a specific group of users. Select the user segment you have created from the dropdown. |
Click PROCEED.
How would you like to rollout your nudge?
Select the method for delivering your nudge to users. The available methods are:
| Method | Description |
|---|---|
| A/B test with multiple nudge variants (recommended) | Discover the best nudge variant by comparing its impact with the control group. There are the options provided.
Note: This feature is available from SDK version 8.5.14 onwards. |
| Rollout nudge once and for all | Display your nudge to 100% of your audience in one go. |
| Rollout nudge in phases | Show your nudge in a series of phases to a portion of your audience. Define the percentage of users in the roll-out. For example, 30-30-40 (%). |
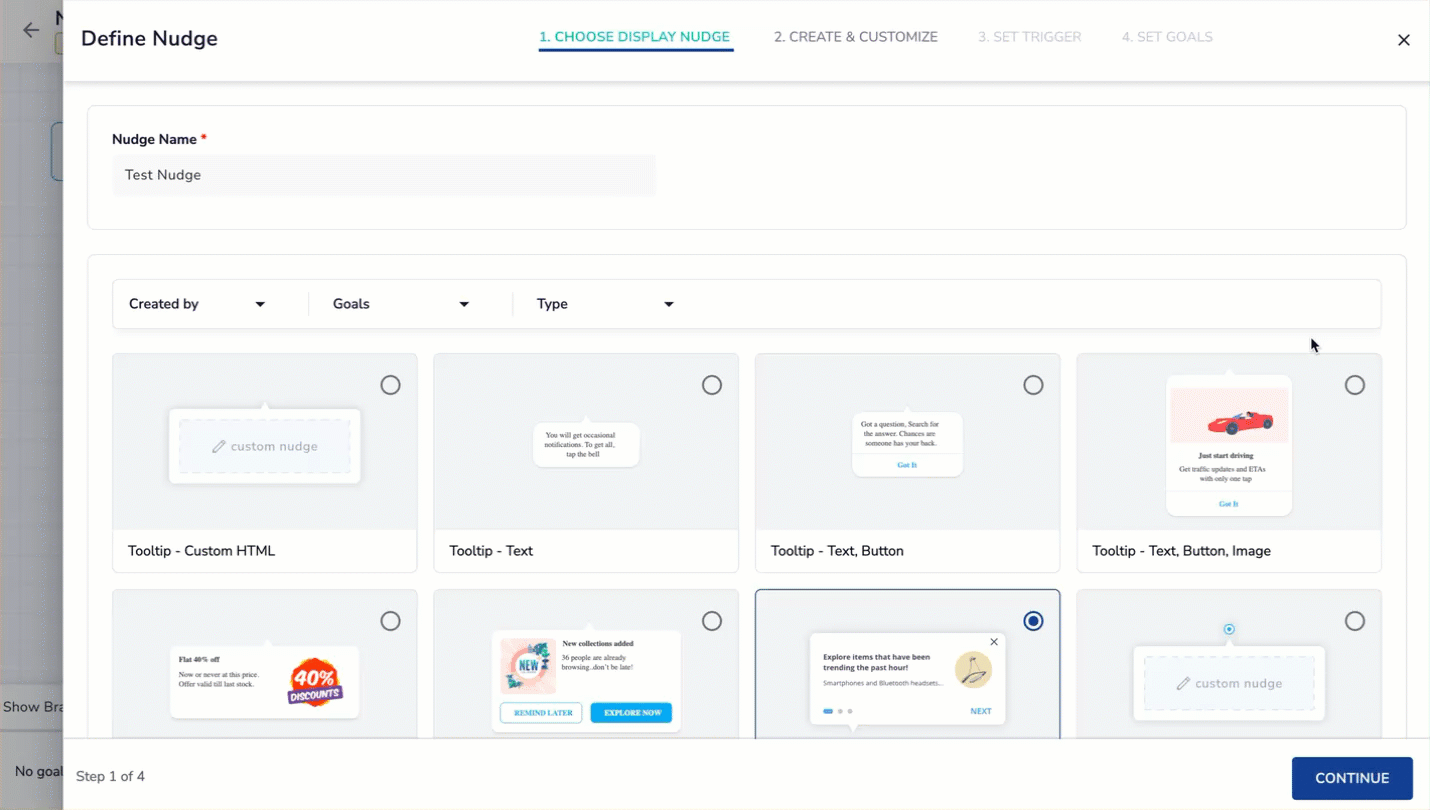
Choose Display Nudge
Give the nudge name and select from the existing nudge gallery. Refer to this document to learn more about the types of nudges and their descriptions.
Create & Customize Nudge
Create & Customize
Steps to Pair Device
Before you start customizing the nudge, you have to pair your mobile device. Follow the steps given to par your device.
-
To pair your device, select a Test group and Test device and click PAIR.
-
Open the app on your mobile and navigate to the page where you want to place the nudge.
-
Once you are on the desired page, click CAPTURE on the PX dashboard. The app page will appear on the dashboard.
-
Select the area where you want to add a nudge and use the editing options on the left to customize the nudge.
Refer to the table to learn the options available for creating and customizing nudges.
| Editor/Feature | Options/ Description |
|---|---|
| Rating Editor | - Star, Heart, Thumbs Up: Click to change the rating icon. - Icon Color: Select from the color palette. - No. of Icons: Select 3 to 7 from the dropdown. |
| Button Editor | - Text Properties: Enter the button text, select the font type, and adjust font size. - Styles: Select between Text Only or Button styles. - Action: Select action (Close prompt, Launch URL, Invoke action). |
| Title Text Editor | - Title Text: Enter the text for the title. - Font: Select the font type. - Font Size: Adjust the size using the slider or input. |
| Animation | Select transition from dropdown. For example, fade, slide, bounce and so on. |
| Nudge Properties | - Position on Screen: Select the nudge’s position, For example, top, bottom, center. - Width, Background, Opacity, Radius, Border Size, Border Color, Padding: Adjust these properties to control the nudge's appearance. - Enable Options: - Show as Modal Bottom Sheet: Check this box to display the nudge as a modal that slides up from the bottom. - Let Users Interact with the App: Allow users to interact with the app while the nudge is visible. - Add Backdrop: Add a semi-transparent overlay behind the nudge. |
| Dismiss Conditions | - Add Close Icon: Add a clickable Close icon on the nudge. - On Click Anywhere Outside Nudge: Allow users to dismiss the nudge by clicking outside it. - On Click of Device Back Button: Enable the device's back button to close the nudge. |
| Input Field Editor | - Write a Review: Enter placeholder text for user input. - Font, Font Size: Customize the appearance of the input field text. - Input Type: Select text, number, or email input. |
| Tooltip Nudge | Hotspot: Add a hotspot to highlight specific areas of the app. |
| FOMO Nudge | Tag Editor: Enter title text. Select the font, size, and style (Hollow or Filled). |
| Alert Nudge | - Nudge Properties: Style the nudge’s appearance. - Animation: Select a transition. - Title Text: Add and style the alert title. - Close Button: Include a button to dismiss the alert. |
| MCQ Nudge | - Multi-choice Editor: Choose between single-select and multi-select options. - Text Properties: Customize font and font size. |
| Image Editor | - Image URL: Add the URL for the image. - Image Width: Adjust the image's display width. |
Set Trigger
| Option | Sub-Option | Description |
|---|---|---|
| Trigger When | Choose the specific conditions or actions that will trigger the nudge. | |
| App Action | Select the app action such as button click or screen view to trigger the nudge. | |
| Nudge Action | Define the action to be taken once the nudge is triggered, such as showing a message or prompting an interaction. | |
| Repeat | Every time | |
| Once every | ||
| Stop | Never | The nudge will never repeat once shown. |
| When | ||
| Change Versions | Define the versions of the app that should display the nudge. | |
| From App Version | Set a minimum app version for the nudge to be shown. | |
| To App Version | Set a maximum app version for the nudge to be shown. |
Set Goals
Set goals to monitor key business metrics and measure the success of your nudge journey. You can set upto 10 goals. Select any event as a goal according to your objectives.
For example, if you want to track the number of customers who have purchased shoes after your campaign was sent. (Event - app_installed, Event count - Total event count).
Once you have added the goals, click DONE. Your nudge is added to the nudge journey. If you want to add more nudges, click Extend Journey according to your desired use case.
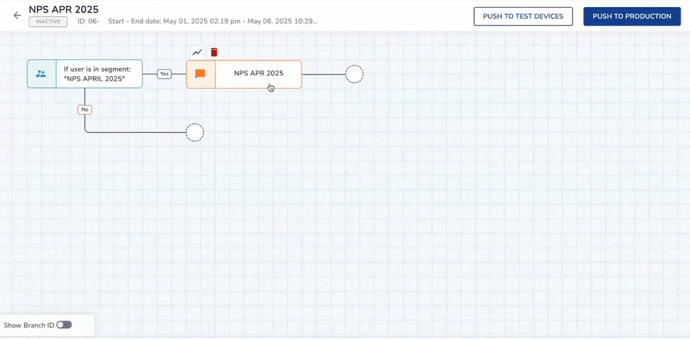
Launch Nudge Journey
Select Push to Test Devices to test configurations on selected devices before deploying them live. Here, you have two options:
- Test Full Journey: Simulate the complete nudge journey on selected devices. This includes testing all conditions like user splits and nudges.
- Test Specific Branches of the Journey: Test specific branches of the user journey. Validate all nudges while skipping user split conditions for targeted testing on selected devices.
Select Push to Production to deploy the nudge journey live to all users.
Points to Remember
- All active tests will be discarded.
- The changes will be deployed to all the production devices.
Updated about 1 month ago