
AMP: Code Editor
Learn to create AMP email using our custom HTML editor.
Customize your AMP email with HTML code for enhanced control and unique branding. Use the Code Editor to create messages that perfectly match your brand and seamlessly engage your app users.
The following features are supported with HTML in AMP email:
- Use HTML templates to display messages within your app.
- Support for both Landscape and Portrait modes in AMP email campaigns.
- Directly paste your HTML code when creating AMP email campaigns.
In the code editor, you can create HTML AMP email templates and specify fallback content for non AMP supported clients.
- AMP Fallback: This version is used when an email client does not support AMP content. It typically includes a simpler, static version of your email that retains the core message and functionality.
- HTML: This email format is supported across all email clients. HTML versions of your AMP emails ensure that users who cannot view AMP content still receive a well-formatted and functional email.
Prerequisites for Creating Template with Code Editor
Several prerequisites must be followed when creating an AMP email template with code editor to ensure an interactive user experience. These include using specific classes, grouping elements, validations, and multi-step forms.
- Classes
Use predefined class names to detect label and input fields and those already used for styling. These class names must not conflict with existing styling classes.
ExampleLabel Element => Class: nc-question
Input / Select / Textarea Element => Class: nc-answer
Applying these classes is crucial for validations, mapping, and storing responses. The application does not validate these classes; you must ensure they are correctly added to the desired fields.
- Grouping
Group every input element that needs to be tracked with a label element using the id and for attributes. Validations ensure correct grouping.
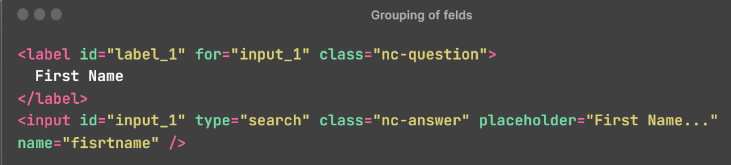
The label's attribute value should match the input's id attribute for correct grouping.
Examplelabel.for ⇔ input.id
You can also nest input elements inside label elements. If there is text inside the label, it will be used for mapping. If no text is found, the value of the label element will be used for mapping.
- Validations
Ensuring proper validation is crucial for the smooth functioning and data integrity of AMP email templates. Here are the validation requirements.
- Form Element: Each form must have a unique ID if there are multiple forms. The application validates this.
- Label Element: If nc-question is applied, the id and for attributes are required for label elements. The application validates this.
- Input / Select / Textarea Element: The id and name attributes are mandatory for input elements if nc-answer is applied. The application validates this. The name attribute must comply with W3C standards, starting with a letter or underscore, followed by alphanumeric characters, underscores, or hyphens.
- Generic Validations
- Ensure the name attribute is unique within the form.
- Ensure the id attribute is unique within the template.
- Ensure the id and name attributes are not repeated in multistep forms.
- Group every input element that needs to be tracked with a label element. The label tag is mandatory but can be hidden.
- Multi-Step Forms
For multi-step forms, group fields using matching data-multistep attribute values for each step. Forms with the same values are grouped together, while different values create separate mapping objects.
To recognize steps in multi-step forms, include additional data attributes like data-curstep=1 (indicating the step number) and data-totalsteps=3 (indicating the total number of steps).
If you do not want to track a form (multi-step or normal), add data-no_tracking=true to the form tag to exclude it from tracking.
Create AMP with Code Editor
To create an AMP email campaign using Code editor, follow these steps:
- Select Create a blank canvas when you create your campaign.
- Select the Code Editor option to create the content for your campaign.
- Go to the Code Editor section on the left pane and add your HTML code in the box. Then, add your code to the right pane box and preview the template.
Code Editor to create AMP Email
HTML Fallback for AMP Emails
Netcore CE's email system implements a crucial AMP Fallback feature to guarantee that all recipients can view the content, regardless of their email client's capabilities or the email's age. This fallback system addresses several key scenarios:
- AMP Email Expiration
Scenario: AMP emails expire after 30 days.
Fallback: If the email is opened after the 30-day expiration period, the recipient will see the HTML (or plain text) fallback.
- Non-Supporting Email Providers
Scenario: Some email providers do not support AMP content.
Fallback: Recipients using these providers will automatically see the HTML fallback.
- Forwarded Emails
Scenario: When an AMP email is forwarded to another recipient.
Fallback: The forwarded email will display only the HTML fallback, as AMP content does not render in forwarded emails.
Sample AMP Email HTML
Creating an AMP email template with HTML code involves following specific parameters to ensure compatibility and functionality. This sample AMP email HTML guide provides a clear structure for building dynamic and interactive email experiences.
<!doctype html>
<html ⚡4email data-css-strict>
<head>
  <meta charset="utf-8">
  <script async src="https://cdn.ampproject.org/v0.js"></script>
  <style amp4email-boilerplate>body{visibility:hidden}</style>
</head>
<body>
  Hello, AMP4EMAIL world.
</body>
</html>
Create Fallback with Code Editor
To create fallback content using the Code editor, follow these steps:
- Select Create a blank canvas when you create your campaign.
- Select the Code Editor option to create the content for your campaign.
- Go to the Code Editor section on the left pane and select Fallback. Add your code to the right pane box, and preview the template.
Fallback for non AMP supported users
- When your template is ready, using your desired elements and settings, click the Next Step button > Save & Preview
- Review the details of your campaign one final time. If everything looks good, click Save & Publish to send the campaign. Refer to Save & Publish your email campaign.
Updated about 1 month ago