Setup Dashboard
Learn how to set up your Netcore CE dashboard.
Overview
The Netcore CE dashboard is your central hub for managing and optimizing your marketing efforts. It is an AI-powered growth marketing dashboard that helps brands analyze and engage to boost conversions on mobile apps and websites. This dashboard lets Product Managers and Marketers conduct detailed analyses and take immediate action to create personalized conversations across all engagement tools.
You can do the following things with the Netcore CE dashboard:
- Monitor Campaign Performance: View real-time data and gain insights into your campaigns' performance. Track key metrics, analyze trends, and make data-driven decisions to boost your marketing results.
- Create and Analyze Campaigns: Create Campaigns with messaging channels. From email and SMS to web push and in-app messages, you can send campaigns with just a few clicks.
- Personalization: Use advanced segmentation and targeting features to engage your audience with personalized content.
- Automate Workflows with Journeys: Streamline your marketing processes by creating Journeys. Set up triggers and workflows to ensure timely and relevant interactions with your audience.
- Generate Reports: Access detailed reports and Analytics to evaluate your campaigns. Customize your reports to focus on the metrics that matter most to your business.
Important Points to Remember
- In your account configuration, you can set the Timemap to schedule your campaigns according to the specified timezone. This ensures your messages are sent at optimal times based on your audience's location.
- Select the appropriate industry category for your campaigns from available options like, Creative Services/Agency, Daily Deals/E-Coupons, Education and Training, eCommerce, and so on. To set up your Industry:
- Navigate to Profile > User Profile > Industry.
- Select your relevant industry from the dropdown menu and click Save.
Here are two key points to help you manage your email deliverability:
- SPAM Score: This score rates your emails' likelihood of landing in the recipient’s inbox. A higher SPAM Score indicates a greater chance of being flagged as spam. To improve deliverability, check your spam score before sending it and aim for a lower rating.
- Use Google Postmaster for Email Reputation: If Gmail users frequently mark your emails as spam, it impacts your overall sender reputation with Gmail. To track these spam complaints, use Google Postmaster Tools. This tool helps you measure your email reputation, specifically within Gmail. By monitoring this data, you can take action to improve your email deliverability and maintain a positive reputation.
Assets
Assets help you integrate and manage various features for your website and application. They include:
Set Up App
Set up your app from Settings > Apps. For detailed steps, refer to Setup Android App and Setup iOS App.
Set Up Website
You can set up your website from Settings > Websites. For detailed steps, refer to setup website.
Integration
Integrate your data with the Netcore CE dashboard using options that suit your needs. Choose to update data in real time, upload files manually, or connect your cloud storage. Netcore offers solutions for seamless data integration. Here are the different ways to integrate your data.
| Integration Method | Description |
|---|---|
| API Integration | Allows you to send contact data directly from your system to Netcore for real-time updates and automation. |
| SDK Integration | Allows you to embed Netcore’s features into your custom applications using provided SDKs, enabling you to manage and push contact data directly from your app. |
| Manual Upload | Allows you to upload contact lists and event data through the Netcore CE dashboard. This method involves preparing and uploading data files directly via the dashboard. |
| Cloud Storage Platforms | Allows you to manage and store contact data in cloud platforms like S3, then connect this storage to Netcore for data transfer. |
Integrate SDK
To integrate an SDK into your app or website, add its code to your existing codebase. The table provides information about integrating various SDKs.
Important Update
The Smartech Web SDK now uses AES-256 encryption to secure user data and protect sensitive information.
| Integration | Description | Guide |
|---|---|---|
| Website | To integrate your website, embed the Netcore SDK into your website's code. This is crucial for tracking user behavior, capturing events, and personalizing messages. | Website Integration Guide |
| Android App | Implement the Android SDK by adding it to your project using Gradle. Initialize the SDK in your main activity or application class. This allows features like Web push notifications and Web messages. | Android SDK Integration Guide |
| iOS App | Install the Netcore iOS SDK using CocoaPods or manually add the SDK to your Xcode project. Initialize the SDK in the AppDelegate file to start tracking events and users. | iOS SDK Integration Guide |
API
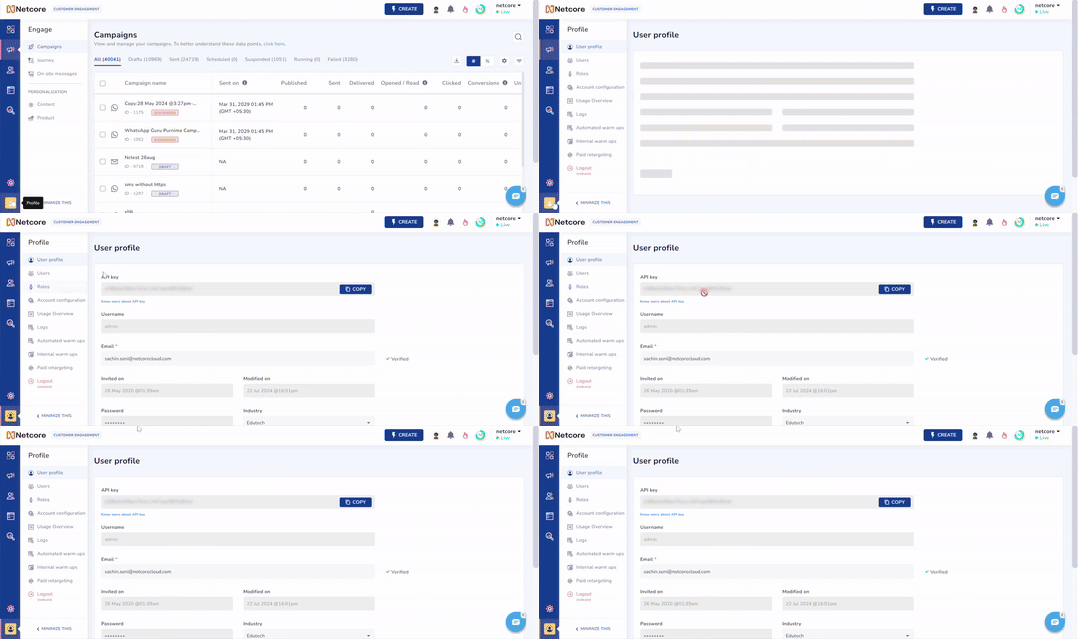
API Key and Where to Get It: An API key is a unique code that authenticates your API calls and identifies your application or user. An API key is assigned to your account during the onboarding process. To locate your API key, follow the given steps:
- Log in to the Netcore CE dashboard.
- Navigate to Profile > User Profile. Locate the API key on this screen.

Unique API Key for your profile
Use the Add New Contact API to add individual contacts or the Bulk API to upload multiple existing contacts into Netcore CE. Refer here to learn more about additional APIs. Refer to Technology Partners to upload your data to third-party platforms such as Amazon S3 or Google Cloud Storage.
Permissions and Roles
Role Based Access Control (RBAC) for account administrators allows you to assign specific roles to your team members. To enable RBAC, contact [email protected] or your account manager to activate it for your account. After activation, you can configure RBAC in your platform's settings.
Set Up User Roles
As you start using the Netcore CE dashboard, you must assign permissions to your team. Grant your team the necessary permissions directly. Initially, users are given default roles. Admins stay admins, makers and checkers keep their roles, but other users are assigned the admin role by default.
For details on each permission, refer to the table to know the predefined roles and permissions.
| Role | Description |
|---|---|
| Admin | Manages access and permissions across all modules. |
| Creator | Creates campaigns, views dashboards, and analytics. |
| Maker | Sends campaigns for approval, publishes post-approval, and views dashboards. |
| Checker | Approves or rejects campaigns and accesses dashboards. |
| Analyst | View-only access to all modules; default role for invited users. |
Campaigns
To create Campaigns in Netcore CE, it is important to understand the different types available. The table below defines the key campaign types in Netcore - Regular, A/B Test, and Split Test.
| Campaign Type | Definition | Use Case |
|---|---|---|
| Regular Campaign | A Regular Campaign sends the same message to your entire audience at once. This is the most common type of campaign. | Use when you want to announce a new product launch to all your subscribers. |
| A/B Test | An A/B Campaign tests two versions of the same message to see which performs better. The best-performing version is then sent to the rest of your audience. | Use when you are unsure if a catchy headline or a detailed one will generate more clicks. |
| Split Test | A Split Test Campaign divides your audience into groups, sending different message variations to each group to compare their performance. Unlike the A/B test, all variations are sent at the same time. | Use when you want to test different email designs to see which layout gets the most engagement. |
Messaging Tools
Messaging tools are the various channels on the Netcore CE dashboard that you can use to create and run campaigns. These tools enable you to deliver personalized, timely, and relevant messages directly to your users across multiple platforms.
Refer to the table to learn about each messaging channel available on the Netcore CE dashboard.
| Messaging Tools | Description |
|---|---|
| Create, send, and track personalized email campaigns to engage with your users directly in their inboxes. | |
| SMS | Deliver messages via SMS to reach users instantly on their mobile devices. |
| App Push | Create and send app push notifications with rich media content to drive user engagement - with no code. |
| Web Push | Reach users with notifications on their web browsers, even when they’re not on your website. |
| Engage users through WhatsApp with rich, interactive messages that support images, links, and buttons. | |
| RCS | Deliver rich multimedia messages with read receipts and interactive features via RCS (Rich Communication Services) for Android users. |
| Line Channel | Communicate with users on Line, a popular messaging app, using rich media and interactive features. |
| Send personalized messages directly to users’ Facebook Messenger, making it easy to interact and engage. | |
| Viber | Reach users on Viber with personalized messages, including text, images, and rich media options. |
| Zalo | Engage with users on Zalo, a widely-used messaging app in Vietnam, with interactive and multimedia messages. |
| In-app Message | Display targeted messages within your app to engage users at key moments during their app usage. |
| Web Message | Show targeted pop-ups or banners on your website to capture attention and drive user actions while they browse. |
Test mode
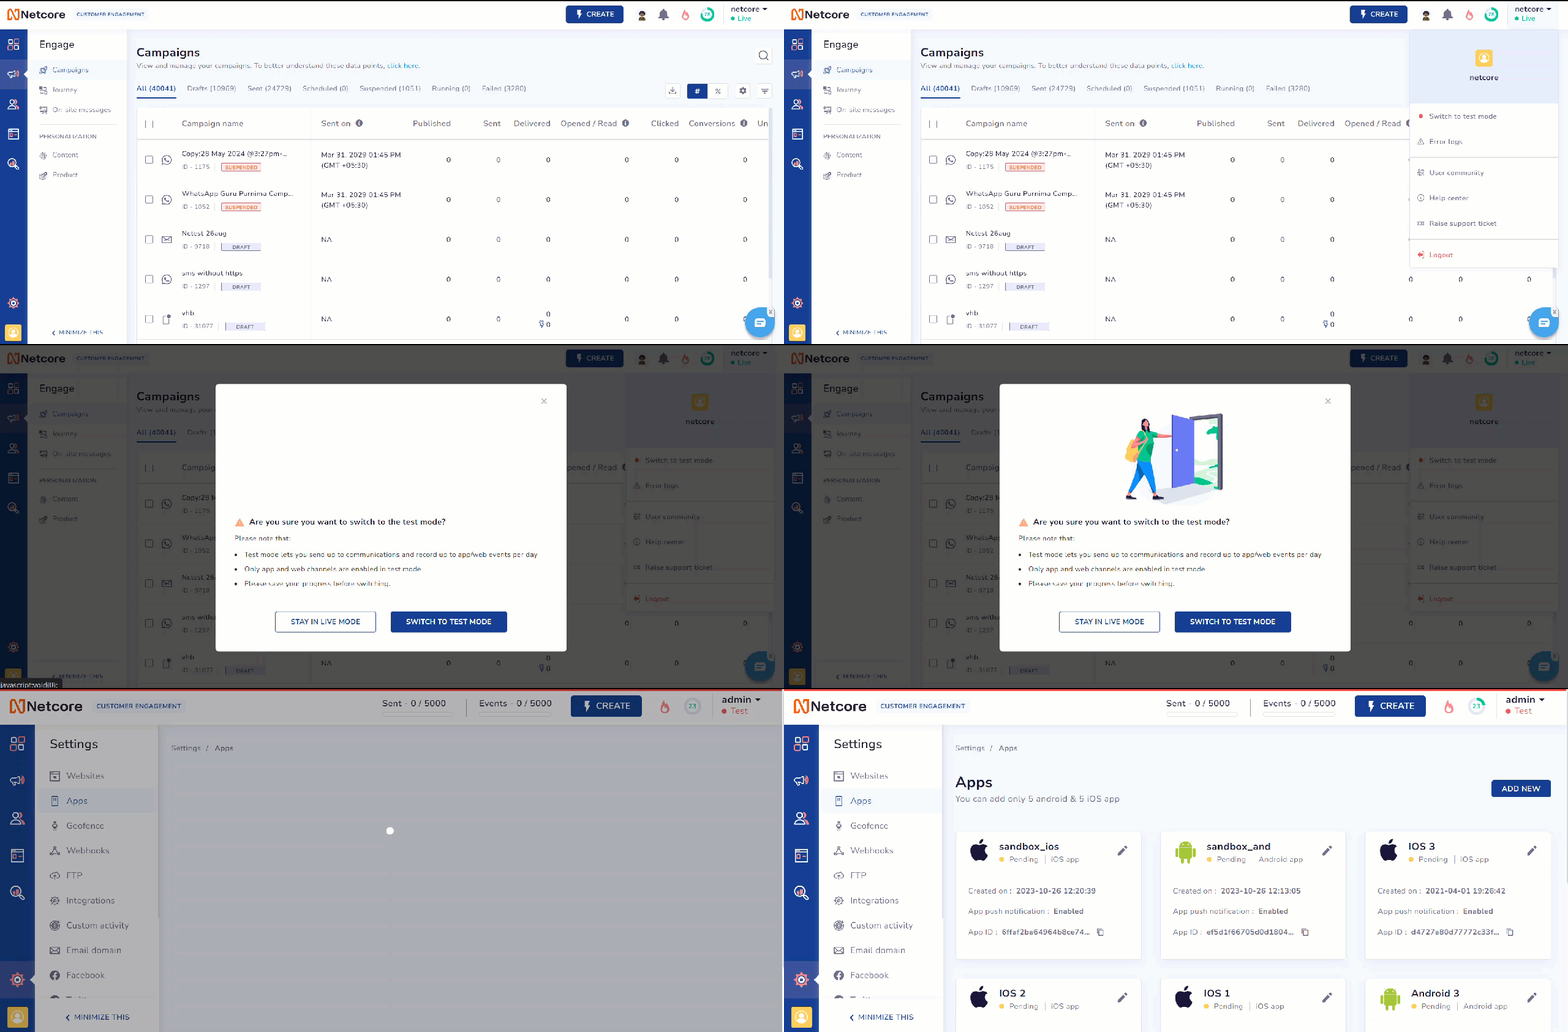
Once your dashboard is set up, you can use it immediately. You can also use the Test Mode first. It lets you test web/app integrations, Webhooks, and campaigns without affecting your live data.
To enable test mode, follow these steps:
- On the Netcore CE dashboard, click your profile name in the top-right corner.
- Select Switch to test mode. Your test mode is now enabled.

Test Mode on Netcore CE dashboard
For detailed information and limitations of Test Mode, refer to the Test Mode section.
You can now create your first campaign on the Netcore CE dashboard. To explore more features, visit our core concepts page.
Updated about 1 year ago
