
Create In-App message
Learn how to create an In-App message using the Netcore CE dashboard.
Overview
In-app messages are triggered when a user interacts with your app. These messages allow you to engage your users at different times throughout the customer journey. With the help of the Netcore CE dashboard, you can easily create and enhance your In-app message campaigns. Discover the prerequisites, a step-by-step guide to create an In-app message, and detailed explanations for each section here.
PrerequisitesIntegrate Netcore SDK in your application. Refer here to integrate App SDK into your application
Steps to Create an In-app Message
There are six steps to create an In-app message campaign, and they are:
- Click the Create button on the dashboard homepage.
- Select Engage with users > In-app Message under Onsite.
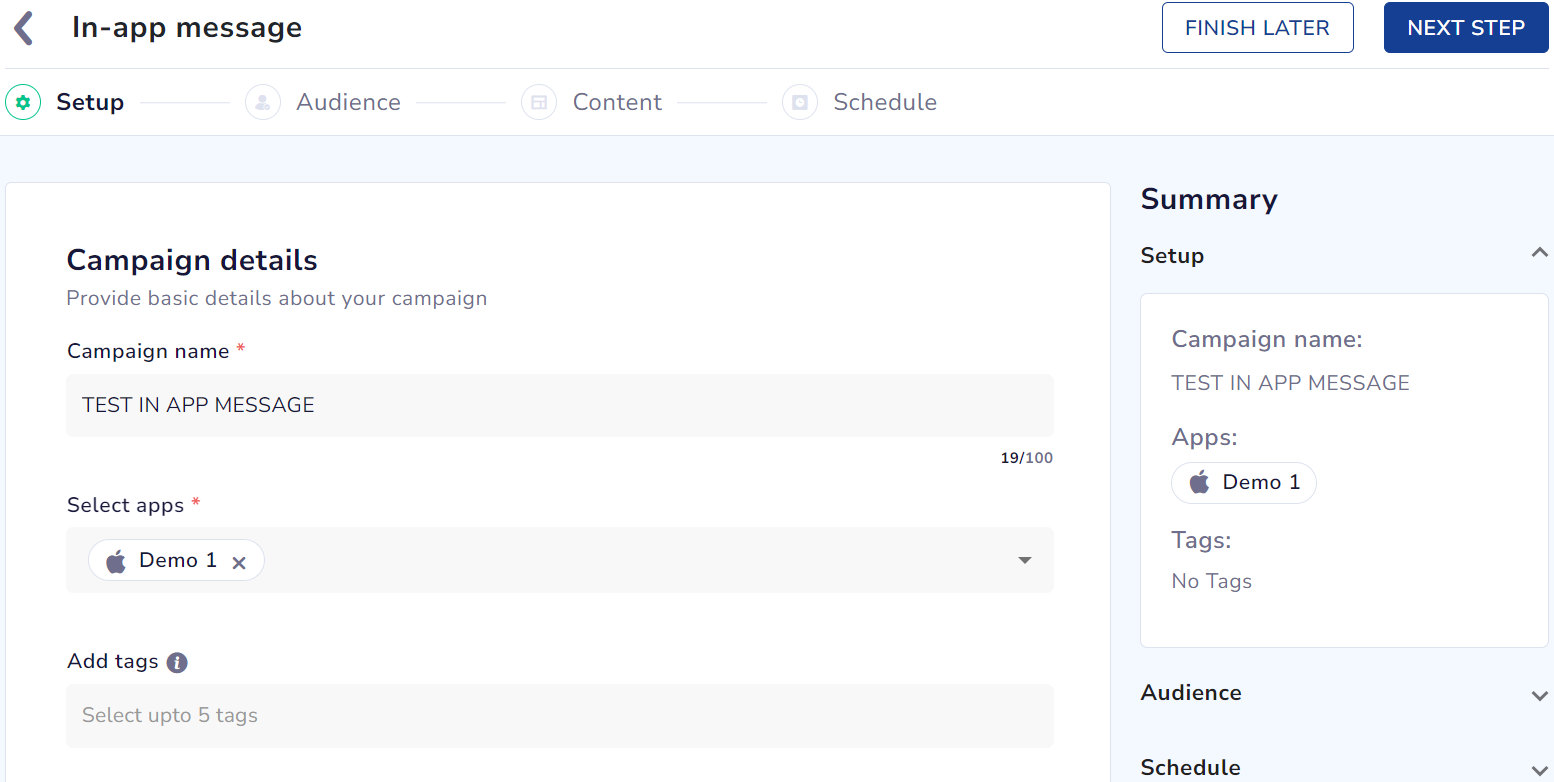
Create an In-App Message
- Setup: Add the campaign details here.
Setup
Refer to the table below for the sections under Setup.
| Sections | Description |
|---|---|
| Campaign Name | Enter a unique name for this in-app message campaign. |
| Select apps | Select the app(s) where this message will appear. |
| Add tags | Add relevant tags to organize and categorize this campaign. You can select up to 5 tags. |
Fill in all the required sections and proceed.
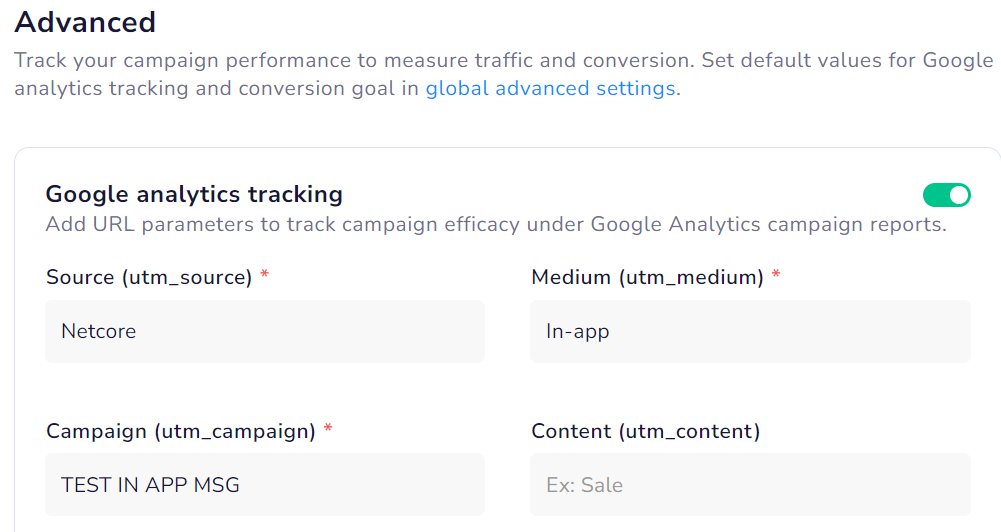
The Advanced details have the following features:
Google Analytics Tracking
Enable tracking to monitor campaign performance via Google Analytics.
Google Analytics Tracking
GA Tracking Guidelines
- Ensure you're using Netcore Android SDK v3.5.0 and Netcore iOS SDK v3.5.0 for GA tracking.
- Netcore provides personalized values for {CHANNEL} in utm_medium and {CAMPAIGN_NAME} in utm_campaign.
- Personalized values are not supported for utm_source and utm_content.
- Character validation allows only: a-z A-Z 0-9 - _ . @ : ' / .
- UTM values auto-populate based on global settings once enabled.
Example: Redirection URL with utm_source = Smartech, utm_medium = {CHANNEL}, utm_campaign = {CAMPAIGN_NAME}, utm_content blank: https://domain.com/collections/payday?utm_source=Smartech&utm_medium=in-app&utm_campaign=25Jan_TRIWellSale.
In the Advanced settings section, you can configure the fields to track campaign performance.
- Enable the Custom key-value: It allows you to attach extra data as key–value pairs to the push notification payload
- Enable the UTM tracking to add UTM Parameters to track campaign efficacy under Google Analytics' campaign reports. Refer to the table below for details on UTM Parameters.
| UTM Parameter | Description | Default Campaign Value |
|---|---|---|
| utm_source | The source identifies the platform or website from which the traffic originates, such as Google, Facebook, or the newsletter. | Netcore |
| utm_medium | The medium specifies the marketing medium used to deliver the traffic. | {CHANNEL} |
| utm_campaign | The campaign refers to the specific marketing campaign name or identifier. For example, summer_sale, holiday_promo, or new_product_launch. | {CAMPAIGN_NAME} |
| utm_term | The term is used to identify specific keywords or phrases associated with paid search campaigns. For example, running shoes or discount coupons. | Campaign |
| utm_content | The content helps differentiate between various versions of an ad or link that direct to the same destination. | None |
Important Points to Remember
- The UTM Parameter values defined in Global Advanced Settings appear automatically when you create a new campaign.
- You can edit any of these default values before saving the campaign. This would ONLY affect the campaign settings not the Global Advanced Settings.
- When the landing page URL already contains UTM parameters, the values you enter on the Setup page replace those values.
- If you leave a UTM field empty on the Setup page, and that parameter exists in the URL, the URL value is kept.
- UTM parameters gets added only to landing page URLs and action button URLs and not to non-URL actions like Dismiss, Copy Code, or Remind Me Later.
Set Conversion Goal
Refer to the table below to set up the conversion goal on the Setup page.
| Advanced Fields | Description |
|---|---|
| Set Conversion Goal | Add conversion goals to monitor key business metrics and measure the success of your app push campaign. You can track one conversion goal per campaign. Select any activity as a conversion goal activity according to your objectives. For example, if you want to track the number of customers who have purchased shoes after your campaign was sent. (Event: Product Search, Product: Shoes). This is a mandatory field. |
| Payload parameters | You can define criteria for the conversion event payload. Up to five parameters can be added for customisation. For example, specify a purchase event when the product price exceeds 10,000. |
| Conversion Window | Define the conversion window to link user actions to campaigns in a specific timeframe. |
| Revenue Parameter | Select this option to assign a value to each successful action to track financial impact. This is a mandatory field. |
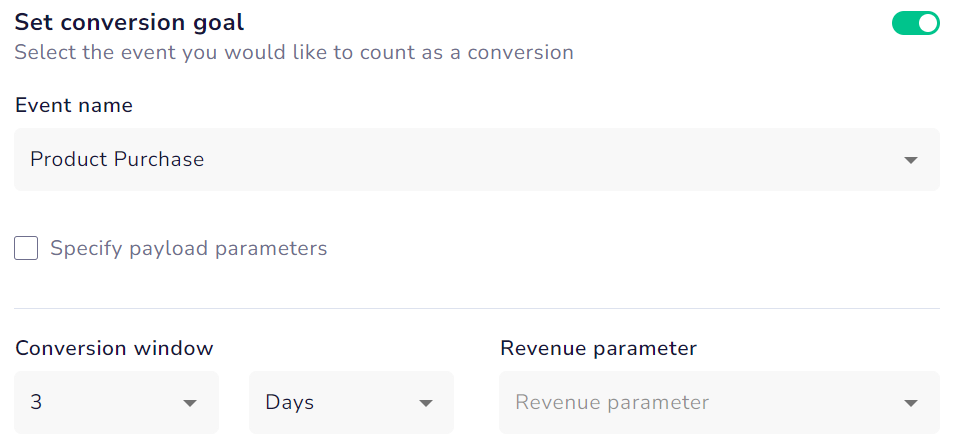
Set Conversion Goal
Control group
These are the number of users you intentionally exclude when sending campaign content. They serve as a reference point for evaluating the effectiveness of your campaign.
NOTESetting up a conversion goal is mandatory when using the Control Group feature.
To exclude users in the control groups, do the following:
- Toggle on the control group to exclude the users in the control group from the campaign's target segment.
- Specify the percentage of users you want to exclude from the campaign using the scroller/ slider.
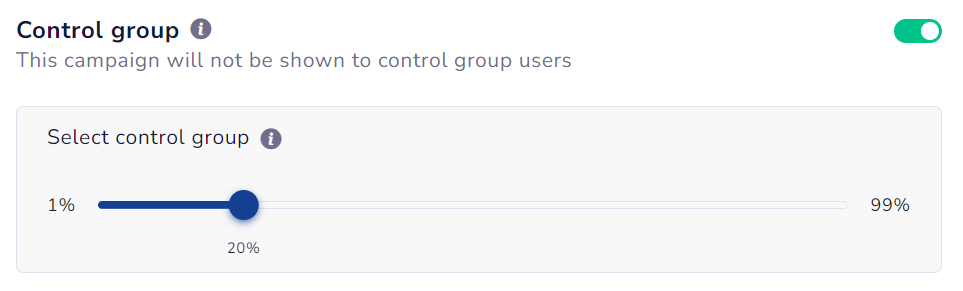
Control Group
- Audience: Define the target audience for the campaign.
Audience
The Audience section allows you to select who to target your in-app messages. It has the following sections:
- Trigger
- Filters
- Select Contacts
- Exclude Contacts
A Trigger determines when to display the in-app message based on specific user actions or conditions. Trigger events in this section activate in-app message displays to users. When a user performs any defined event, the message appears. You can add up to five triggers in a campaign. Each trigger should have a distinct event.
Refer to the table below to learn the triggers available when creating an in-app message.
Set a trigger event as follows:
- Event: Choose from the dropdown menu (e.g., Add to Wishlist, App Launch).
- Geofence Events Support: Choose a User Exited, User Entered, or User Dwelled geofence. Select geofence criteria like name or group as payload parameters. You can also select criteria such as geofence name and geofence group as payload parameters. For geofence setup instructions, refer to this document.
Refer to the table for descriptions of geofence events.
| Geofence | Description |
|---|---|
| User Exited | The user has left the designated geofenced area. |
| User Entered | The user has entered the specified geofenced area. |
| User Dwelled | The user remained within the geofenced area for more than 15 minutes (dwell time). |
- Delay: Introduce a delay (up to 120 seconds) between the triggering event and message display.
- Specify Parameters: Further refine payload parameter criteria for the event.
Add multiple trigger events and delays to display the same in-app message across different app sections.
Minimum SDK version requirementsTo utilize multiple trigger events, update to Netcore Android SDK v3.1.23 and Netcore iOS SDK v3.1.10 or newer.
For delay functionality, update to Netcore Android SDK v3.5.0 and Netcore iOS SDK v3.5.0 or newer. Older SDK versions only use the first added event as the trigger.
Select Contacts
Choose a specific segment or list to define the audience for the in-app message after the trigger event. Pick up to five user segments or lists. Use for targeting based on historical behavior captured by server-side user segments.
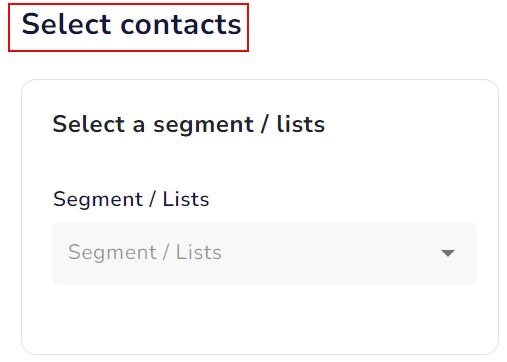
Select the user list/segment to send the campaign to
NoteSelect list/segment from your saved segments because you cannot create a new segment in this section.
Exclude Contacts
After the trigger event, select the list or segment of users to exclude from the in-app campaign. The multi-select dropdown allows you to choose up to 15 lists or segments. Once you have made 15 selections, multi-select will be turned off for additional lists.
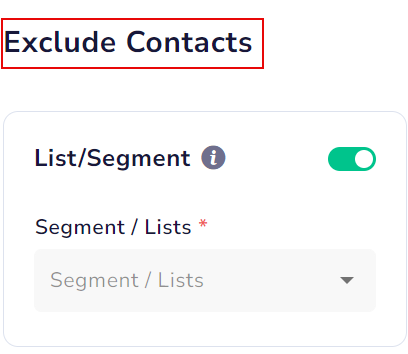
Select the user list/segment to exclude from the campaign.
SDK Requirements for FeaturesList & Segment Selection and Multi-event Conditions: Available on Android SDK v2.2.19 and iOS SDK v2.5.5. Ensure you migrate to the AndroidX library if not already done.
Event Filter Criteria: Only the last 200 events stored locally on the device are considered.
Exclude Contacts Functionality: Available on Android SDK v3.5.0 and iOS SDK v3.5.0 or newer.
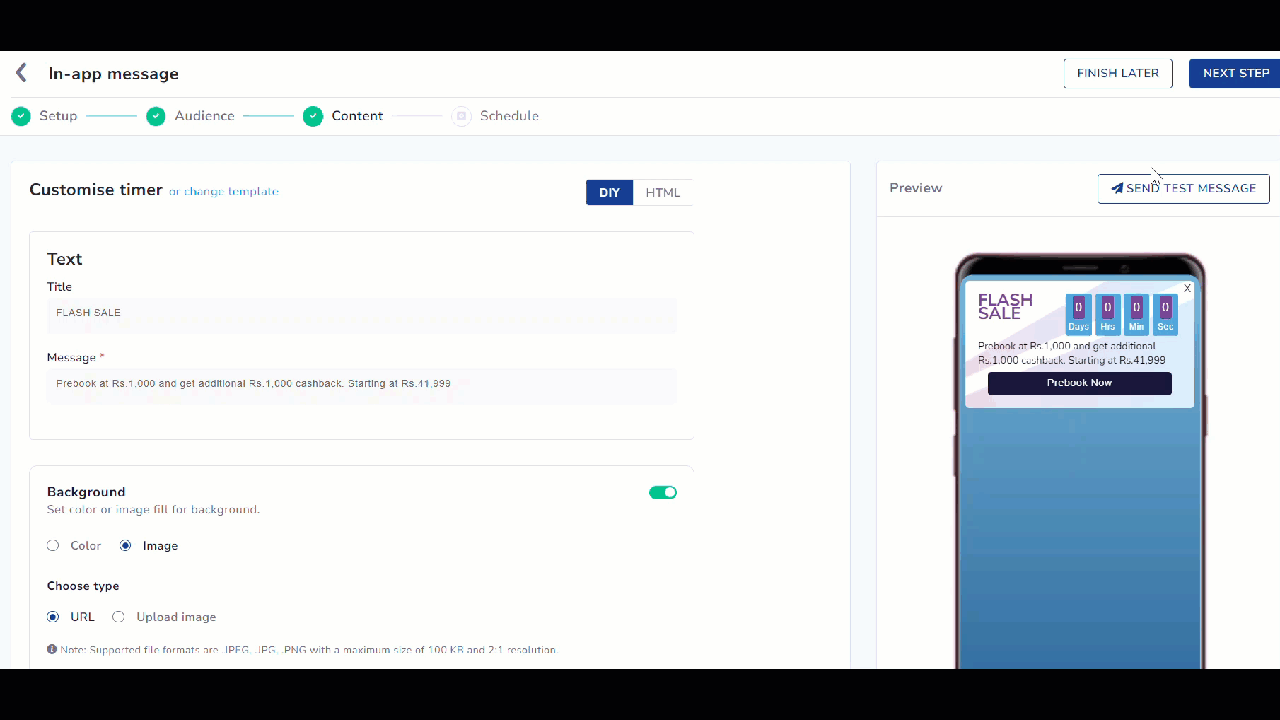
- Content: Define the content of the In-app message to be sent.
Content
After the basic setup and defining the target audience, Content is the section where you can create your template. In this section, you can create your in-app message using various template positions and editing options to make your template stand out.
Refer to the table to learn about the template positions for creating an in-app message.
| Position | Description |
|---|---|
| Sticky Header | A banner message that sticks to the top of the screen. |
| Sticky Footer | A banner message that sticks to the bottom of the screen. |
| Half Interstitial | A message that covers half of the screen, typically centered. |
| Interstitial | A full-screen message appears over the entire screen temporarily. |
| Cover | A message that thoroughly covers the entire screen, requiring user interaction. |
Once you have selected the in-app position, proceed to create the template.
Click Create New under the Select template option. This lists all the templates for the in-app message channel based on the selected layout. You can create a template from scratch with these three options:
- Text only: A message that consists solely of text.
- Image only: A message that includes only an image without any accompanying text.
- Custom HTML
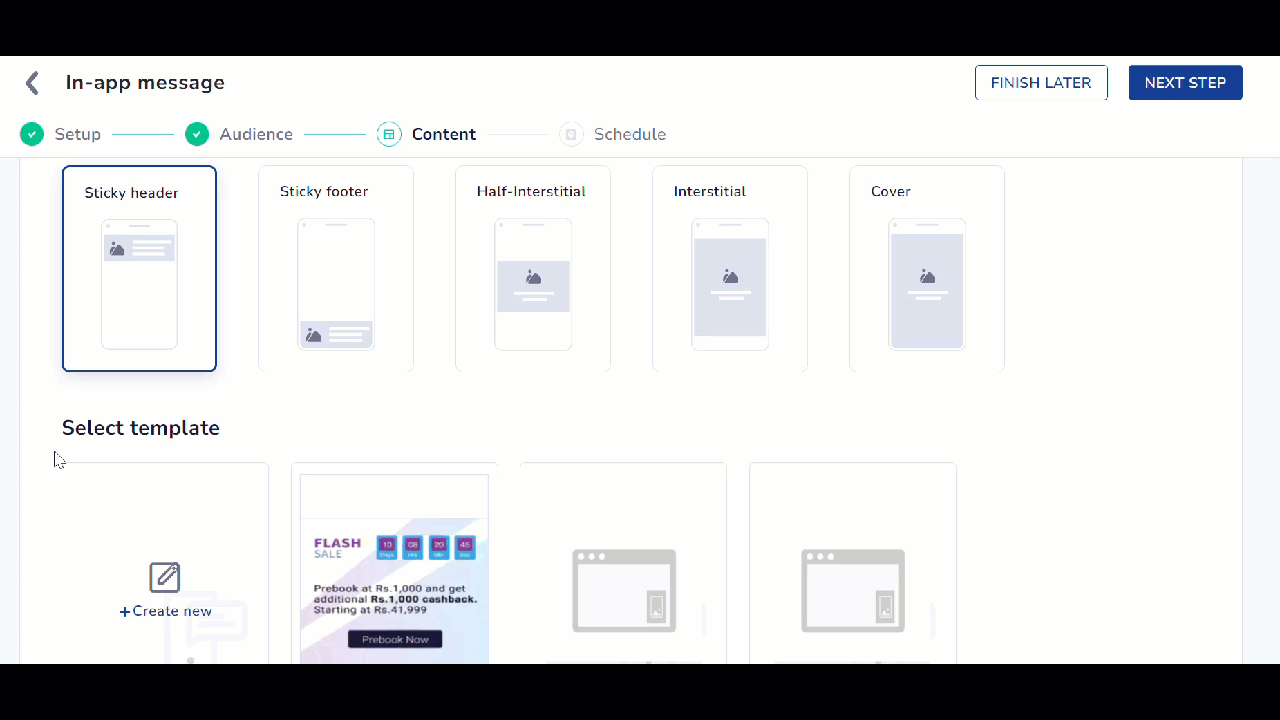
Select your preferred In-app message template.
Refer to the table below, which outlines the various features and their specifications for different types of in-app message templates.
| Template Type | Feature | Sticky Header and Sticky footer | Half Interstitial and Interstitial | Full-screen cover |
|---|---|---|---|---|
| Text only | Character limit | Message: 80 characters | Title: 35 characters Message: 150 characters | Message: 80 characters |
| Text only | Image | NA | NA | NA |
| Text only | Action button | up to 2 buttons, 15 characters | One button, 15 character | up to 2 buttons, 15 characters |
| Text only | Background color or background image | Yes | Yes | Yes |
| Text only | Personalization | Yes | Yes | Yes |
| Image only | Image Format: .jpeg, .jpg, .png or add a URL link | Size: 100 KB Resolution: 2:1 ratio | Half interstitial Interstitial | Size: 500 KB Resolution: 1:2 ratio |
| Image only | Action button | NA | NA | NA |
| Image only | Personalization | Yes | Yes | Yes |
Text-only
Select the Text only option to create the content for your in-app message. As you proceed, you see these options on the left pane and its preview on the right pane.
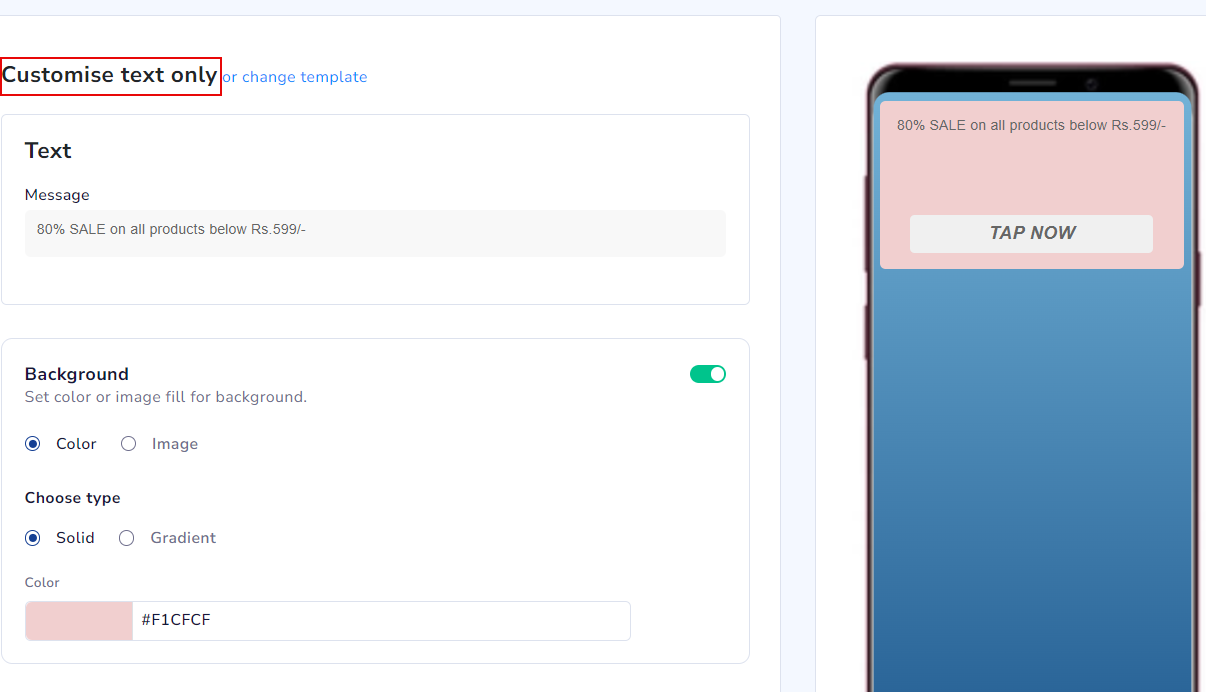
Create an In-app message with Text only
-
Text
- Title: The main heading or headline of your message.
- Message: The detailed text or body of your in-app message.
-
Background
- Color
Solid: Choose a single color for the background.
Gradient: Select a gradient color scheme for a more dynamic background. - Image
URL: Use an image from a web link.
Upload Image: Upload an image from your device.
- Color
-
Action button
- Action title: The text appearing on the action button.
- Call to action: Define what happens when clicking the button. Refer to the table to learn about the actions available here.
Call to action Description Open a URL Directs the user to a specified web address. Send SMS Opens the SMS app with a pre-filled message. Call this number Initiates a phone call to a specified number. Deep Link Redirects to a specific section within the app. Whatsapp Opens a conversation in WhatsApp. Email Opens the email client with a pre-filled email. - Enter URL here: Provide the URL for the action.
NoteThe supported file formats are JPEG, JPG, and PNG, with a maximum size of 100 KB and a2:1 resolution.
Image only
Select the Image only option to create the content for your in-app message. As you proceed, you see these options on the left pane and its preview on the right pane.
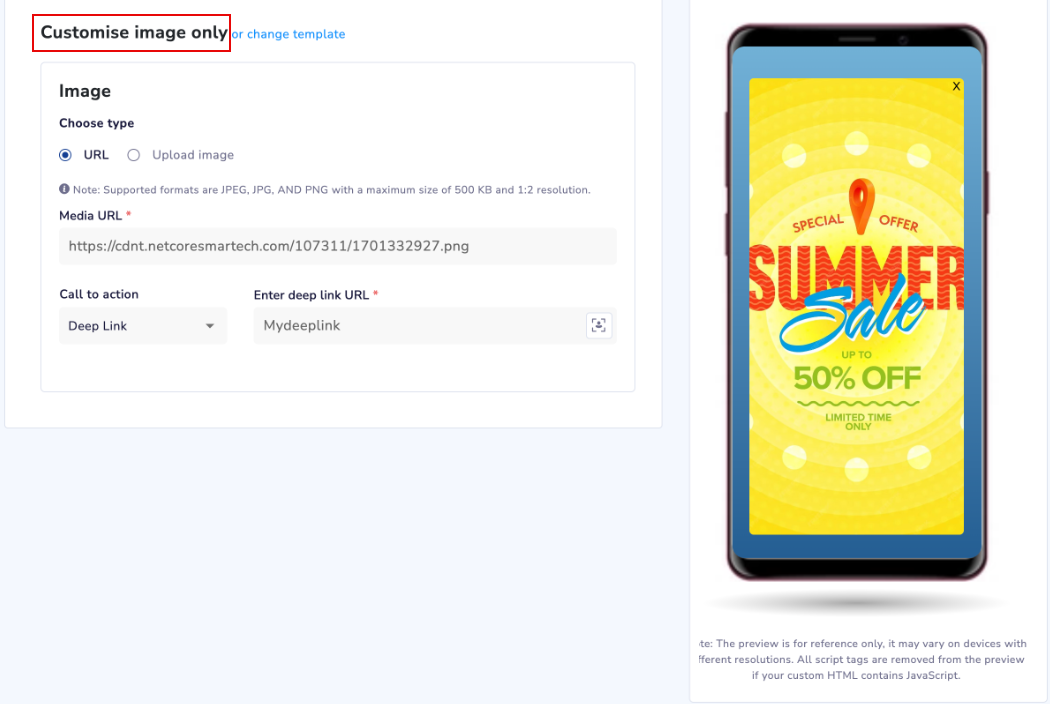
Create an In-app message with Image only template
- Image
- Choose type
URL or Upload Image
- Choose type
Media URL: Add the direct link to the media file or image.
Redirection URL: The URL that users will be taken to when they click on a link.
- Action button
- Action title: The text appearing on the action button.
- Call to action: Define what happens when clicking the button. Refer to the table to learn about the actions available here.
| Call to action | Description |
|---|---|
| Open a URL | Directs the user to a specified web address. |
| Send SMS | Opens the SMS app with a pre-filled message. |
| Call this number | Initiates a phone call to a specified number. |
| Deep Link | Redirects to a specific section within the app. |
| Opens a conversation in WhatsApp. |
Note
- Image size restrictions are recommended for optimal user experience and apply to images uploaded on the Netcore CE dashboard. To use larger images, use the self-hosted image URL feature.
- Personalize in-app messages using event payload parameters to provide a tailored experience for your customers.
- Test Your In-App Message
As you compose your in-app message, preview it in real time. The Send Test Message feature helps you preview the final message that your user will receive. You can view how your In-app messages look on different devices and screen sizes. Make adjustments on the spot to ensure clarity and engagement. This way, your message is consistent, appealing, and effective before you send it out.
Follow the steps below to test your in-app message.
- Click the Send Test Message button on the right pane of the Content screen.
- Choose the device on which you want to preview the in-app message. There is no limit to the number of devices you can select. Refer here to learn how to add a test device.
Test your In-app message
The Reset option clears previously chosen devices. It allows you to select new devices or prevent unintended recipients from receiving test messages.
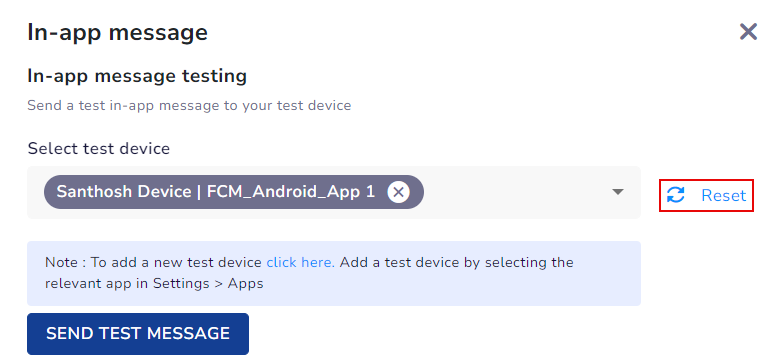
Reset selected test device(s)
- Click Send Test Message to test and view your In-app message.
- Click Done to complete the process.
- Schedule: Define the campaign's delivery time and date.
Schedule
Finish creating and previewing your in-app message, then schedule your campaign.
- Under Start campaign, select Send Now to send immediately or select Send later to send it on your desired date and time.
- Under Campaign frequency, you can control how often a user views your campaign. Under Select the frequency, you have three options.
- Time per session: Number of times an in-app message is shown per session.
- Time per day: Number of times an in-app message is shown in a day.
- Time per campaign: Number of times an in-app message is shown per campaign.
Fill in the required fields according to your preference. Before saving your campaign, you can also select Additional Settings.
- Launch Campaign: Once you have checked the appearance of your entire in-app message, publish it by clicking the Save button.
Updated about 1 month ago