Role Based Access Control
Learn about Role-Based Access Control (RBAC) to manage different access levels for dashboard users.
Overview
Netcore provides Role-Based Access Control (RBAC) to manage team access efficiently. Admins assign specific roles to users, defining what each user can access on the Netcore CE dashboard. RBAC ensures users see only the information relevant to their roles, enhancing security and streamlining user management. This feature improves data protection by limiting access based on job responsibilities.
Invite Users
To access the Netcore CE dashboard, users must receive an invitation and be assigned the relevant access level. Admins can invite new users, define their roles, and manage their permissions through the Invite Users feature. This ensures that only authorized individuals gain access to the dashboard, helping to maintain security and control within the platform.
Important Point
For detailed instructions on inviting users and setting their access levels, refer to the Invite Users section.
Types of Roles
The various roles on the Netcore CE dashboard define the level of access and actions users can perform. This includes managing permissions to create, approve, or analyze campaigns. The table below outlines each user role's responsibilities and permissions within the CE dashboard.
| Role | Description |
|---|---|
| Admin | Manages user access and permissions across all features on the Netcore CE dashboard. |
| Creator | Creates campaigns and views dashboards and analytics. |
| Maker | Submits campaigns for approval, publishes them post-approval, and views dashboards. |
| Checker | Approves or rejects campaigns and views dashboards. |
| Analyst | View-only access to all features; default role for invited users. |
Create Custom Role
The Create Your Custom Role feature lets you set up specific organizational roles. By customizing permissions and settings, you control which tools and features users can access. This helps you manage your dashboard effectively and supports team collaboration.

Create your Custom Role
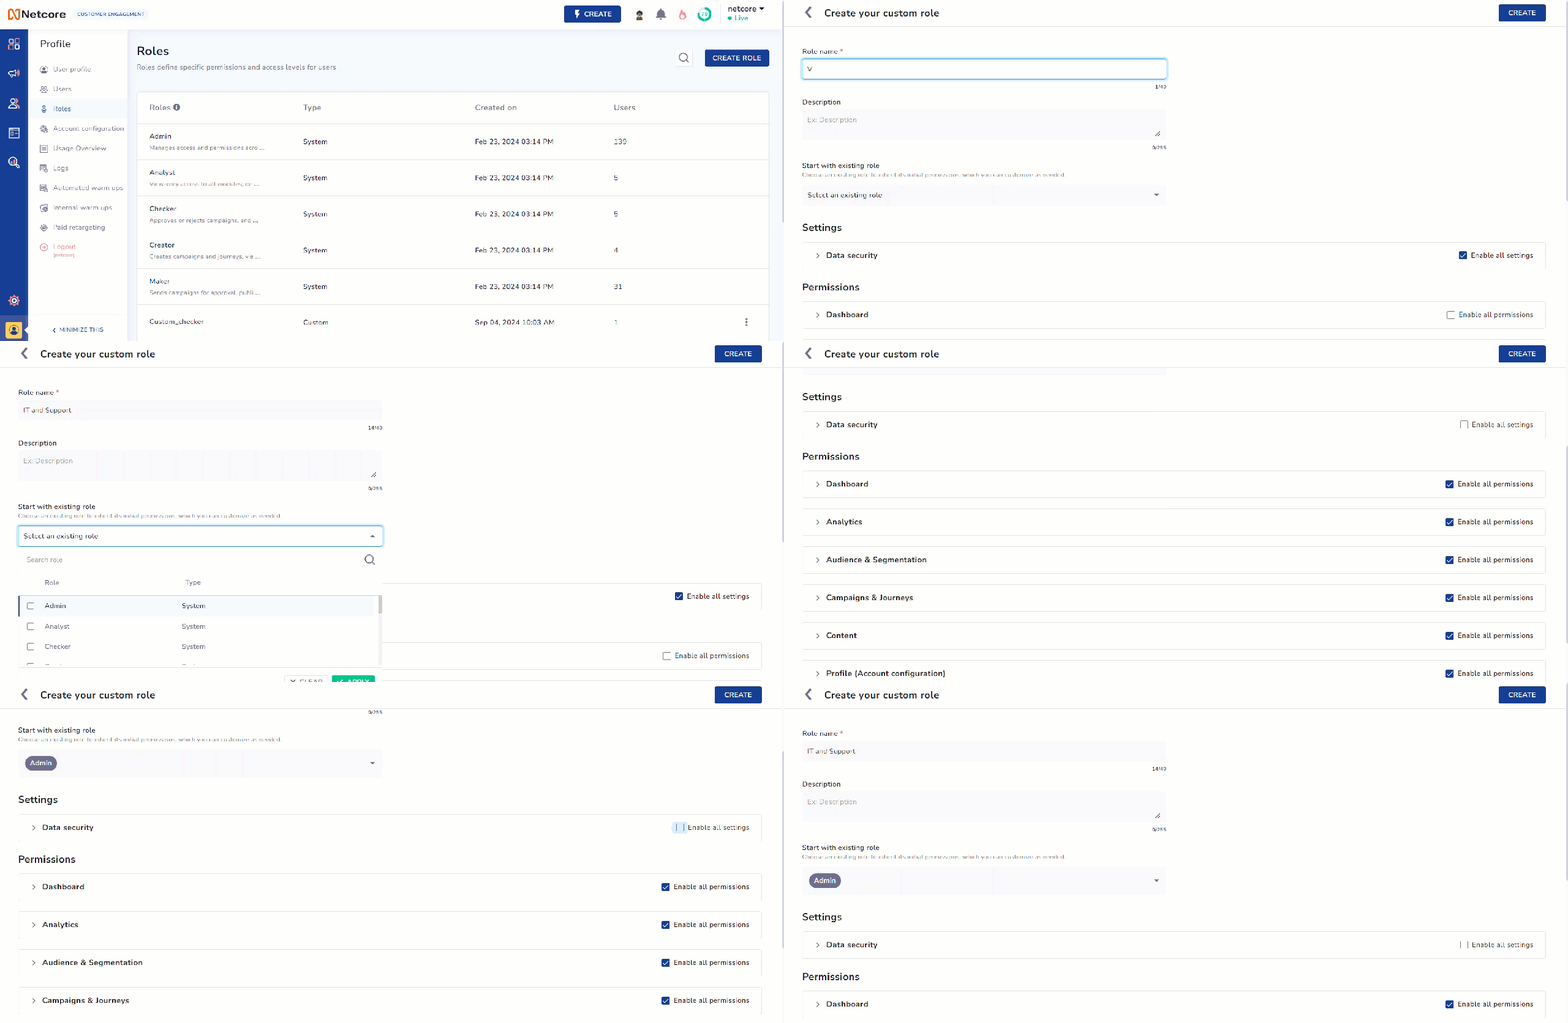
To create a custom role, perform the following steps:
- Navigate to Profile > Roles.
- Click Create role. Check the table below for the fields you can customize when creating a new role.
| Field | Description |
|---|---|
| Role name | Add a name for the custom role for easy identification. |
| Description | Add a brief explanation of the role's purpose and responsibilities. |
| Start with existing role | Select an existing role. Inherit its permissions, which you can further modify as needed. |
| Settings | Allows the role to manage dashboard settings and configurations. Check the box to enable all available settings for this role. |
| Permissions | Allows the role to access specific features or modules on the Netcore CE dashboard. Check the box to enable all permissions for this role. |
- Fill in the required sections and click Create. Your new custom role will be added to your Netcore CE account.
Important Points to Remember
- RBAC (Role-Based Access Control) is not available for certain features due to technical limitations, ongoing updates, or specific design reasons.
- All users will have access to the following: Web Push Campaigns, In-App Campaigns, Web Message Campaigns, Integrations Page, Contact Overview, Email Templates (HTML & AMP), Webhooks
- Admins, Makers, and Checkers will be migrated with their existing permissions.
- Sub admins will be migrated as Admins; create a custom role with specific permissions if a different role is needed.
- All system roles, except Admin, will have masked data for security reasons.
Updated 7 months ago
