Integration checklist - Shopify Plugin
If you're using the Netcore Shopify plugin, make sure you go over the checklist below to validate your integration.
1. When linking a Shopify store to Netcore CE dashboard, the user on Shopify must be a SUPERUSER.
If the credentials entered do not have adequate privileges, an error appears on the Shopify screen. To avoid making such an error, always insist that the user be a super user only.
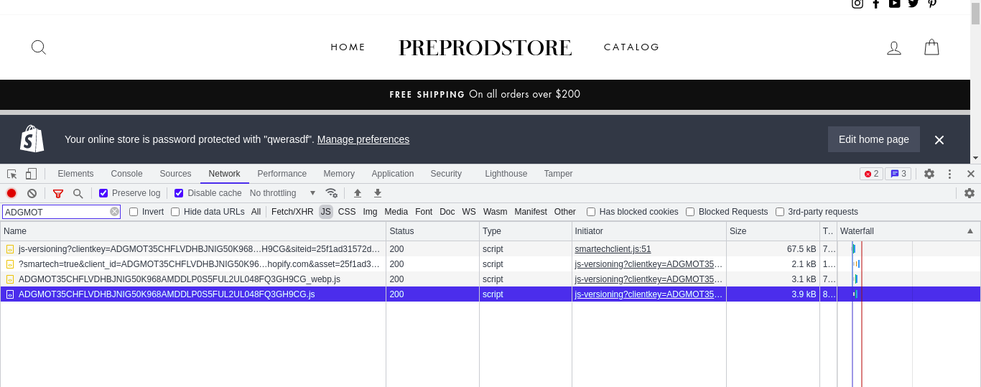
2. tracking id.js should get loaded in network tab (ADGMOT…js)
For enabling web activity events trackingid.js should got loaded in network tab.
Network tab can be seen in chrome browser as
- click on 3 dots seen on top right corner
- go to more tools > Developer Tools

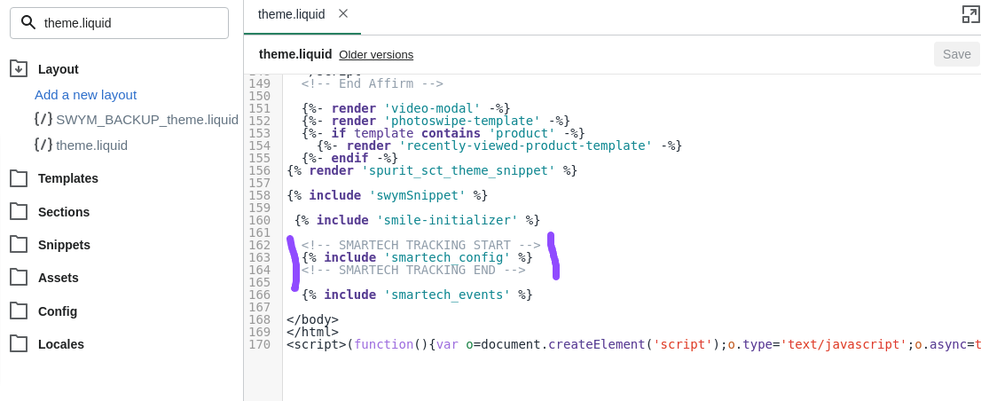
"Tracking id.js" is completely reliant on "smartech_config.liquid," which is injected into "theme.liquid" during the shopify-to-smartechech connection.
In some circumstances, due to the use of a third-party app, "theme.liquid" is not used and instead another liquid file overrides the layout; in this scenario, we must add the following code snippet before the end of the body tag to the active layout liquid file.

3. Network Tab - https://cdnt.netcoresmartech.com/smartech-shopify-v2.js and https://cdnt.netcoresmartech.com/smartechcode.js should get loaded in network tab
If you find above mentioned JS are not getting loaded then there are two possibilities
-
There is some issue while connecting shopify store from CE.
-
Client might have done some optimization and blocked few JS URL to enhance page speed.
4. Examine Shopify's Events
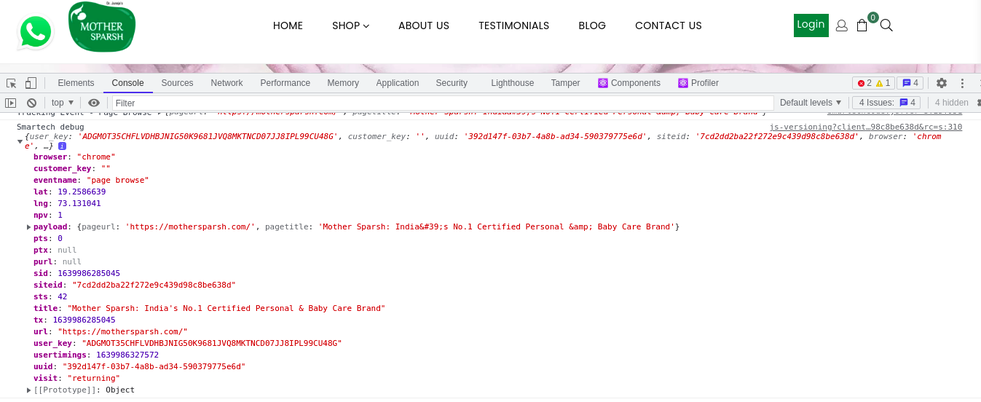
For verifying shopify events, please follow these steps
Run smartech('debug','1') in developer console

| Event | Payload |
|---|---|
| Page Browse | 1. Page URL 2. Page Title |
| Product View | 1. Product Id - prid 2. Product Price 3. Product Name 4. Product Image 5. Product URL 6. Product Type 7. Currency 8. CompareatPrice 9. Brand |
| Product Search | 1. Key Word used 2. Products (Array of Product Id Displayed) |
| Add To Cart & Remove from Cart | 1. Product Id 2. Product Price 3. Product Name 4. Product Image 5. Product URL 6. Product Type 7. Currency 8. Product Quantity 9. Brand 10.Variant 11.Activity Date (TimeStamp) |
| Customer Register | 1. First Name 2. Last Name 3. Email Address 4. Mobile |
| Checkout | 1. Item count 2. Total price 3. Items": "1. : 4. Product Id 5. Name 6. Image 7. Price 8. Product URL 9. Product Type 10.Currency 11.Variant |
| Product Purchase | 1. Item Count 2. Order Number 3. Amount 4. Shipping City 5. Shipping Region 6. Shipping Country 7. Shipping Cost 8. Shipping Address9.Billing Address 10.Shipping Method 11.Discount- Items 7 } [/: - Product Id - Name - Image - Price - Product URL - Product Type - Currency - Variant - Compareatprice |
Events and Payload - Debugging
To know more about the Events and Payloads click here
Step 5 - Verify Purchase event on revenue dashboard
This is the final step of verification, where you must check revenue on the revenue dashboard.
In general, it takes time to reflect revenue counts on the revenue dashboard, but you must ensure that the Product Purchase event and its amount payload option are visible in the dropdown.
There are two scenarios if the Amount payload is not seen against a Product Purchase event.
- The amount payload was not collected
- The payload was caught as a data type other than int or float.
Updated over 1 year ago
