Attributes
View, manage, and create attributes that define the characteristics of your user.
Attributes are the various data points associated with each contact in your database. These can include basic information like names and email addresses, demographic details like age and location, or even behavioral data such as purchase history and engagement levels.
You can create specific groups or segments for targeted marketing content by organizing contacts based on shared attributes.
You can use attributes to create marketing content based on individual preferences, making your communications relevant. Attributes provide the foundation for understanding customer behavior, preferences, and trends, enabling data-driven decision-making.
There are the following types of Attributes:
-
System Attributes: These are predefined attributes provided by Netcore CE. They include commonly used data fields that are essential for most marketing activities. For Example: First Name, Last Name, Email, Gender, and Country.
-
Custom Attributes: These are attributes that you define for your dashboard. Netcore CE does not define it. Custom attributes are the ones that you can define. You can map the attributes in your list to system attributes.
-
Derived Attributes: These attributes are calculated or inferred from existing data points. Derived attributes are typically used to gain deeper insights or to create complex segments. By creating more detailed categories, you can better understand your audience, enabling advanced segmentation and personalization. For Example, Age Group, Engagement Score.
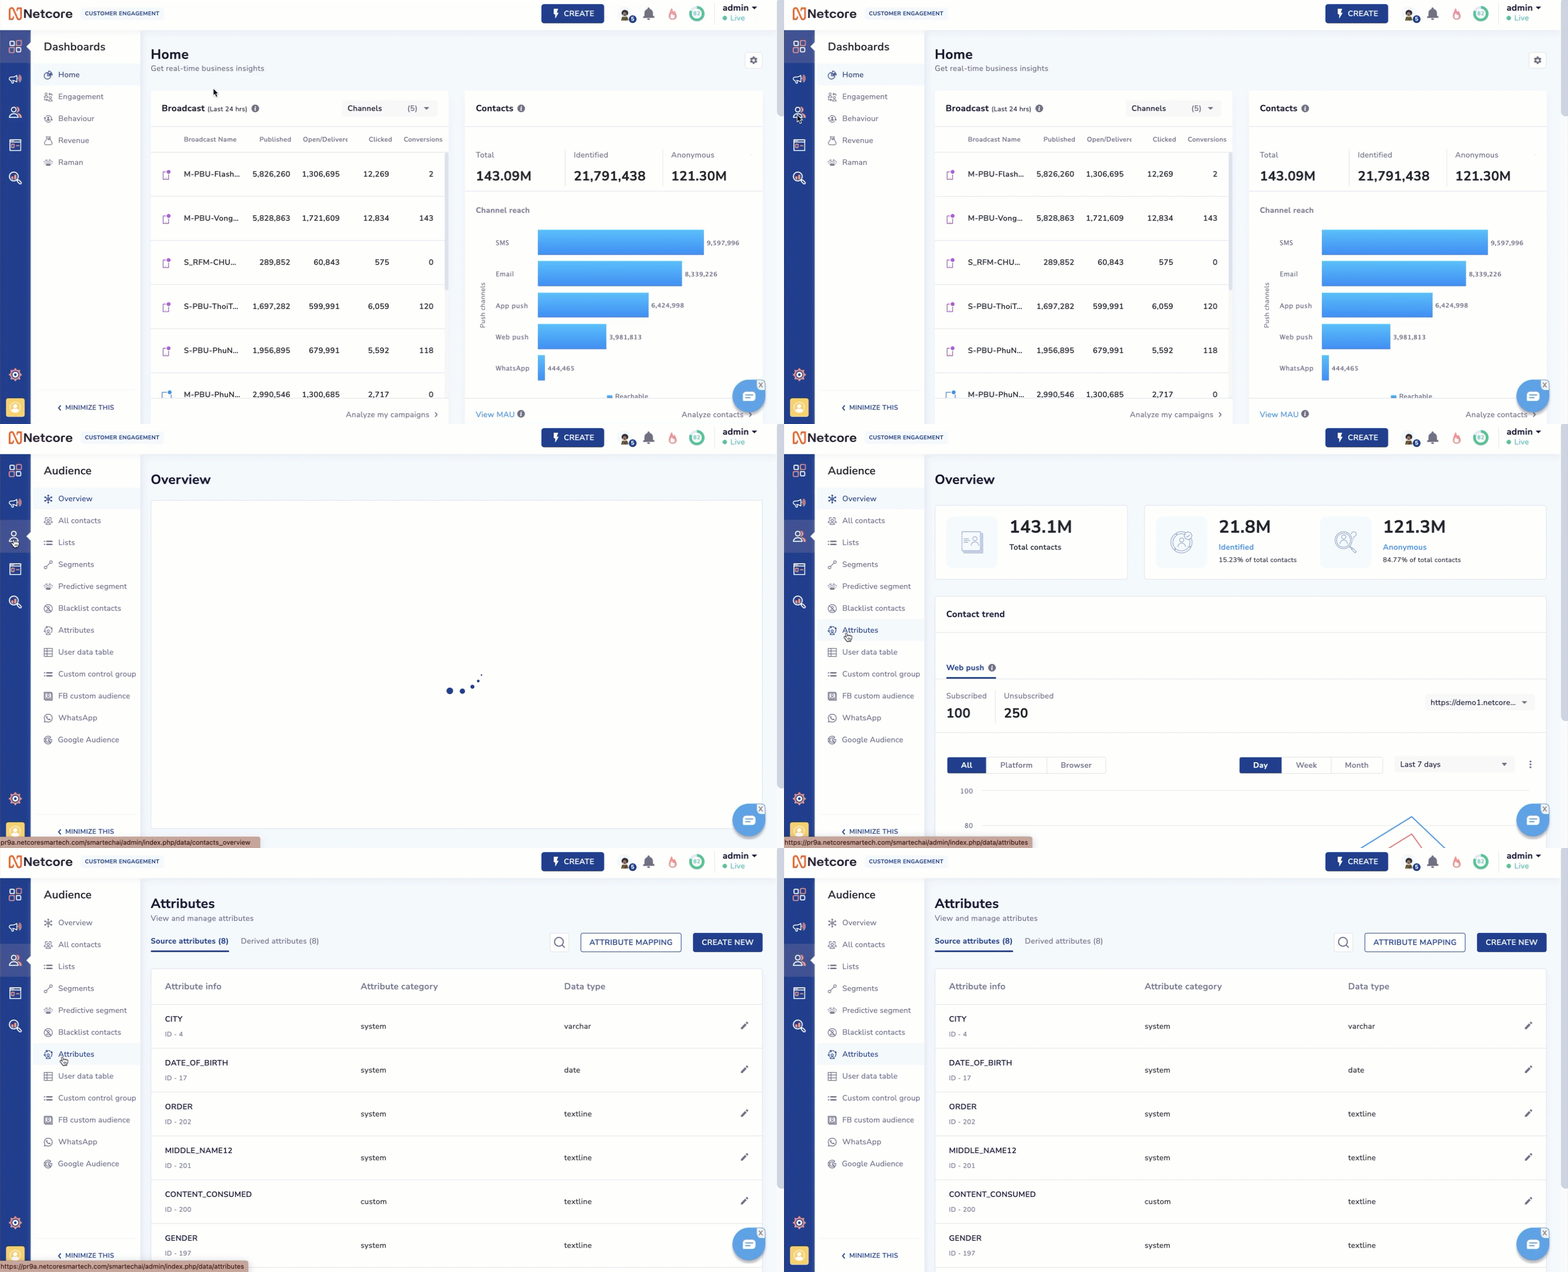
Navigate to Audience > Attributes and Attributes section. You can view all the system attributes in the Source attributes section and all the custom attributes in the Derived attributes section.

Navigate to Attributes Section
Supported Data Type
Here are the supported data types available for attributes.
| Data Type | Applicable | Maximum Length Allowed | Allowed Special Characters | Sample Value |
|---|---|---|---|---|
| Text line |
| 255 | All special characters are allowed. | Netcore Cloud |
| Date |
| No limit. Ensure to follow the format: DD-MM-YYYY or YYYY-MM-DD | Except for dash(-), no other special format is allowed. | 23-01-2013, 2012-01-23 |
| Decimal |
| It can support 18 digit before the decimal point and eight digit after decimal point. | Only dot(.) is allowed. | 1111111111111111111.99999999 |
| Integer |
| 11 | Not allowed | 123 |
| No limit | At-the-rate(@) and dash(-) are only allowed. | [email protected] | ||
| Mobile | 16 | Not allowed | 919999999999 You can also pass your country code | |
| URL | 255 | All are allowed | https://cedocs.netcorecloud.com | |
| Long Text | 5000 characters | All are allowed | Note: Similar to Text line, but can not be used for paragraphs or other text forms. 5k character limit. This is not allowed in Segments and Journeys. |
Create New Attribute
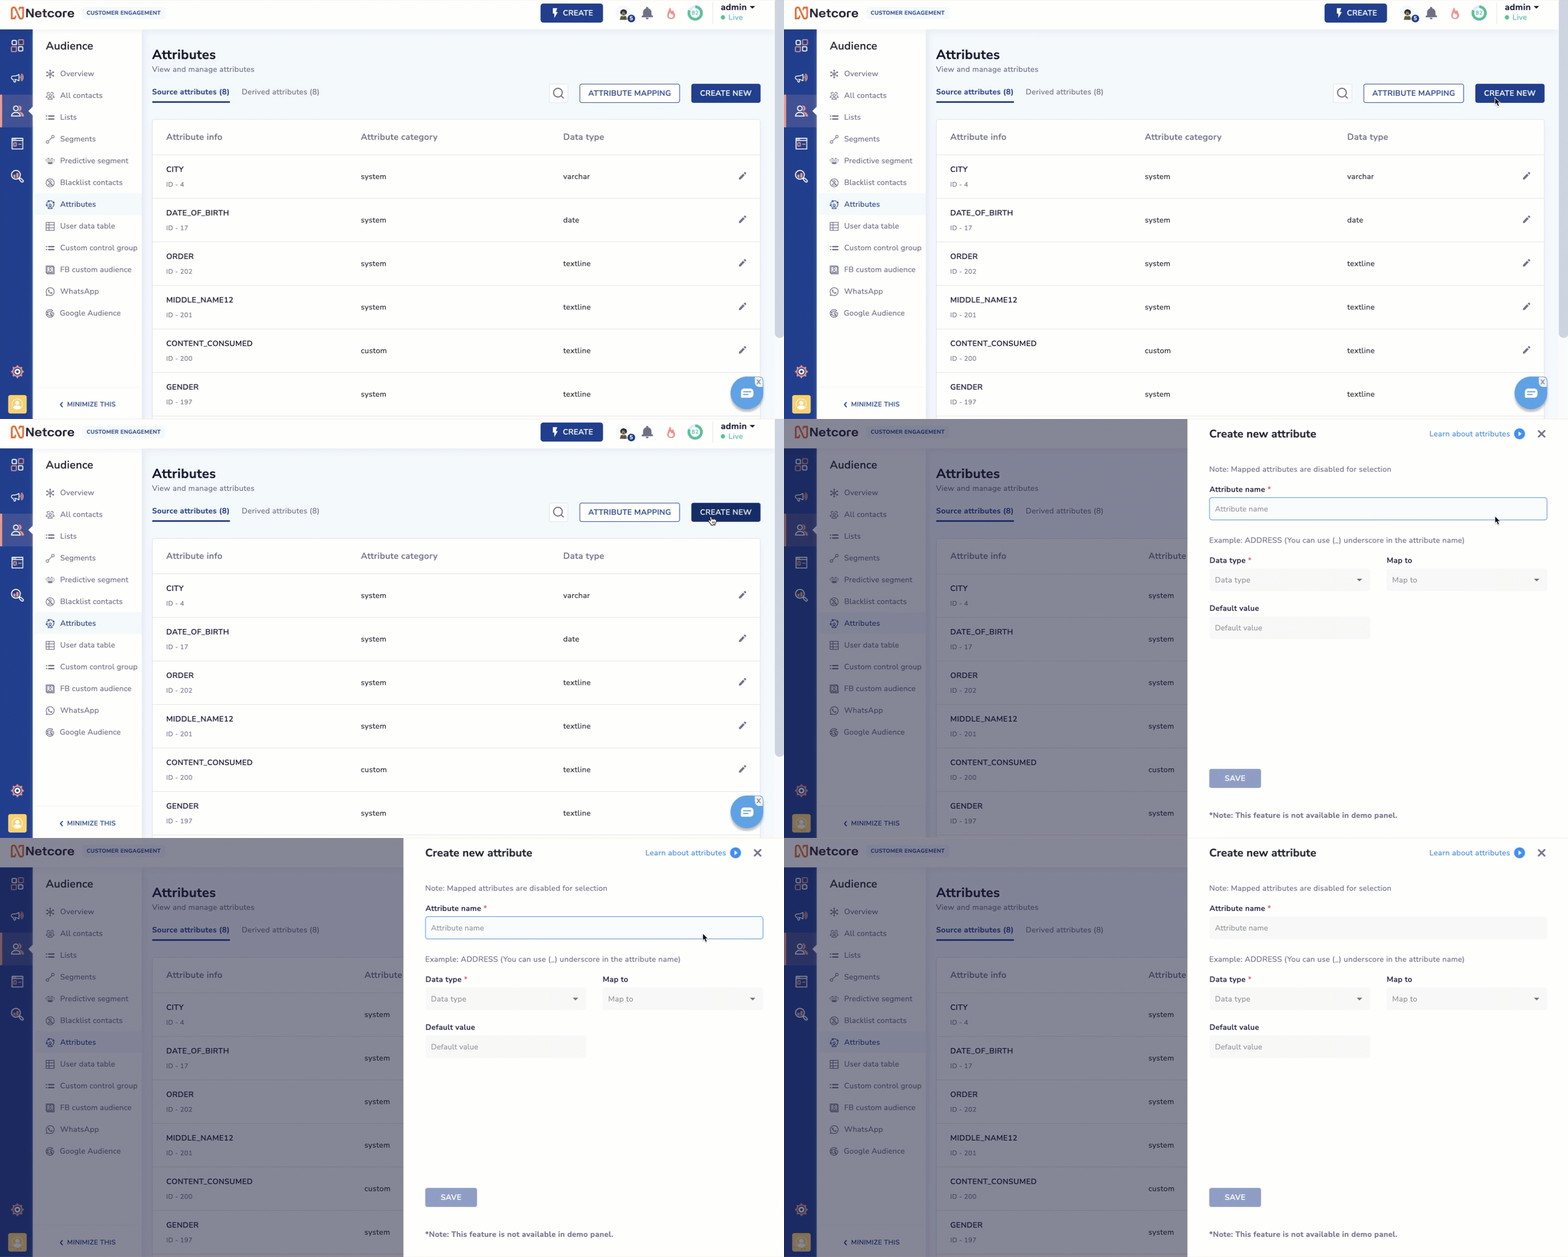
You can create new source attributes. Click Create new in the Attributes section to create a new attribute. The Create new attribute dialog box appears.
Note that mapped attributes are disabled for selection in the dialog box options.

Create New Attribute
Ensure to configure the following fields.
| Field Name | Description |
|---|---|
| Attribute name | Name of the attribute. You can use (_) underscore in the attribute name |
| Data type | Select the type of data. Refer here to learn more about data types available for attributes. |
| Map to | Select the attribute you want this attribute to be mapped. |
| Default value | Set a default value to provide a fallback when an attribute, like a user's first name, is missing. |
Every field marked with an asterisk (*) is mandatory.
The attribute gets created and appears in the Attributes grid view.
Attribute Mapping
You can create segments based on the contact attributes. You can also update the attribute values of contact through Journeys. However, out of all the attributes that you define in CE, you need to select up to a maximum of 15 attributes for segmentation and journeys.
You can map custom attributes to system attributes. Attributes, once mapped, cannot be unmapped or changed. Mapped attributes are disabled for selection.
Click ATTRIBUTE MAPPING in the Attributes section. The Attribute mapping dialog box appears.
Select the Custom attributes value from the dropdown against each System attribute and save to map the attributes.
Create Attribute with CSV Upload
You can also create a new attribute while uploading a list via CSV. To create a new attribute while uploading a list using a CSV file, follow the below steps:
- Navigate to Audience > Lists. Create a List and How would you like to upload the contacts? section appears.
- Select Bulk upload and upload the CSV file.
- Map your attributes to your desired attributes. On the attribute mapping page, under map attributes, you find the following options:
- Done: When you have made spelling errors in the existing attribute name and want to select it from the dropdown with the proper spelling and continue with the attribute mapping procedure, you can utilize the Done option.
- Skip: You can utilize the skip option if you created an incorrect attribute and want to change it completely.
- Create new: When you wish to create a new attribute, use the create new option under map attributes.
Select Attribute
Your new attribute is mapped in the Netcore CE dashboard; you can navigate to the attribute section and search for the attribute by name.
Attribute Masking
Attribute Masking helps you protect sensitive user data by masking specific attribute values across the Netcore CE dashboard and reports. When an attribute is masked, it appears as XX, ensuring data privacy.
Important Points
- Contact Netcore [email protected] to enable Attribute masking.
- After this feature is enabled, only admin can configure attribute masking.
- Admins can view unmasked attribute values on the CE dashboard as well the exported reports.
Example: If the City attribute is masked, admins will still see actual values such as Mumbai, Pune, Delhi in the export.- Masked attributes do not affect searches across the Netcore CE dashboard.
Example: If the City attribute is masked, you can still search and use it while creating a segment.
Mask Attribute
Follow the steps given below to learn how to mask an attribute.
- Log in to the Netcore CE dashboard.
- Navigate to Contacts > Attributes.
- Find the attribute you want to mask.
- Click the three dots icon in the attribute row.
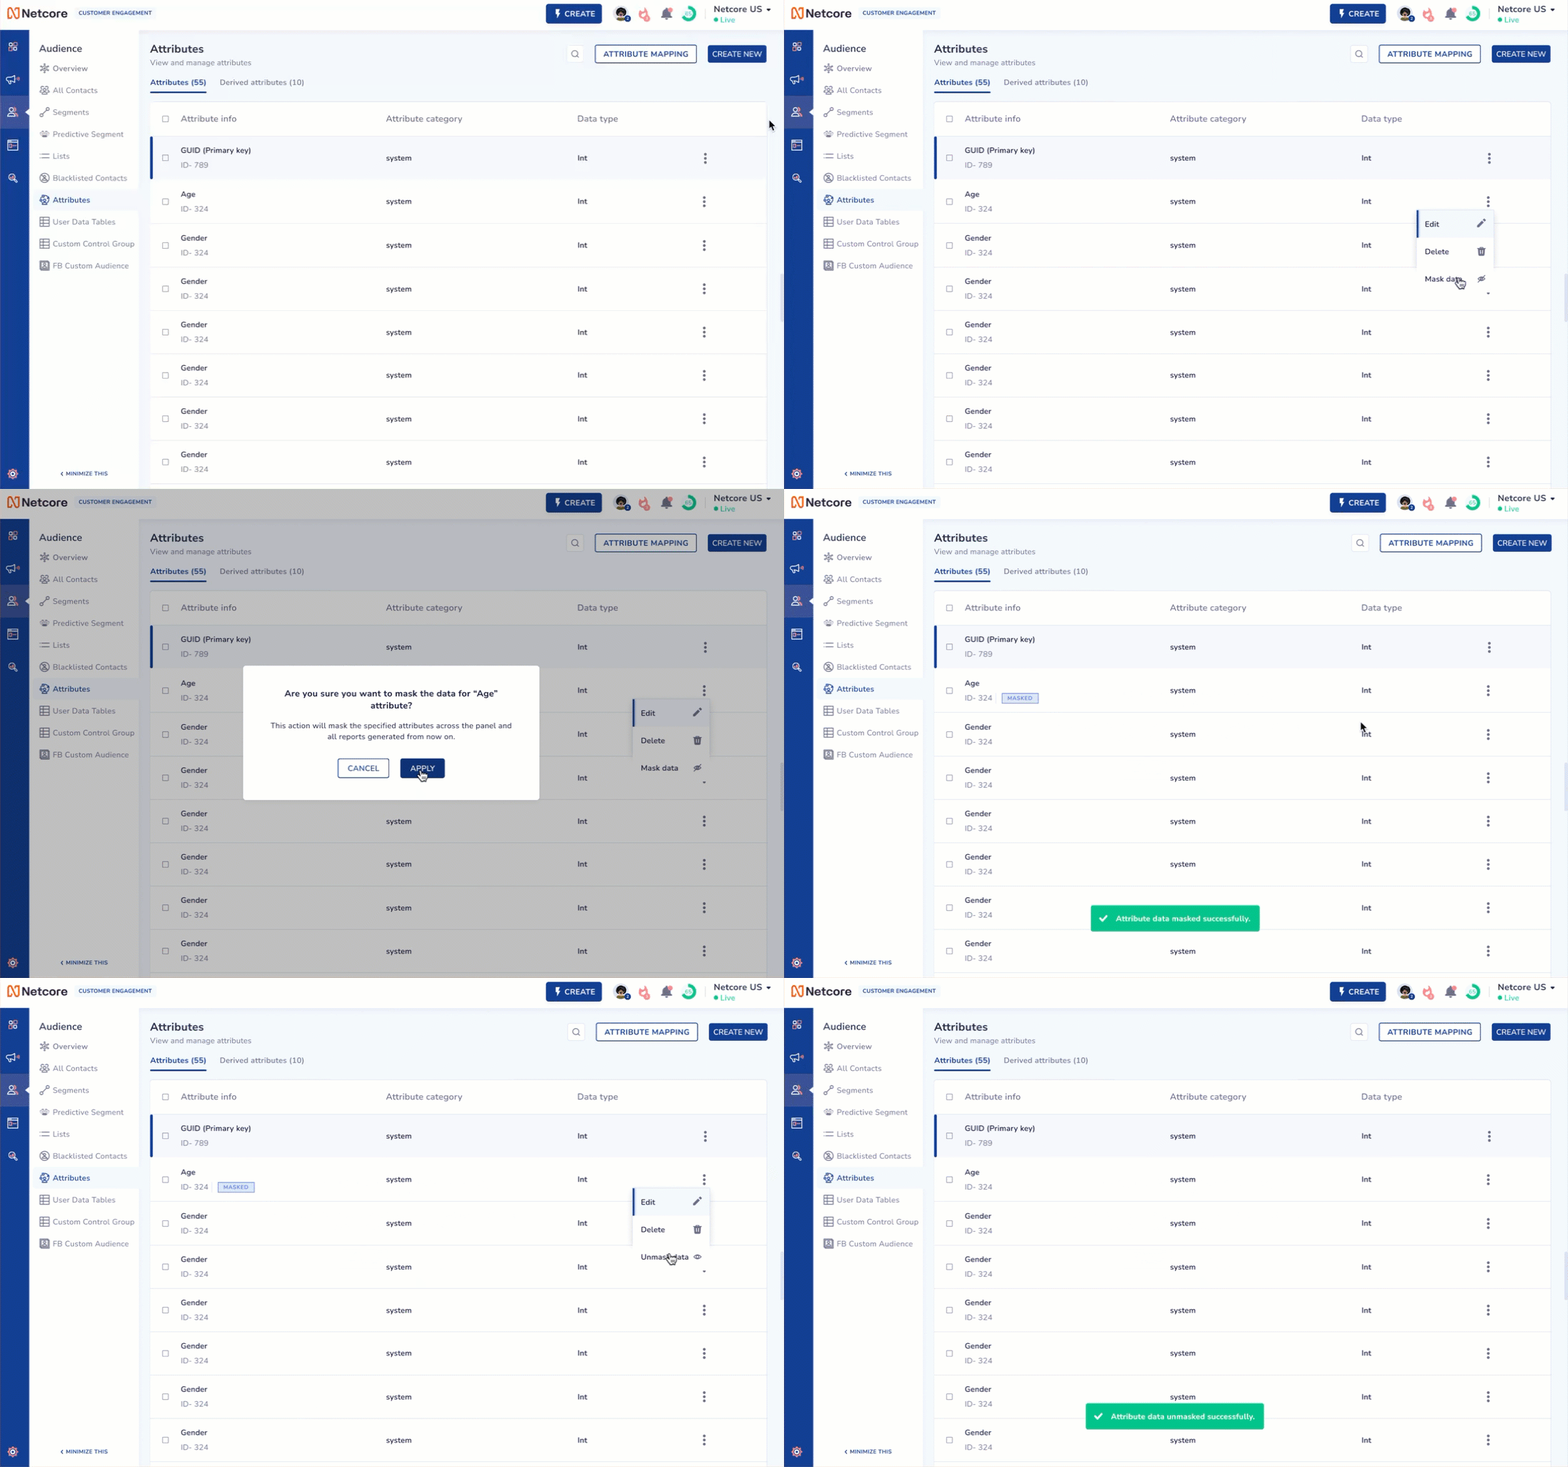
- Select Mask Data and click Apply.
- The attribute will be masked, and a MASKED tag will appear beside it.

Mask & Unmask an Attribute
For example, if you mask the AGE attribute, the age column in the All Contacts page will display "XX" instead of actual values. Once masked, this attribute remains masked across the dashboard, and all reports generated afterward.
The PII Data Masking feature applies to:
- Audience: All Contacts, List of Contacts, Segments, Sample Users
- Individual Contact: Unified View
- Behavior Dashboard: Events > Users > Recent five users
- Exported Reports: Any report where the masked attribute is included
- In Funnels and Cohorts reports, masked attributes will be masked even after export.
Masking rules applied on the CE dashboard
- Alphanumeric values shorter than 4 characters → Fully masked (For example, XYZ → XXX).
- For longer values, only the first and last characters are retained, while the rest are replaced with X.
Examples
- AB123CD → AXXXXXD
- abc12 → aXXX2
Delete Attribute
Remove unnecessary attributes from your workspace while ensuring system integrity across campaigns and analytics.
Follow the steps given below to delete unused custom attributes.
- Log in to the Netcore CE dashboard.
- Navigate to Audience > Attributes.
- Click
 and select Delete, check to identify where the attribute is being used.
A pop up will list all impact areas where this respective attribute is being used, such as running campaigns, journeys, scheduled reports, analytics dashboards, etc. Deletion is restricted if the attribute is found in any of the impact areas.
If there is no usage detected, you can proceed with the deletion request immediately. Once confirmed, click YES, DELETE.
Use this feature to maintain a lean, relevant set of attributes and reduce clutter in your workspace.
Important Note
Once an attribute is deleted, its values are automatically removed from all users. The user data stays, only the attribute’s values are deleted.
Attribute logs
The Attribute Logs feature provides a detailed audit activity record of all attribute-related actions within the CE Dashboard. You can view logs for created, edited, or deleted attributes, including who performed the action and its status. This helps you monitor changes, investigate issues, and maintain operational visibility.
This feature supports up to 90 days of searchable history for improved data management and troubleshooting.
Follow the steps given below to delete unused custom attributes.
- Log in to the Netcore CE dashboard.
- Navigate to Audience > Attributes.
- Click on ATTRIBUTE LOGS to view the audit log display.
Refer to this to analyse each entry in the log display.
| Field | Description |
|---|---|
| Action | Type of action performed on the attribute (Create, Edit, Delete) |
| Requested On | Date and time when the action was initiated |
| Completed On | Date and time when the action was completed |
| Username | Name of the user who initiated the action |
| Status | Current state of the action: In-process, Processed, or Failed |
Use the available options to refine log entries.
- Search: Filter by Action type or Username
- Date Range: View logs for any period within the last 90 days
Note:
Logs are updated in real time. This feature does not include notifications to action impacts internal or other teams regarding attribute actions.
Updated 2 months ago
