Website Integration
Learn to integrate your website into the Netcore CE dashboard.
Easily integrate your website with the Netcore CE dashboard. This lets you enable web features and test their functionality in real-time.
Integrate Website
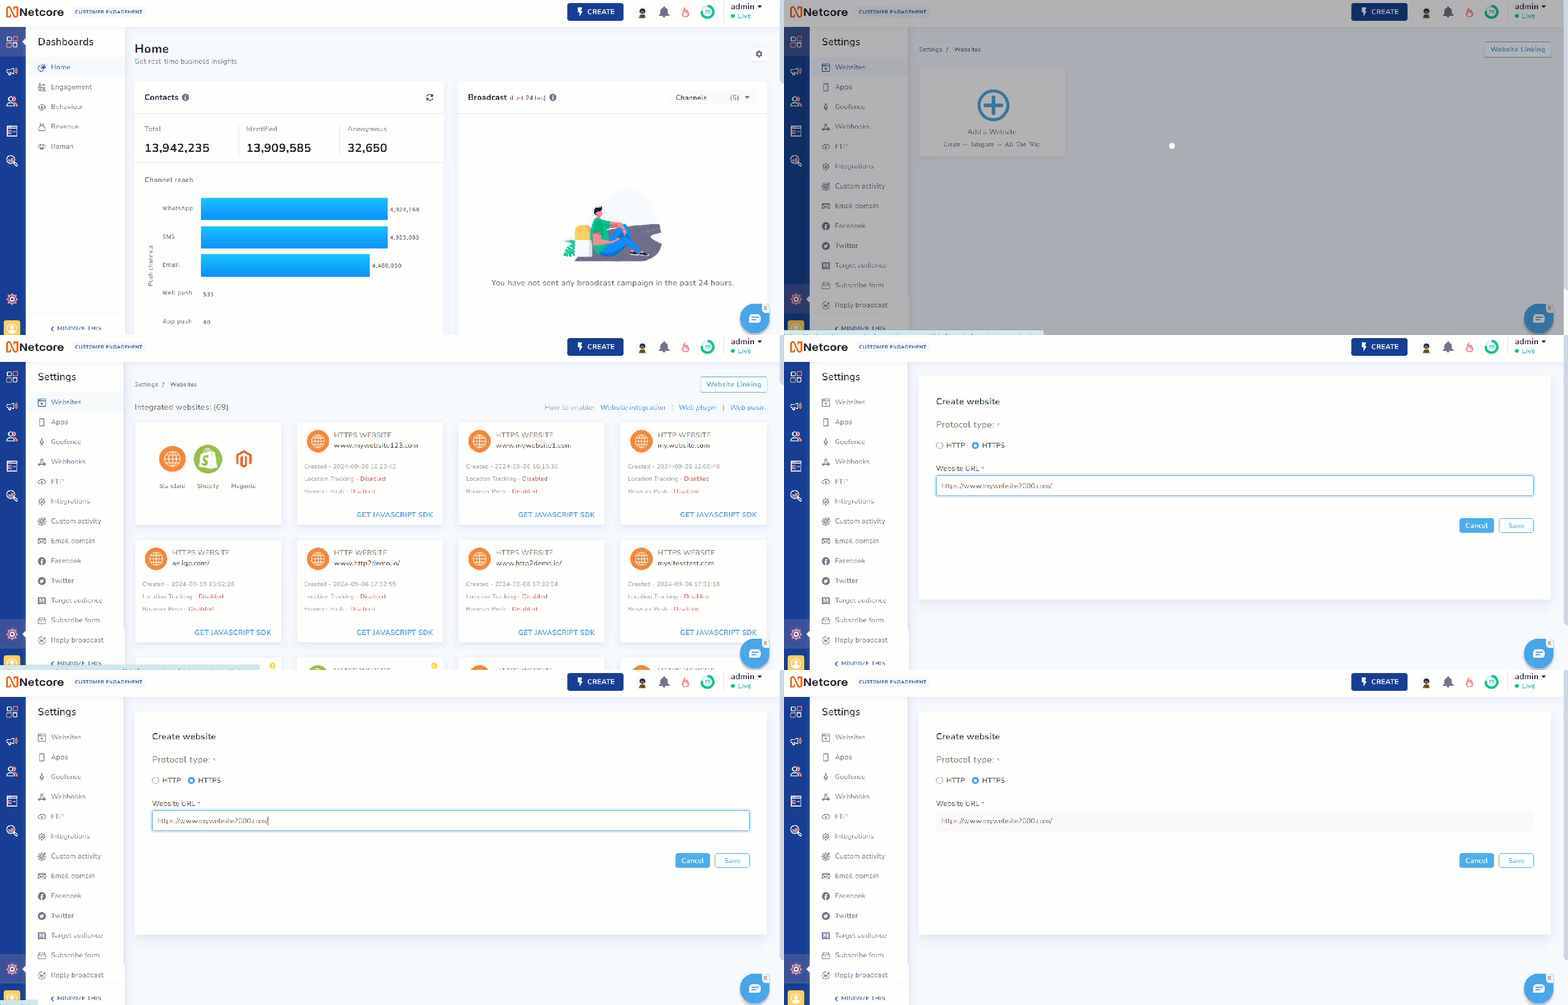
Follow the steps below to integrate your website with the Netcore CE dashboard.
- Log in to the Netcore CE dashboard.
- Navigate to Settings > Websites > Add a Website.
- Select your preferred integration type: Website, Shopify, or Magento. The Create website screen appears.
- Select your preferred protocol type: HTTP or HTTPS.
- Add your website URL and click SAVE.

Integrate Your Website With Netcore CE Dashboard
Points to Remember
- To send Web Push Notifications, you must use HTTPS. If you select HTTP, you must configure an HTTPS website later.
- There is no need to type HTTP or HTTPS; the Domain Type automatically adds the correct prefix.
- Include www if it is part of your domain.
- Once a domain is added, it cannot be deleted, so take your time to add it thoughtfully.
Advanced Features
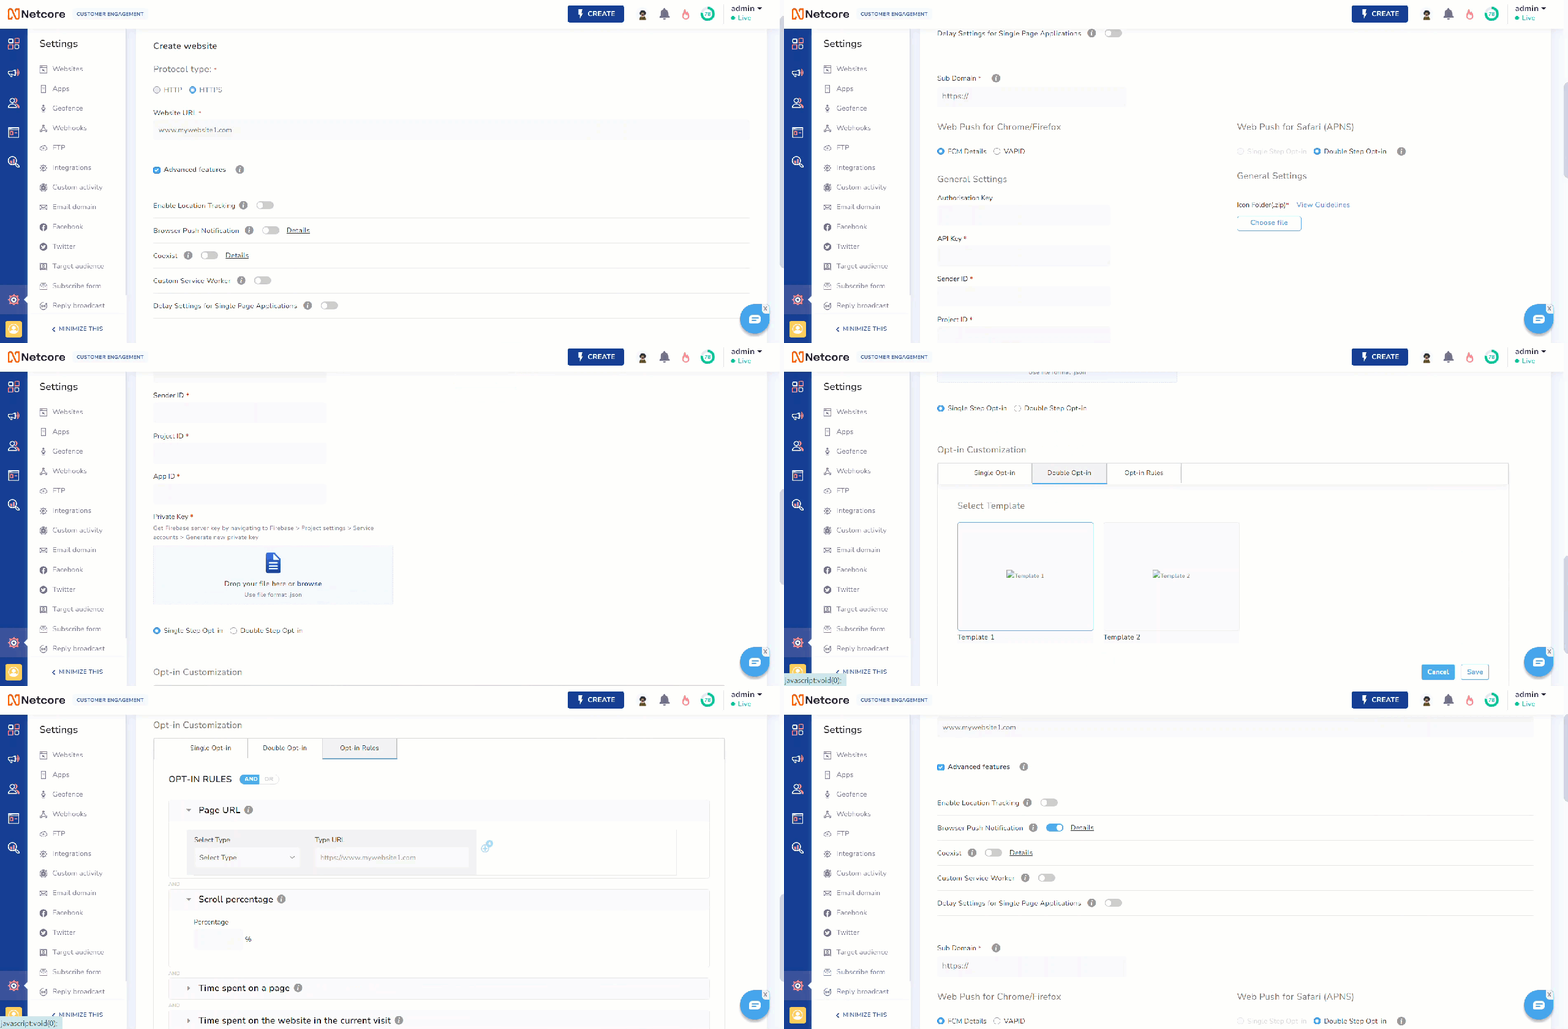
Check the Advanced Features checkbox to enable additional functionalities for your website. Refer to the table to learn about the Advanced Features.
| Feature | Descriptions |
|---|---|
| Enable Location Tracking | Sends location tracking opt-ins to your website. |
| Browser Push Notification | Sends web push notifications to your website visitors. |
| Coexist | Allows the smartech sw.js file to coexist with another sw.js file. |
| Custom Service Worker | Sets a custom name for the service worker instead of sw.js. |
| Delay Settings for Single Page Applications | Adds a delay to the display of your campaign in single-page applications. |
Here is a detailed overview of the advanced features that are available.
1. Enable Location Tracking
Enable Location Tracking
Enabling this feature allows you to ask users to opt-in for location tracking on your website. This helps personalize their experience and target communications based on their location. By activating this setting, you ensure compliance with privacy regulations while using location insights to create your messaging effectively.
2. Delay Settings for Single Page Applications
Delay Settings for Single Page Applications
Single Page Applications (SPAs) are websites that load a single HTML page and dynamically update content as users interact with the site. This provides a smoother, more responsive user experience like a desktop application. SPAs use JavaScript to fetch and display new content without reloading the entire page, making navigation fast and seamless. Popular examples of SPAs include Gmail, Twitter, and Facebook.
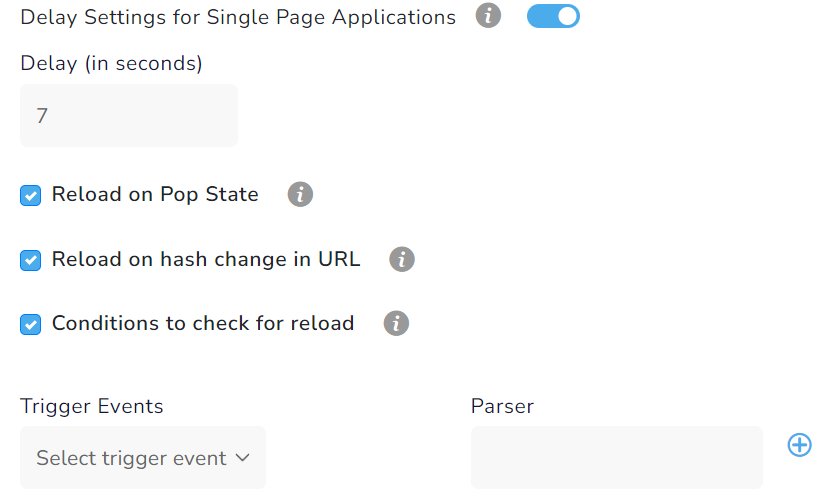
The display settings for SPAs allow you to add a delay to the campaign display. Choose how the SDK should be refreshed on your SPA website. The available options are:
| Option | Description |
|---|---|
| Reload on Pop State | Reloads when the browser's forward or backward button is clicked. |
| Reload on Hash Change | Reloads the SDK when the URL path after the "#" character changes. |
| Reload Conditions | Select from a variety of trigger events to initiate the reload. |
Click  to add multiple Trigger Events.

Delay Settings for Single Page Applications
3. Coexist
Coexist
The Netcore CE Web SDK seamlessly coexists with other vendors' JS/SDKs, allowing you to send web push notifications from both platforms simultaneously. The Coexist feature requires integrating the Netcore CE service worker alongside the client's or vendor's service worker without exception. Netcore CE exclusively supports FCM, which remains consistent even in coexistence scenarios.
Once the base SDK is integrated, Netcore CE provides a JavaScript method to retrieve GUID, token, and user identity (if available) and captures all associated events.
4. Custom Service Worker
Custom Service Worker
A custom service worker allows you to define background tasks, including handling web push notifications and managing caching for improved performance. If you do not want to use the default service worker file name sw.js, you can specify a custom service worker name.
5. Browser Push Notifications
Browser Push Notifications
Browser Push Notifications (BPNs) are popups that appear on a recipient's desktop or mobile device even when they are not active on your website. These notifications help engage users with timely updates, promotions, and reminders, driving increased traffic and interaction. BPNs are a powerful tool for re-engagement and keeping users informed.
To enable Browser Push Notifications for your website, toggle the icon on. Once you turn it on, the following options appear.
| Option | Description |
|---|---|
| Sub Domain | It is mandatory in the case of double opt-in for both FCM and APNS. If the subdomain is not similar to the domain, the double opt window will open in a new browser. |
| Web Push for Chrome/Firefox | Sends web push notifications to users on Chrome and Firefox browsers. |
| Web Push for Safari (APNS) | Delivers web push notifications to users on Safari browsers, utilizing Apple Push Notification Service (APNS). |

Enable Browser Push Notifications to Send Opt-Ins
Web Push for Chrome/Firefox
This feature enables the delivery of web push notifications to users on Chrome and Firefox browsers. It allows businesses to engage users even when not browsing the website. The notifications are supported across platforms, including Windows, macOS, Android, and Linux. Refer to the table to learn about the options available here.
| Option | Sub-option | Description |
|---|---|---|
| FCM Details | Fill in the following fields to configure Firebase Cloud Messaging for push notifications. | |
| API Key | Enter the API key to authenticate your application with the FCM server to send notifications. | |
| Sender ID | Enter the unique numerical Sender ID for your project, used during device registration for notifications. | |
| Project ID | Enter the unique Project ID for your Firebase project, required for various Firebase services. | |
| App ID | Enter the App ID for your application within Firebase, which helps FCM distinguish between different apps. | |
| Private Key | Upload the Private Key .json file generated from Firebase > Project settings > Service accounts > Generate new private key for server authentication with FCM. | |
| VAPID | Fill in the following fields to configure VAPID for web push notifications. | |
| VAPID Public Key | Enter the VAPID Public Key used by the web application to authenticate push requests to the push service. | |
| VAPID Private Key | Provide the VAPID Private Key that signs push notifications, ensuring their integrity and authenticity when sent to the push service. | |
| Single Step Opt-in | Allows users to subscribe to notifications with a single click. | |
| Double Step Opt-in | Requires users to confirm their subscription through an additional step. |
Web Push for Safari (APNS)
This feature enables the delivery of web push notifications to Safari users through the Apple Push Notification Service (APNS). This ensures communication with users on macOS, allowing notifications to appear directly on their desktop even when Safari is not open.
| Option | Description |
|---|---|
| Single Step Opt-in | Allows users to subscribe to notifications with a single click. |
| Double Step Opt-in | Requires users to confirm their subscription through an additional step. |
| Icon Folder | Upload a compressed (.zip) folder containing the icons required for Safari web push notifications. These icons will be displayed in the notification alerts. For more information, refer to APNS guidelines. |
With web push notifications enabled, choose between Single Opt-In or Double Opt-In.
Single Opt-In
Single opt-in allows users to subscribe to web push notifications with a single click. Upon clicking the subscription promptly, users immediately opt-in and start receiving notifications without any additional confirmation. Refer to the table below for information about the options when editing the double opt-in templates.
| Option | Description |
|---|---|
| Overlay | Adds a background color behind the opt-in form. |
| Overlay Text | Adds text on the background color for extra context. |
Double Opt-In
Double opt-in requires users to confirm their subscription to web push notifications. After clicking the initial subscription prompt, users receive a follow-up message or email to verify their intent. Only after this second confirmation are they fully subscribed and can receive notifications.
You can edit the two templates by selecting the double opt-in option. For information about the options, refer to the table below.
| Option | Description |
|---|---|
| Layout | Allows you to arrange the elements of the opt-in. |
| Image | Allows you to upload or select an image displayed in the opt-in. |
| Text | Allows you to customize the message content shown to users. |
| Background | Allows you to change the background color of the opt-in. |
| Call to Action | Allows you to customize the button or link that prompts users to take action, such as subscribing or accepting notifications. |
Opt-in Rules
Opt-in rules let you target users for subscription prompts based on their behavior. Setting these rules allows you to customize when and how users see subscription requests. Refer to the table below to learn more about Opt-in rules.
| Features | Description |
|---|---|
| Page URL | Specify web pages to display the subscription prompt, using All and Or conditions. |
| Scroll percentage | Show the subscription prompt after the user scrolls a certain percentage. |
| Time spent on a page | Show the subscription prompt after the user spends a set amount of time on the page. |
| Time spent on the website | Show the subscription prompt after the user spends a set amount of time on the website. |
| Repeat subscription prompt | Set the interval for repeating the subscription prompt if the user has not subscribed yet. |
Once you have added settings for all the required features, click Save. Your website is now integrated with the Netcore CE dashboard. refer to these links to create your web push notifications and create web message.
Updated over 1 year ago
