Cart abandonment via Journey
What is Cart Abandonment?
For an online environment, Cart Abandonment is when Customers add items to their shopping cart although they exit the website without purchasing the items.
Do you know Cart Abandonment can be a cause of lost sales that were engaged at your website?
Cart Abandonment Rate = {Add to Cart / (Purchase done + Add to Cart)}*100
For example, if purchase done is 7 and add to cart is 3, then cart abandonment rate is 30%
If a Cart Abandonment Rate is high then many Customers add the items to their Cart and do not make a purchase.
To reduce your Cart Abandonment Rate, you can implement Marketing Campaigns. Netcore provides Marketing software, with templates and recommendations, which can effectively reduce the Cart Abandonment Rate.
Here, we have shown you a sample of a Cart Abandonment flow in a Journey and how to build the flow.
Firstly, let’s go through the Pre-Requisites for building the flow:-
- ‘Add to Cart’ Activity to be integrated with the website/app. (Mandatory)
- ‘Checkout’ Activity to be integrated with the website/app. (Mandatory)
- ‘Remove from Cart’ to be integrated with the website/app. (Not mandatory)
P.S – The Activity ID for Add to Cart, Checkout and Remove from Cart is 2, 3, and 5 respectively.
Once the above Activities are integrated with the website, let’s move on to the next step where we can see a Journey created.
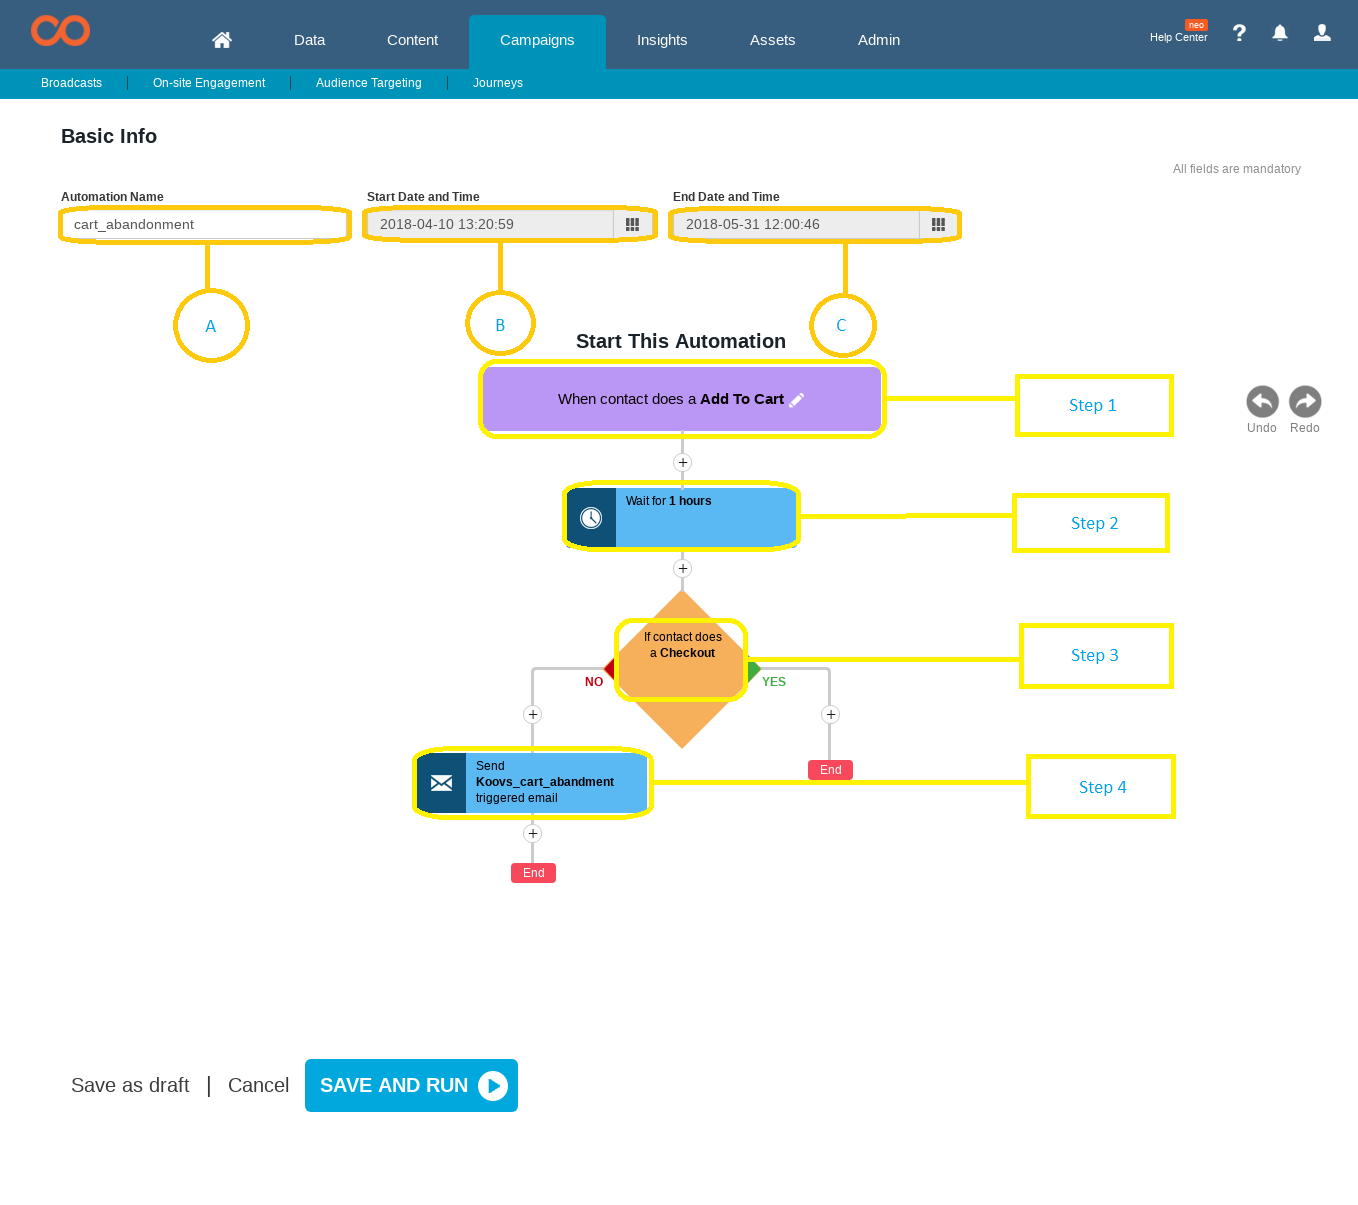
To know the detailed explanation of the Flow created, please refer to the 4 steps after the image.

Create a Cart Abandonment Flow
A : - Automation Name
B : - START Date and Time of Automation
C : - END Date and Time of Automation
Event Type		:- 	Web Activity
Activity  		:-	Add to Cart
Frequency 		:- 	Every time this Happens
Choose Action Type: "Wait for a time period"
For/Till: "a fixed period"
Duration: "1 Minutes"
If: Customer Web Activity
Activity: Checkout
Choose Action type: "Send and Email"
Message Name: 'Name for as per your convenience'
Sender Name:
Sender Email:
Reply-to Email:
Subject:
Template:
Note
If you want to test the above Flow created before sending it to Customers:
- You can make the Journey live on a UAT website.
- If you do not have a UAT website, you can create a dummy attribute and pass a static value and pass the attribute as a part of Check If condition. For eg, ATC as attribute has static value 1.
While making the Journey live, please remember to remove the attribute Check
If added in above step 2.
Important points to be followed
- The integration has to be done for the Activities mentioned.
- Please ensure the Journey is tested before it is made live to Customers
- The Flow explained is for Email communication. Email can also be substituted with Browser Push or App Push Notification.
Let’s now go on to a section where we talk about how to pass the Activity values (Payloads) in the Content of a Email.
How to send digestified emails from Cart Abandonment Flow?
Cart Abandonment & Email Digestification (Digestified email template creation instructions)
Objective
Every Customer will have different products in his/her cart.
On Cart Abandonment, we want to send an email to the Customer with a list of products present in his/her cart.
Flow
- Customer adds products to the cart.
- Customer abandons the cart.
- All the info related to the product is captured as payload. e.g. product_name, product_price, product_desc.
- As per the defined automation, cart abandonment event is triggered.
P.S.:- Digestified emails are supported by five system activities, namely:
1.PRODUCT SEARCH
2. PRODUCT VIEW
3. LEAD SUBMITTED
4. CHECKOUT
5. ADD TO CART
Email Digestification
Below is a sample template based on which we can understand the requirements for creating an Email Digestification:
NOTE: - Below code requires HTML expertise. Recommendation is to have HTML experts do it.
<h4 align="right">
Total Items : {{ COLLECTIONS.size() }}
</h4>
<hr>
<br />
<table>
{{ cnt = 0 }}
{{ FOREACH item IN COLLECTIONS }}
{{ cnt = cnt + 1 }}(
<tr>
<td colspan="2"><b>{{ cnt }}.</b>Product Name : {{ item.product_name }}</td>
<td> </td>
</tr>
<tr>
<td>product_price : {{ item.product_price }}</td>
<td>product_qty : {{ item.product_qty }}</td>
<td> </td>
</tr>
<tr>
<td colsapn="3">img src=”{{ item.product_image }}”</td>
</tr>
<tr>
<td colspan="2"> </td>
</tr>
{{ END }}
</table>
Above code explanation
All variables will be enclosed within {{ }}.
- If we get ‘{{‘ in the template data we will mark this template as a dynamic (digestified) template.
- ‘COLLECTIONS’ is the default keyword which will be used for specifying the list of products within the payload (the set of parameters related to a specific event).
- The code ‘{{ COLLECTIONS.size() }}’ will give the count of total products in payload.
{{ cnt = 0 }}
{{ FOREACH item IN COLLECTIONS }}
{{ cnt = cnt + 1 }}
<tr><td colspan="2">
<b>{{ cnt }}.</b>Product Name : {{ item.product_name }}
</td></tr>
{{ END }}
- In the above code we initialize variable ‘cnt’ to 0 (instead of cnt any variable can be used)
- Foreach item in the collections the counter (cnt) is incremented by 1 & item.payload_variable (item.product_name) will printed in the specified html.
- The payload can have more than one record. The keyword ‘item’ represents each record present in the payload.
- All the info present in the payload can be added to the email content. E.g. if payload is "payload":[{"product_name":"270 L, Smart Inverter compressor","price":25900,"product_desc":"270 L, Smart Inverter compressor is refrigerator from Samsung"}] then item.product_desc & item.price will print the description and price in the provided html.
- The code ‘{{ END }}’ will end the foreach loop.
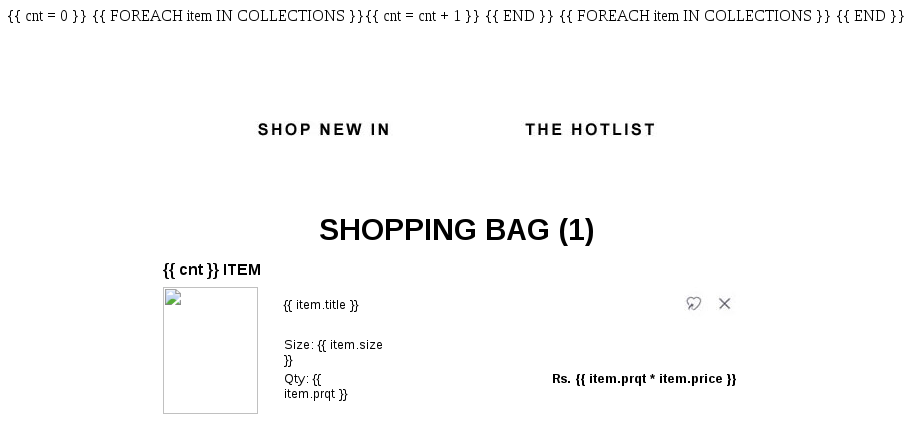
Sample digestified HTML preview for reference:

Updated over 1 year ago
