Email: Product Recommendations on Channel
AI-driven recommendation engine for delivering personalized product and content suggestions across customer touchpoint using Netcore Unbxd Recs.
Overview
Netcore Recommedation is an AI-powered engine that helps you deliver personalized product suggestions to users across channels such as emails, web, and apps.
In a nutshell, Recommedation uses data from your website, such as product catalog, user behavior, and purchase history, to recommend relevant products to each user, increasing engagement, conversions, and revenue.
For example, A user has searched for white sneakers on an e-commerce website but didn’t purchase anything. Later, they will receive an email, if the Recommendation platform is enabled, with details of
- Sneakers they viewed
- Similar sneakers
- Trending sneakers in their size or location, etc.
This personalized content makes the email more relevant and increases the chances of a conversion.
Important Points to Remember
- Recommendation is currently available only for Email : Campaign & Journey
- Recommendations for other channels like Whatsapp is coming soon.
- Recommendation types are divided into two categories: Journey & Campaign
- Journey recommendations are personalized. They are based on the user's individual behaviour.
- Campaign recommendations are not personalized. They are shown to all users or your customised user segments. Refer here to learn how to create segments.
Prerequisites
Before you begin creating a recommendation-based email template, ensure the following conditions are met:
- You have access to a Netcore Cloud (Customer Engagement – CE) account. To use the Unified Content Editor platform for creating templates and delivering personalized email campaigns, you must have an active Netcore CE account with the required permissions.
- Netcore Recommendation Engine is enabled in your CE panel. The recommendation feature must be activated and configured in your CE account.
Remember that
- If you do not have access to Netcore recommendations, contact the Netcore Support Team to enable it for your panel.
- Netcore CE panel should be mapped to Netcore Unbxd Recs panel, as this is a prerequisite for integration. This is handled by your Netcore Support Team.
Create Recommendation Template
-
Navigate to Content > Email > Create New Template. Refer here to set a new email template.
-
Enter Template's name, Select / Add category, and select Unified editor.
-
Click Save & Next to create the template.
-
Drag & drop Product from the Widgets section to the canvas. Refer here to set up products in your email template.
-
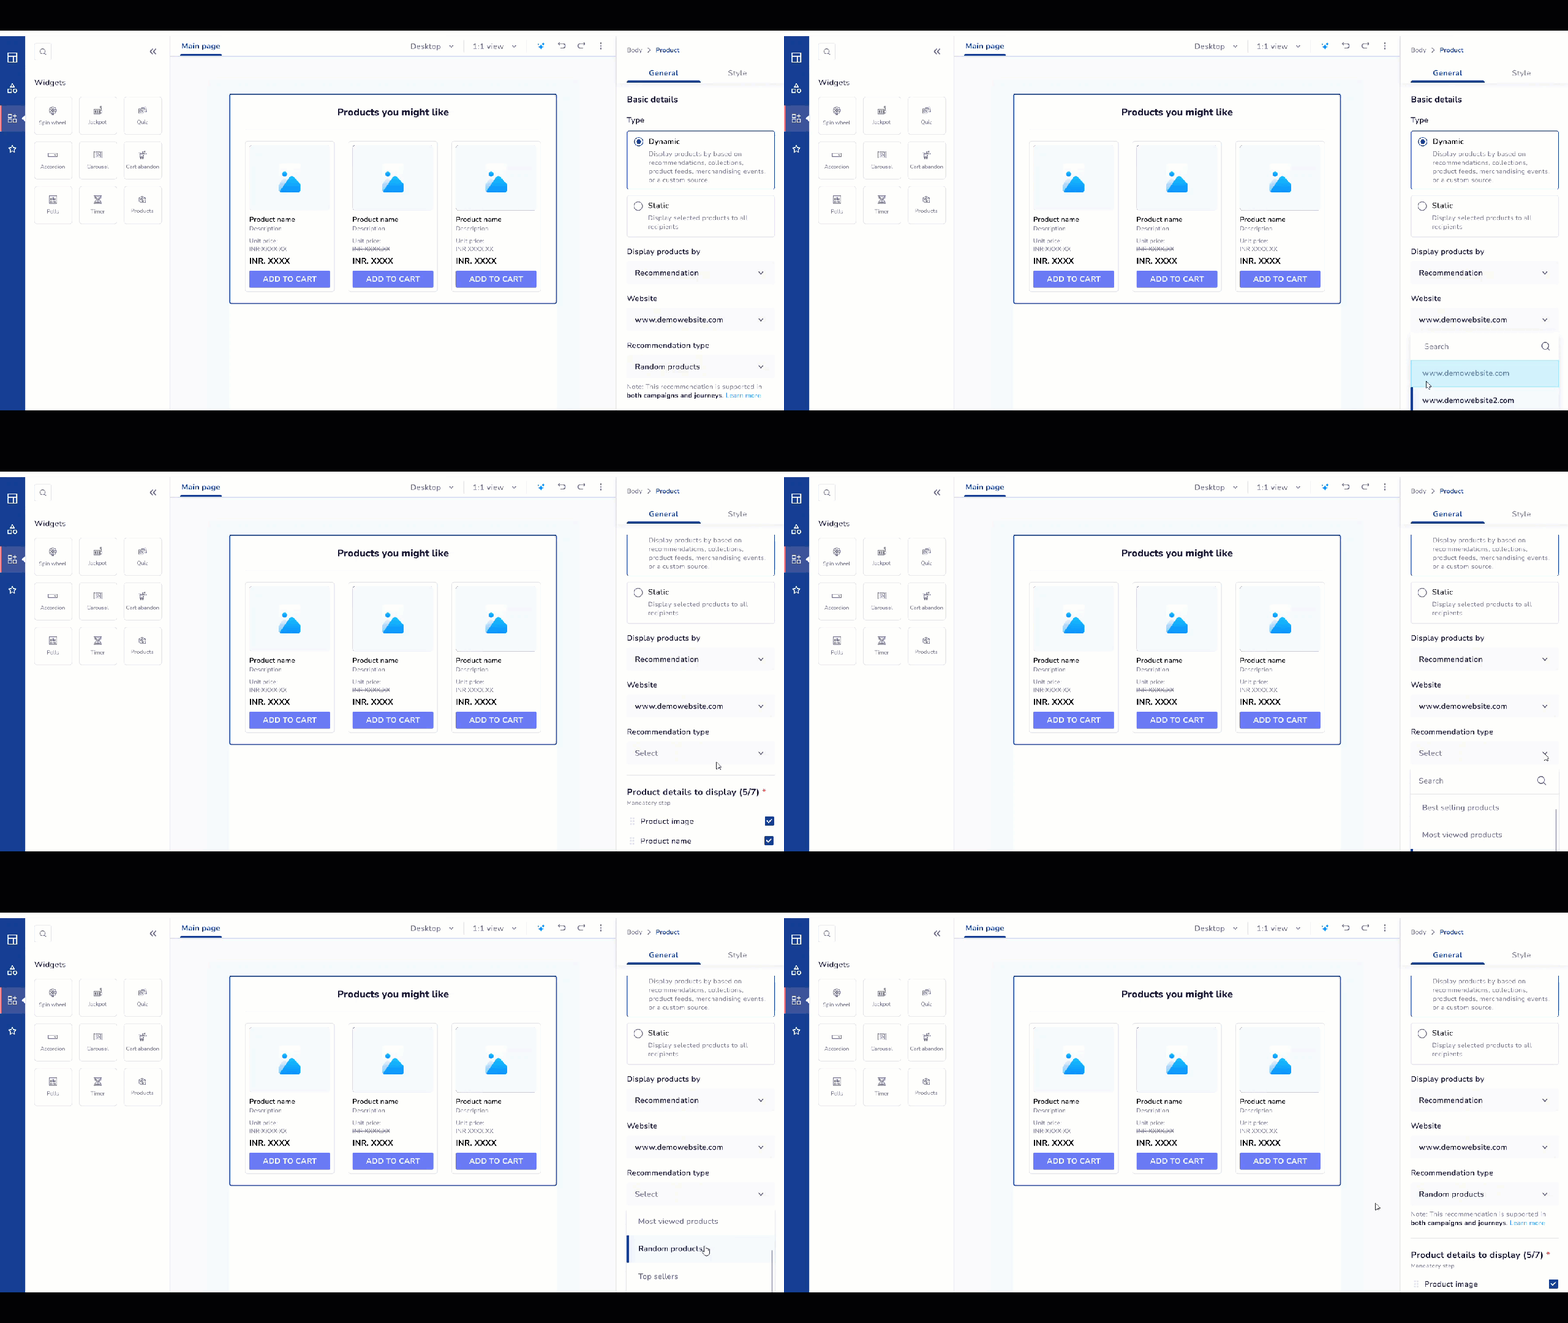
Select Dynamic under Basic details and Recommendation from Display products by dropdown. Refer here to know more.
-
Select the relevant website from the Websites dropdown.
The Websites dropdown lists all the websites or domains you have configured within your Netcore account. The recommendation engine pulls product data (catalog, user behavior, and so on) specific to the selected website. When you select a website, then the system will understand which product catalog and user activity it should use to generate recommendations in the email.

Setting up Product Block details
- Select the type of recommendations (algorithms) you want to send to your customers. The table below displays the predefined set of algorithms Netcore offers.
Important Points to Remember
While creating algorithms on the Unbxd panel, avoid using special characters like $, @, #, and so on, because using these can negatively impact email communications.
For example: Most Viewed Price 20 DASH 60$, the $ can lead to the email communication being dropped.
Predefined Recommendation Algorithms
| Recommendation type | Description | Supported in Campaign | Supported in Journey |
|---|---|---|---|
| 1. Best Selling products | Recommends top-selling products based on overall sales data. | Yes | Yes |
| 2. Most Viewed products | Shows products with the highest views across users. | Yes | Yes |
| 3. Top Sellers | Highlights top-performing products, often based on specific categories. | Yes | Yes |
| 4. Trending products | Recommends products that are currently gaining popularity. | Yes | Yes |
| 5. Recently Viewed | Shows products the specific user has recently interacted with. | No | Yes |
| 6. Frequently Bought Together | Recommends items that are often purchased together. | Yes | Yes |
| 7. Similar Products | Suggests products similar in category or attributes to the one being viewed. | Yes | Yes |
| 8. Cart-Specific Recommendations | Suggests products based on the current contents of the user’s cart. | No | Yes |
| 9. Recommendation based on last purchase | Recommends products based on the user’s most recent purchase. | No | Yes |
| 10. Recommendation based on last viewed | Suggests products related to the last product the user viewed. | No | Yes |
- Click the product block to select the product details you want to include from the content section.
Important Points to Remember
- You can choose up to 7 product details, such as name, price, or description. Refer here to set up the product details in your email template.
- You can add multiple Product blocks in your email template and have a combination of rules available in the Display products by dropdown. You cannot use all product rule combinations in your template product block. Specifically, you cannot use both Collection and Merchandising Event rules together because they are trigger-based rules.
- Click Preview to preview your email template in mobile/ desktop view.
- Click SAVE & CLOSE to save the template.
Once your template is saved, you can start using it for different messaging channels Netcore offers to boost customer engagement and experience. Refer here to how to set up a messaging channel and engage users.
You can also use this for in journey . Ensure to add a product recommendation template in the email node for journeys. Once you have created the template, you can decide whether the recommendation type would be Journey or Campaign.
Refer analytics documentation to learn how to check your email campaign performance.
Updated 5 months ago
