Learn how to create an App Content Personalization using the Netcore CE dashboard.
Prerequisites
SDK Integration
To enable personalisation and engagement features, your mobile app must be integrated with Netcore's SDK. Contact your Netcore Integration Manager to get your App ID.
Follow the SDK integration documentation specific to Android and iOS.
Enable App Content Personalisation features on the Netcore CE dashboard.
Widget Allocation
Your app should have widget space reserved to display personalised content.
Decide where you want to show personalization. For example, homepage banner, carousel, product recommendations, and so on.
Ask your developers to add a space in the app where the personalized content from Netcore can appear.
Since it's a premium feature, it has to be enabled from the backend. Enable App Content Personalisation via “Request Access” or “Contact Support” in the dashboard.
App Content Personalisation will be enabled via backend toggle by Netcore LDAP users.
Add at least one widget via the integration flow. Refer to Android and iOS for more details.
Create App Content Personalization
Follow the steps to create an App Content Personalization campaign.
Log in to the Netcore CE dashboard.
Click the Create button on the dashboard homepage.
OR
Navigate to Engage > Campaigns > Create.
Select Engage with users > App under Personalization.
4. Setup: Add the campaign details here.
Setup
Refer to the table below for details on the sections available under Setup.
Sections
Description
Campaign name
Enter a unique name for this campaign.
Maximum length: 255 characters
Allowed characters: alphanumeric, space, a hyphen, underscore, and ampersands (&)
App(s)
Select the app(s) where this notification will appear.
Add tags
Add relevant tags to organize and categorize this campaign. You can select up to five tags.
Widget selection
Select the widget(s) from the dropdown you want to run your campaign.
Fill in all the required sections and proceed.
Refer to the given table to know the Advanced fields.
Advanced Fields
Description
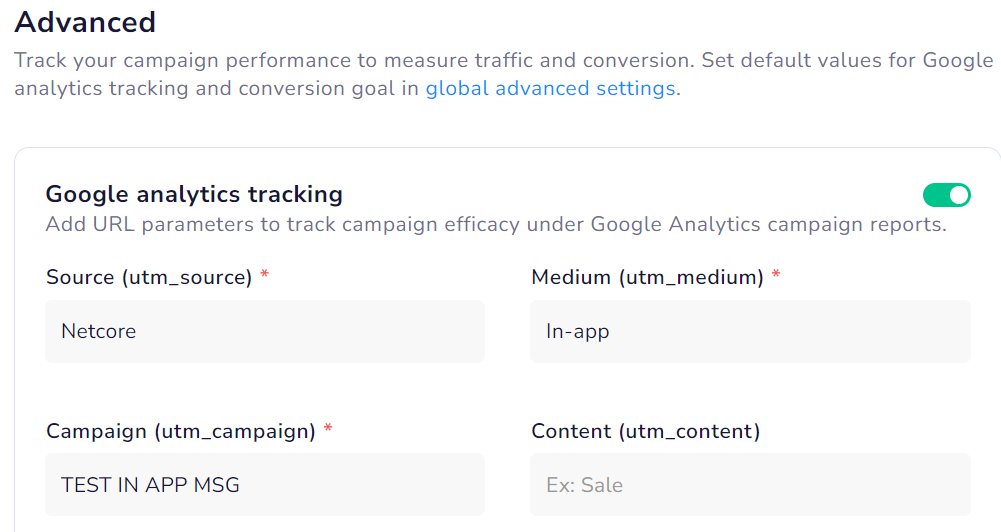
Google analytics tracking
Add URL parameters to track campaign efficacy under Google Analytics campaign reports.
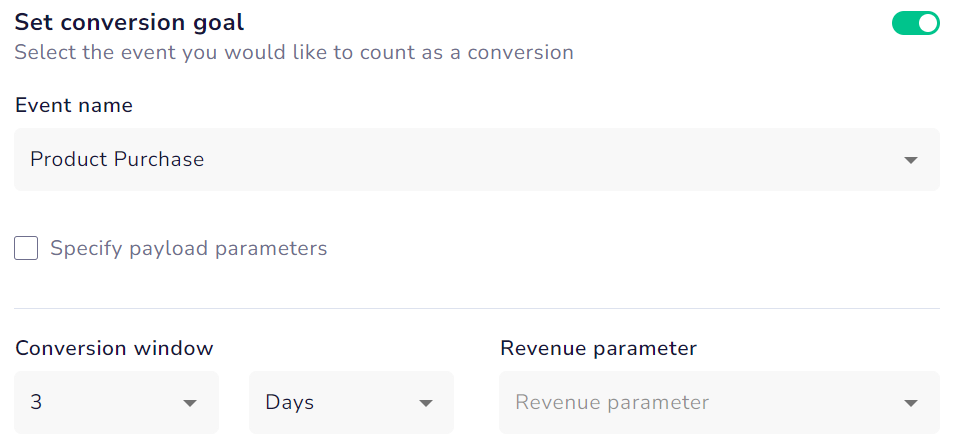
Set conversion goal
Select the event you would like to count as a conversion.
Payload parameters: You can define criteria for the conversion event payload. Up to five parameters can be added for customization. For example, specify a purchase event when the product price exceeds 10,000.
Conversion Window: Define the conversion window to link user actions to campaigns in a specific timeframe.
Revenue Parameter: Select this option to assign a value to each successful action to track financial impact. This is a mandatory field.
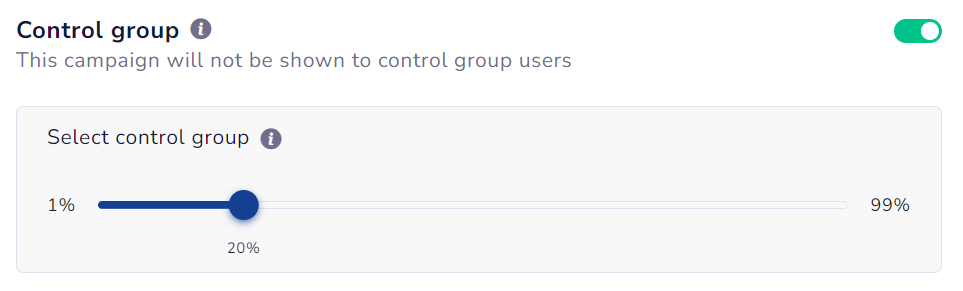
Control group
This campaign will not be shown to control group users. This campaign will not be shown to users in the control group.
Custom key value
Send custom data to your app when the user clicks the app content personalization.
Refer here to know the advanced fields in detail.
Google Analytics Tracking
Enable tracking to monitor campaign performance via Google Analytics.
Google Analytics Tracking
Source (utm_source): Identify the origin of your traffic, such as a search engine or newsletter.
Medium (utm_medium): Specify the marketing medium, like email, social, or CPC (cost-per-click).
Campaign (utm_campaign): Name the specific campaign, like a product launch or a seasonal sale.
Content (utm_content) (Optional field): Differentiate specific campaign content or links.
📘
GA Tracking Guidelines
Ensure you're using Netcore Android SDK v3.5.0 and Netcore iOS SDK v3.5.0 for GA tracking.
Netcore provides personalized values for {CHANNEL} in utm_medium and {CAMPAIGN_NAME} in utm_campaign.
Personalized values are not supported for utm_source and utm_content.
Add conversion goals to monitor key business metrics and measure the success of your in-app message campaign. You can track one conversion goal per campaign. Select any event as a conversion goal activity according to your objectives.
For example, if you want to track the number of customers who have purchased shoes after your campaign was sent. (Event - Product Search, Product - Shoes).
Set Conversion Goal
Specify payload parameters: You can define criteria for the conversion event payload. You can add up to 5 parameters that are available for customization.
For example, specify a Purchase event when the product price exceeds 10,000.
Conversion Window: Select this option to define the time frame for successful actions after interacting with your campaign.
Revenue Parameter: Select this option to assign a value to each successful action for tracking financial impact.
Control group
These are the number of users you intentionally exclude when sending campaign content. They serve as a reference point for evaluating the effectiveness of your campaign.
📘
NOTE
Setting up a conversion goal is mandatory when using the Control Group feature.
To exclude users in the control groups, do the following:
Toggle on the control group to exclude the users in the control group from the campaign's target segment.
Specify the percentage of users you want to exclude from the campaign using the scroller/ slider.
Control Group
Custom key value
Add a custom key value if required. Toggle the Custom key value button to add
Custom key-value: A custom key-value pair is a simple data structure that sends extra information with your campaign. This lets you personalize the user experience and trigger specific actions within the app when the message is received. This data becomes available whenever an in-app message is clicked or dismissed.
Add a custom key value
Set custom key-value data for specific Android or iOS apps, or both.
Add up to 50 custom key-value pairs.
Once enabled, you must add at least one key-value pair. Duplicate key names are not allowed.
Only these characters are allowed: a-z, A-Z, 0-9, -, _, ., @, :, ', /, {,}.
Only these characters are allowed: a-z, A-Z, 0-9, -, _, ., @, :, =, &, +, %, ?, #, ', /, {,}, [, ].
5.Audience: Define the target audience for your campaign in the Audience section.
Audience
The Audience section lets you select who to target your App Content Personalization. You can add up to 50 target audience groups to filter the app content pz as per variours user segments/ lists.
It has the following sections:
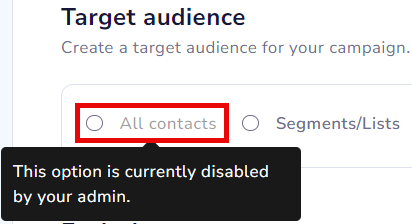
All Contacts: Target all users in your contact list when creating campaigns.
📘
All Contacts Setting
Admin users of the Netcore CE dashboard can disable the All Contacts option, if they prefer not to send a campaign to all contacts. This option is enabled by default, making the All Contacts option selection accessible. However, admin users can change it as needed.
To enable or disable the feature, navigate to Profile > Account Configuration > All Contact Enable/Disable >Active / Inactive.
Enable or Disable All Contacts option
Segments/List: Select from existing lists or segments to target specific contacts. Search for the desired segment or list by name and add it to your campaign with a checkbox selection.
Filters
You can add criteria for up to 5 events. By applying multiple conditions, you can narrow down your audience.
Exclude Audience
Select suppression segments or lists to exclude specific users from campaign targeting. You can select up to 15 segments or lists for exclusion.
6. Content: Create the content of the campaign under the Content section.
Content
Single Image
This section enables you to personalize your app's in-app experience by displaying a single image with an actionable button. Here's a breakdown of the settings:
Section
Field
Description
Add Image
Choose Type
Select how to add the image: - URL: Enter an image link (HTTPS) - Upload File: Upload PNG or JPEG from your device.
Media URL
Media URL is required when using image links and must support https or http with file formats: PNG, JPEG, or JPG.
Personalization is supported.
Action Button
Action Title
Toggle the button ON and define the button label (Max 25 characters). You can select a maximum of 2 buttons.
Call to Action
Choose what the button does: - Open within app: Opens a screen via deep link. - Open in browser: Opens a webpage in an external browser. - Copy text: Copies predefined text to the clipboard.
Enter Deep Link URL
Required if “Open within app” is selected. Deep link that defines in-app behavior.
Text Color
Select a hex color code for the action button text such as,#6F6F8D.
Background Color
Select a hex color code for the background of the button, such as,#6F6F8D.
JSON Code Editor
To create an app content personalization using Code editor, follow these steps:
Select JSON code editor.
Add your code JSON code in the blank canvas or upload the JSON code from your device (Max size: 5 kb). Preview the template in real time on the right pane.
📘
Note
To use personalization in the JSON code editor, follow the steps given here.
Test app content personalization
Select TEST to preview the final personalization before making it live.
Select your desired test device from the dropdown and click SEND TEST MESSAGE.
🔜
Coming Soon
More ready-to-use templates are coming soon. Stay tuned for more updates.
📘
Note
To add a new test device, click here. Add a test device by selecting the relevant app in Settings > Apps.
7. Schedule: Define the campaign's delivery time and date.
Schedule
Finish creating and previewing personalization, then schedule your campaign.
Under the Schedule campaign, select Send Now to send immediately or select Send later to send it on your desired date and time.
Under Campaign Frequency, you can control how often a user sees your campaign. Select the specific days of the week and time until which you want the personalization to run. Click COPY FOR ALL to apply the same time to all days.
Once you have checked the appearance of your entire personalization, publish it by clicking the Publish Campaign button.