WhatsApp is a messaging channel that allows you to engage with your customers. You can send personalized messages, notifications, and updates directly to your users' WhatsApp accounts. This channel helps improve customer engagement, support, and marketing efforts by reaching users on a platform they use daily.
Key Features
Direct Messaging: Send personalized messages to your customers in real-time.
Rich Media Support: Share images, videos, documents, and more.
Automation: Trigger messages based on user actions or predefined workflows.
Two-Way Communication: Allow customers to respond, enhancing interaction and support.
Analytics: Track message delivery, read rates, and customer responses.
Use Cases
Use Case
Example
Transactional Alerts
Notify customers about order confirmations, payment receipts, or shipping updates.
Promotional Messages
Inform users about seasonal sales, special offers, or new product launches.
Customer Support
Assist customers with FAQs, troubleshooting, or account management.
Surveys & Feedback
Ask for customer feedback after a purchase or service experience.
Appointment Reminders
Send reminders for scheduled consultations, webinars, or deliveries.
Order Abandonment
Remind customers who have left items in their cart to complete their purchase.
📘
Prerequisites
WhatsApp Business Account: Ensure you have a verified WhatsApp Business Account.
WhatsApp Business Number: Ensure that the phone number you use for WhatsApp is active and verified.
Netcore Integration: Your WhatsApp business account should be integrated with Netcore. This requires API provided by WhatsApp.
User Consent: Ensure you get consent from users to send them messages on WhatsApp.
Templates: WhatsApp requires pre-approved message templates for non-transactional messages. Ensure you have these templates approved by Meta.
Compliance: Follow WhatsApp’s business policy to ensure all communications are compliant.
Steps to Create a WhatsApp Campaign
Follow the steps to create a WhatsApp campaign.
Navigate to Engage > Campaigns and click the Create button to create your email campaign.
Select Engage with users > WhatsApp.
Create a WhatsApp Campaign
3. Provide basic details about your campaign in the Setup section
Setup
Refer to the table below for details on the sections available under Setup.
Field Name
Description
Campaign name
Add a name for your campaign.
Business Number
Select the registered phone number through which users will receive your WhatsApp messages.
Add tags
Add tags to categorize your campaign. You can select up to five tags.
The Advanced section has the following features:
In the Advanced settings section, you can configure the fields to track campaign performance.
Enable the UTM tracking to add UTM Parameters to track campaign efficacy under Google Analytics' campaign reports. Refer to the table below for details on UTM Parameters.
UTM Parameter
Description
Default Campaign Value
Default Journey Value
utm_source
The source identifies the platform or website from which the traffic originates, such as Google, Facebook, or the newsletter.
Netcore
Netcore
utm_medium
The medium specifies the marketing medium used to deliver the traffic.
{CHANNEL}
{CHANNEL}
utm_campaign
The campaign refers to the specific marketing campaign name or identifier. For example, summer_sale, holiday_promo, or new_product_launch.
{CAMPAIGN_NAME}
{JOURNEY_NAME}
utm_term
The term is used to identify specific keywords or phrases associated with paid search campaigns. For example, running shoes or discount coupons.
Campaign
Journey
utm_content
The content helps differentiate between various versions of an ad or link that direct to the same destination.
None
None
📘
Important Points to Remember
The UTM Parameter values defined in Global Advanced Settings appear automatically when you create a new campaign.
You can edit any of these default values before saving the campaign/journey. This would ONLY affect the campaign/journey settings not the Global Advanced Settings.
When the landing page URL already contains UTM parameters, the values you enter on the Setup page replace those values.
If you leave a UTM field empty on the Setup page, and that parameter exists in the URL, the URL value is kept.
UTM parameters gets added only to landing page URLs and action button URLs and not to non-URL actions like Dismiss, Copy Code, or Remind Me Later.
Set Conversion Goal
Refer to the table below to set up the conversion goal on the Setup page.
Advanced Fields
Description
Set Conversion Goal
Add conversion goals to monitor key business metrics and measure the success of your app push campaign. You can track one conversion goal per campaign. Select any activity as a conversion goal activity according to your objectives.
For example, if you want to track the number of customers who have purchased shoes after your campaign was sent. (Event: Product Search, Product: Shoes).
This is a mandatory field.
Payload parameters
You can define criteria for the conversion event payload. Up to five parameters can be added for customisation.
For example, specify a purchase event when the product price exceeds 10,000.
Conversion Window
Define the conversion window to link user actions to campaigns in a specific timeframe.
Revenue Parameter
Select this option to assign a value to each successful action to track financial impact. This is a mandatory field.
Deduplication: Deduplication ensures that each contact receives only one WhatsApp message per campaign. It prevents multiple messages from being sent to the same person. This feature automatically detects and removes duplicate entries in your contact list. It avoids annoying your contacts with repeated messages and optimizes your campaign's reach. You can toggle this option to enable.
4. Define the target audience for your campaign in the Audience section.
Audience
The Audience section allows you to select who to target with your WhatsApp message. It has the following sections:
Choose a specific segment or list to define the campaign audience. Pick up to five user segments or lists. Use for targeting based on historical behaviour captured by server-side user segments. Target Audience has the following options:
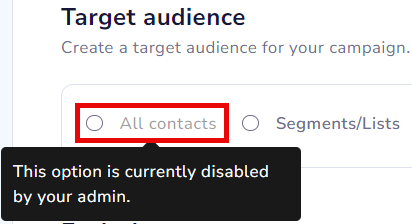
All Contacts: Target all users in your contact list when creating campaigns for broader outreach.
📘
All Contacts Setting
Admin users of the Netcore CE dashboard can disable the All Contacts option, if they prefer not to send a campaign to all contacts. This option is enabled by default, making the All Contacts option selection accessible. However, admin users can change it as needed.
To enable or disable the feature, navigate to Profile > Account Configuration > All Contact Enable/Disable >Active / Inactive.
Enable or Disable All Contacts option
Segments/List: Select from pre-defined lists or segments to target specific contacts. Search for the desired segment or list by name and add it to your campaign.
Reachable Contacts
Locate Reachable contacts to view the approximate number of users who can receive this campaign. It excludes users who have uninstalled the app, opted out of notifications, or have stale tokens. The actual number can vary because of blacklists, suppressions, frequency caps, or other delivery rules applied at send time.
View Reachable Contacts for a Messaging Campaign
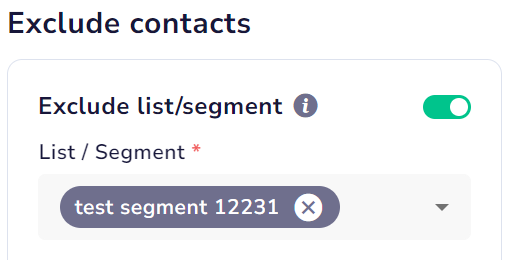
Exclude Contacts
Select segments or lists to exclude specific users from your campaign. You can choose up to five segments or lists for exclusion.
Exclude Contacts from your Campaign
5. Create the WhatsApp content under the Content section.
Content
After the basic Setup and defining the target audience, Content is the section where you can select and edit your meta-approved WhatsApp template.
Refer to this document to create a WhatsApp template.
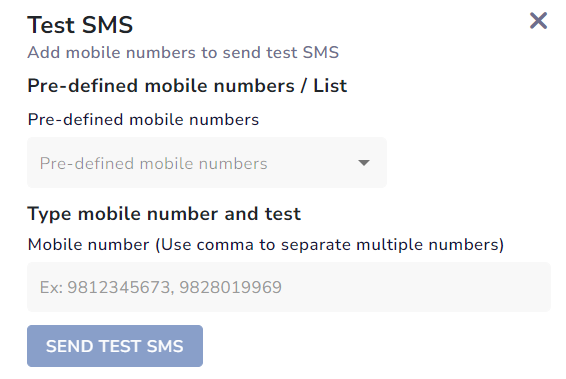
Send Test Message
Select the Send Test SMS option to preview your SMS before sending it to users.
Add mobile numbers to send a test message
Refer to the table below for details on the sections under Send Test SMS.
Field Name
Description
Add WhatsApp Numbers
Select this option to get a test message on your preferred WhatsApp number. You can add up to five WhatsApp numbers.
Paste WhatsApp numbers (Comma-separated value)
Select this option to get a test message on multiple WhatsApp numbers. The numbers should be comma-separated.
7. Define the campaign's delivery time and date under the Schedule section.
Schedule
You can create and preview your WhatsApp campaign and then schedule your campaign.
Refer to the table below for details on the sections under Schedule campaign.
Option
Description
Frequency cap
Toggle communication frequency settings to limit the WhatsApp messages a specific user can receive.
When to send
Select the options for when you want your WhatsApp campaign to be sent.
Send now: You can immediately send the WhatsApp campaign to recipients.
Send Later: You can schedule the WhatsApp campaign at a specified date and time.
Contact limit
Limit the number of contacts who have joined this message.
The Contact Limit feature in campaigns allows marketers to communicate in smaller chunks over an extended period. This helps manage costs and control the reach of each campaign efficiently. You can control message delivery during the warm-up phase to avoid resending the same content to the same users.
This is an approximate count of users to whom this campaign would be sent. This excludes users who have uninstalled the app, opted out of receiving notifications, or have stale tokens. The final count may vary due to blacklists, suppressions, frequency capping, etc.
The tabs present under Contact limit are:
Reachable count: Total number of contacts that can be reached.
Set contact limit: Number of contacts already reached.
Edit Contact Limit after Campaign is Sent
If the campaign was sent with a contact limit, you can edit the limit even after the campaign has been executed. Follow the steps given below.
Navigate to the campaign and click the Edit button (available only if a contact limit was set).
You will be redirected to the Schedule screen. Here, you can change the contact limit, send time, or other scheduling parameters.
📘
Disabled Tabs
The Setup, Audience, and Content tabs are locked. You can only view their details through the Summary tab on the right.
When your campaign is ready, click the SAVE AND PREVIEW using your desired settings.
Review the details of your campaign one final time. If everything looks good, click SAVE & PUBLISH to send the campaign.