All Contacts
View and manage contacts on the Netcore CE dashboard.
Video Tutorial
Refer to the video below to learn how to bulk upload all your contacts.
Overview
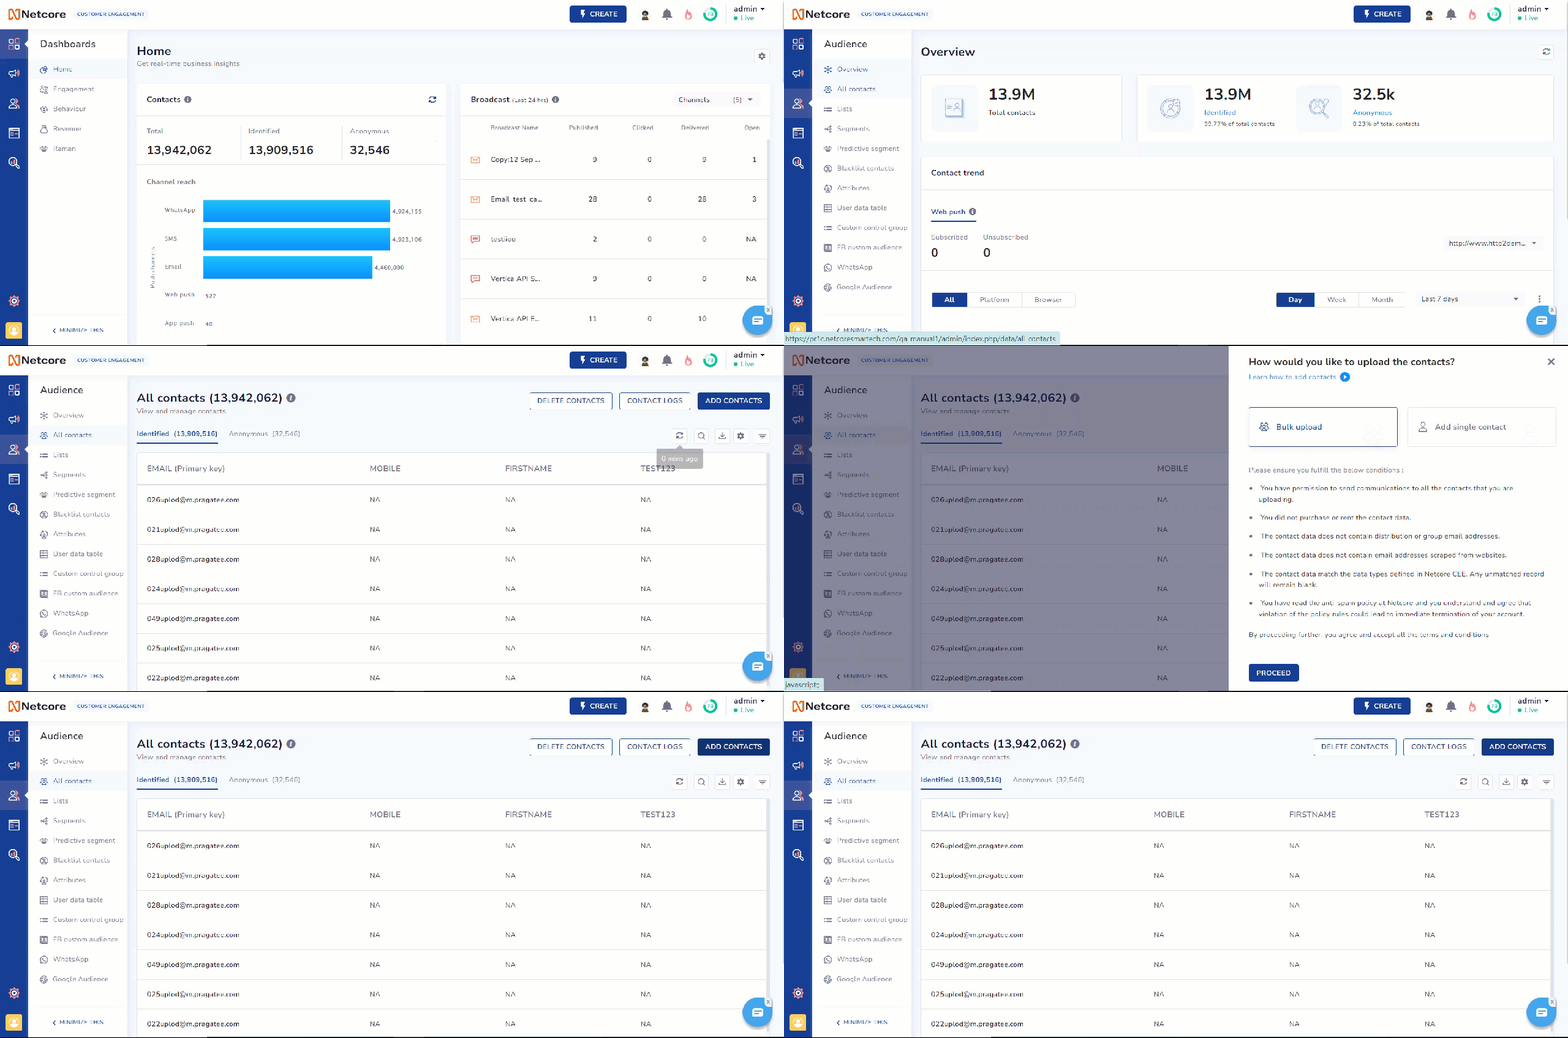
The All Contacts feature on the Netcore CE dashboard provides a comprehensive view of your entire contact list, including Identified and Anonymous contacts. This feature allows you to manage, filter, and customize the display of contacts. You can perform key actions such as deleting contacts, adding new contacts, and viewing detailed contact logs.

View and manage contacts
Key Features
| Option | Description |
|---|---|
| Refresh | Update and refresh the current contact count |
| Search by Primary Key | Search for contacts using their unique primary key, such as email or mobile number. |
| Download Contacts | Download the filtered or entire contact list to your device. |
| Customize | Select the contact attributes you want to display on the listing page. |
| Filter | Use filters to refine the contact list based on specific criteria. Options:
|
Here are the key actions you can perform here:
Delete Contacts
The Delete Contacts feature lets you remove contacts from your system or specific lists using a CSV file containing primary keys or email addresses.
To delete contacts, follow the steps given below.
- Navigate to Audience > Delete contacts. The Delete contacts screen appears.
- The options available for deleting contacts are the following:
| Options | Description |
|---|---|
| Primary Key / Email | Select the identifier (Primary Key or Email) for the contacts you want to delete. These will be used to match and remove the appropriate contacts. |
| Delete From | Lists: Select a specific list from the dropdown menu from which the contacts will be deleted. This option allows you to remove contacts from a particular list without affecting their status in other lists. System: Select this option to delete contacts entirely from the system. You can upload the file containing the contacts to be deleted. |
| Select list | Select from the existing list from the dropdown menu. |
| Upload file | Upload a UTF-8 encoded CSV file containing the contacts to be deleted. Ensure that the file only contains a single column with the Primary Key or Email and no headers. Note: - Upload a UTF-8-encoded CSV File to ensure proper handling of special or multilingual characters. - Avoid using headers and ensure the file contains only one column (Primary Key or Email). - The system accepts files with a maximum of 50,000 rows. If you need to delete more contacts, split the data into multiple files. |
- Review the summary of the contacts selected for deletion. When you are ready, click Done to confirm.
Contact Logs
Access detailed logs that provide insights into the activities and updates related to each contact, helping you track interactions and changes over time. The system may take up to 30 minutes to make the contacts available for segmentation. Refer to the table to know the functionalities available.
| Functionality | Description |
|---|---|
| Search | Search by request ID, file or list name. |
| Duration | Select your preferred year from the dropdown, and the data will be displayed month by month for that selected year. |
Refer to the table below to learn the fields available for contact logs.
| Field | Description |
|---|---|
| Request ID | Refers to the unique identifier assigned to each contact upload request. |
| File Name | Refers to the name of the file that was uploaded with contact data. |
| Status | Refers to the current stage of the contact upload (Processed, Completed, Failed). |
| Upload Started On | Refers to the date and time when the contact upload process began. |
| Requested On | Refers to the date and time when the contact upload was initially requested. |
| Selected Lists | Refers to the specific lists where the uploaded contacts have been added. |
| Failure Report | Refers to a downloadable report containing details of any failed uploads or errors. |
Note
- Datatype mismatch: The attribute value displays 0 if the provided data doesn't match the predefined data type.
- Invalid data: The email addresses and corresponding attributes are not uploaded if they contain typographical or syntax errors.
- Harvest error: If a list is suspicious of containing harvested and unsolicited data, you can upload it only after the support team authentication.
- System error: The list failed to upload due to a technical issue. You can contact the technical support team.
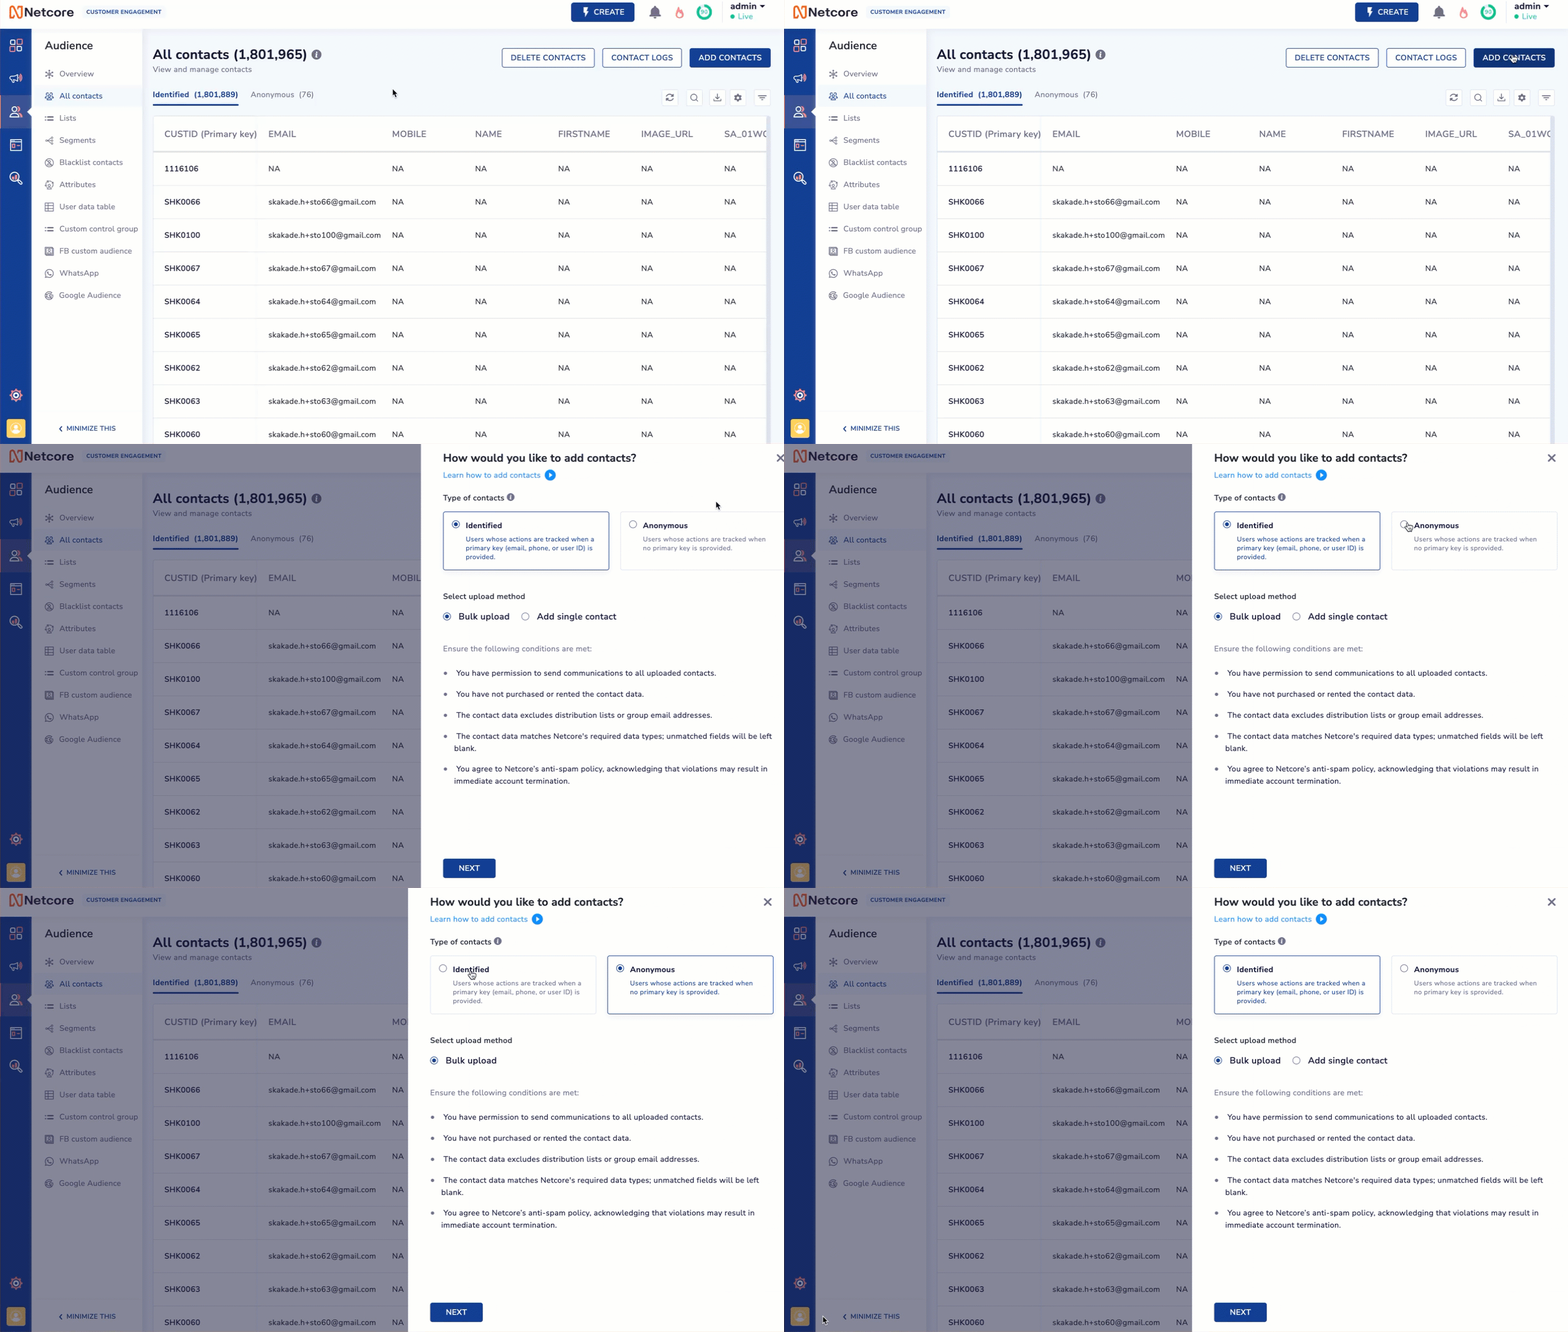
Add Contacts
Add new contacts to your database either individually or in bulk. This feature lets you import contacts using CSV files and map attributes to ensure proper integration into your contact lists.
Primary Key Selection
- If the primary key is either Email or Mobile: These are system attributes and cannot be renamed. However, other attributes can be created as per your requirements.
- If the primary key is CUSTID: It cannot be renamed. However, other attributes can be created as per your requirements.
Refer here for sample format for uploading contacts with different primary keys.
There are two ways to upload contacts:
Bulk upload
Terms & Conditions
- You have permission to send communications to all the contacts that you are uploading.
- You did not purchase or rent the contact data.
- The contact data does not contain distribution or group email addresses.
- The contact data does not contain email addresses scraped from websites.
- The contact data match the data types defined in Netcore CE. Any unmatched record will remain blank.
- You have read the anti-spam policy at Netcore and you understand and agree that violation of the policy rules could lead to immediate termination of your account.
- By proceeding to bulk upload contacts, you agree and accept all the terms and conditions
To upload multiple contacts at once, follow the steps given below.
- Navigate to Audience > Add Contacts > Bulk Upload > Proceed.
- The Bulk upload screen appears. Upload your file here or browse.

Add Single or Bulk Upload Contacts
Bulk Data Upload Guidelines
- CSV, ZIP, and TXT, with a maximum file size of 150MB. For proper handling of special or multilingual characters, ensure your CSV file is UTF-8 encoded.
- Ensure that mobile numbers are entered without any special characters, and do not include a + sign, * or spaces.
- The correct format for the phone number is: [country code][phone number]. For example, a valid number for India would be 919869311111, where 91 is the country code.
If you upload numbers with a ‘+’ sign, system will reject the given modile numebr move it to error file under upload logs section.
- Click Next step. Under Attribute Mapping , map the columns in your CSV file to their corresponding attributes.
Note
- Add any new attributes missed while creating the list during this step.
- Mapping the Primary key attribute is mandatory.
- Unmapped attributes will not be uploaded from the contact file.
- Once the mapping is complete, click Save & Add Contacts to upload your contacts.
Add Single Contact
To manually add a new contact, follow the steps given below.
- Navigate to Audience > Add Contacts > Add single contact .
- Enter the contact's email address. This is a required field.
- Optionally, enter the contact's mobile number for multi-channel communication.
- Add to List: From the dropdown menu, select the list(s) to which you want to add this contact.
- System Attributes: Fill in any system-defined attributes such as name, location, or date of birth.
- Custom Attributes: You can add custom attributes specific to your campaign needs or tracking preferences.
- After adding the required fields, click Save. Your contact information has been uploaded to the Netcore CE dashboard.
Unified View of Contact
The Unified View of Contact gives you a complete, real-time overview of each contact’s profile and activity data. This feature lets you view a user's demographic details, transaction history, and real-time engagement across various channels.
To view a unified view of contact, navigate to Audience > All Contacts, then click the primary key of the contact you want to view.

Unified View of a Contact
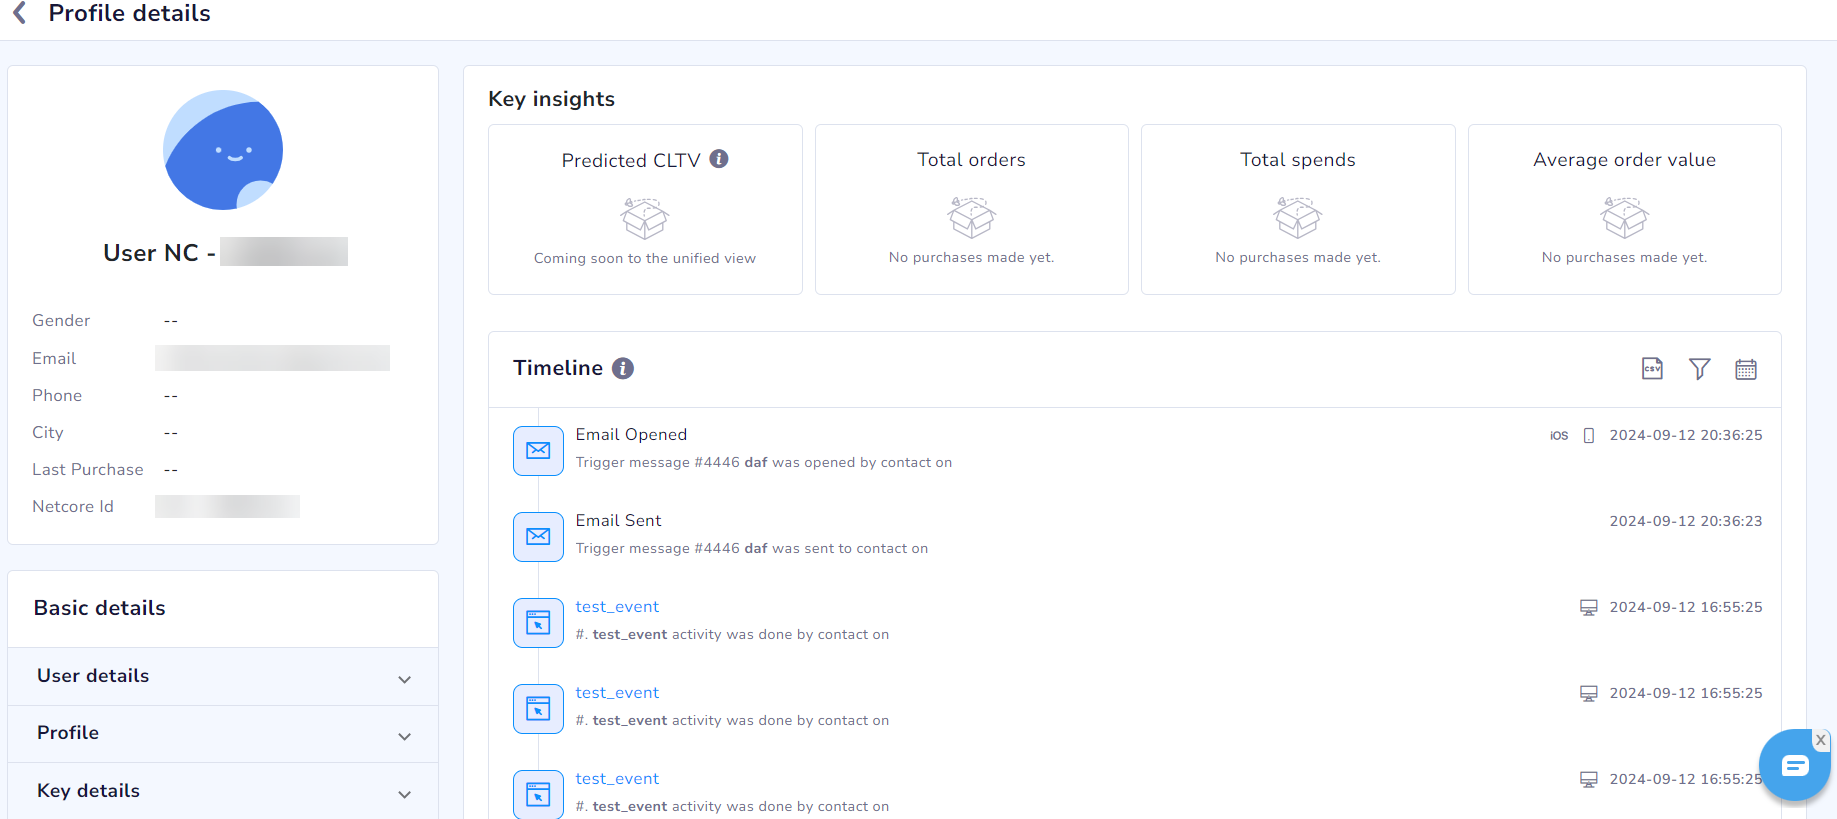
When you click on the primary key, a Profile details screen appears. In the top left corner, view the following details of a user: Gender, Email, Phone, City, Last Purchase, Netcore ID
Refer to the table given to learn about the available fields.
| Section | Description |
|---|---|
| User Details | Information about when and how the user was added or updated. Options:
|
| Profile | Displays the primary key of the user. |
| Key details | Shows key insights into the user's inclusion in segments, lists, and journeys. Options:
|
On the right pane, Key insights are available, which include Total orders, Total spends, and Average order value.
The Timeline shows users' recent actions and interactions, such as email opens and clicks. By default, it displays the past seven days, but you can adjust the time range or filter by specific activities for more details. Refer to the table to know the other options available here.
| Option | Description |
|---|---|
| CSV | Click on the CSV icon to download the user's activity timeline as a CSV file. |
| Filter | Filter the user's activity timeline based on specific messaging channels they have engaged with, such as Email, SMS, web message, and so on. |
| Duration | Filter and view the user’s activity within a specific time range. |
Updated 9 months ago
