
Rule-Based Personalization
Learn how to create Rule-Based Personalization on the Netcore CE dashboard for your website.
Overview
Rule-based personalization allows you to manually set specific conditions and rules to customize website content for your users. This is ideal when you need control over your campaigns and want to deliver specific content to different user segments based on predefined conditions.
Workflow
You define a set of rules based on user attributes or behavior. When users visit your website, the system checks if they meet your set conditions, such as location, device type, browsing history, or referral source. If they match the criteria, they are shown personalized content, offers, or product recommendations that are relevant to them.
Key Features
- Targeted Customization: You can personalize content based on user characteristics like age, location, device, or browsing patterns. For example, users in one country can see a different homepage banner than users in another.
- Control and Flexibility: By manually setting the rules, you have complete control over which segments of your audience see specific content. Rule-based personalization is ideal for running seasonal promotions, localized offers, or specific campaigns.
- Real-Time Adaptation: The content is updated in real-time as users interact with your website. This ensures users see relevant content based on their current behavior or previous interactions.
Use Cases
Here are some everyday use cases where Rule-Based Personalization can help you deliver targeted, relevant content to your users.
| Use Cases | Description |
|---|---|
| Localized Content | Show different versions of your homepage or product offerings to users in different regions. |
| Time-Sensitive Offers | Display promotions based on the time of day or during specific seasons, such as holiday discounts. |
| Device-Specific Customization | Customize your website layout or offers depending on whether the user is on a mobile device, desktop, or tablet. |
Create Content Personalization
These are the steps to create a Content personalization campaign:
- Click the Create button on the dashboard homepage.
- Select Engage with users > Content under Personalization.
Create Content Personalization
3. Setup: Add the campaign details here.
Setup
Refer to the table below for the sections under Setup.
| Sections | Description |
|---|---|
| Campaign Name | Select a name (up to 100 characters) to identify your campaign. You can use letters, numbers, hyphens, and underscores. |
| Campaign placement | Specify where you want to run your personalization campaign. Options:
|
| Tags (Optional) | Assign up to five tags. |
| Priority Logic | Campaign: Show personalisation based on the list page's campaign priority. Note: Last action priority will override campaign level priority. Refer here to know more about Campaign Priority Logic. |
| Conversion Goal | Set a goal to measure campaign success. |
| Control Group | Define a percentage of users who will not see the personalization for comparison. |
| Campaign notes | Write to remember why you created this campaign. |
Fill in all the required sections and proceed.
The Advanced details have the following features:
- Set conversion goals: Add conversion goals to monitor key business metrics and measure the success of your personalization. You can track one conversion goal per campaign. Select any event as a conversion goal activity according to your objectives.
For example, if you want to track the number of customers who have purchased shoes after your campaign was sent. (Event: Product Search, Product: Shoes).
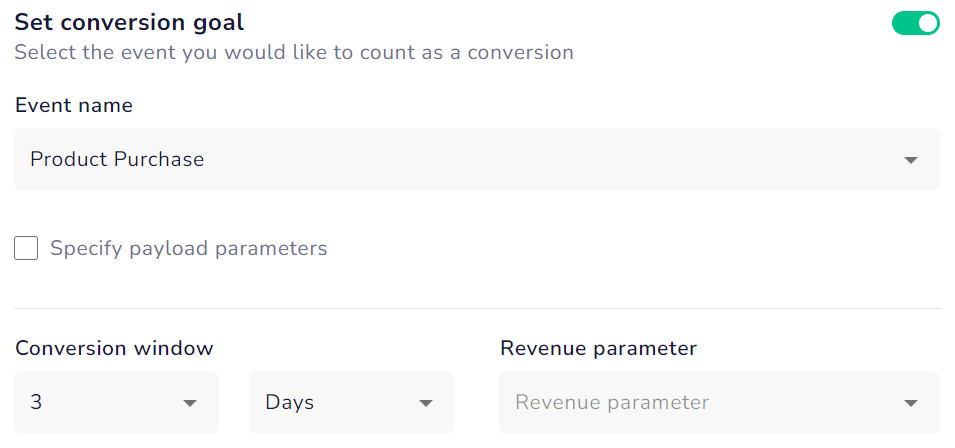
Set Conversion Goal
- Conversion Window: Select this option to define the time frame for successful actions after interacting with your campaign.
- Revenue Parameter: Select this option to assign a value to each successful action for tracking financial impact.
- Control group: These are the number of users you intentionally exclude when sending campaign content. They serve as a reference point for evaluating the effectiveness of your campaign.
To exclude users in the control groups, do the following:
- Toggle on the control group to exclude the users in the control group from the campaign's target segment.
- Specify the percentage of users excluded from the campaign using the scroller/ slider.
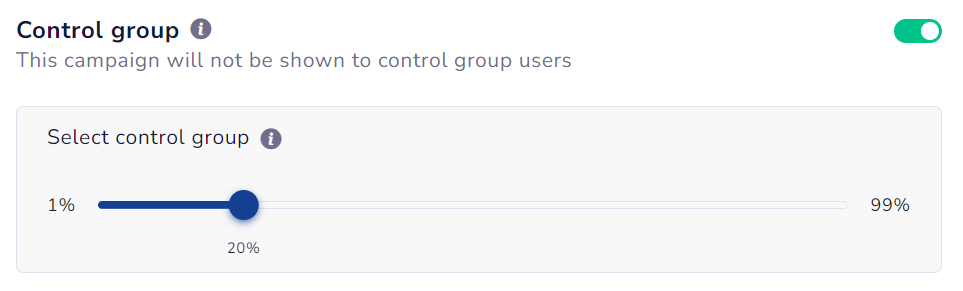
Control Group
4. Audience: Define the target audience for the campaign.
Audience
The Audience section allows you to select who to target for your website personalization. You can add multiple audience groups to show the personalization as per user behaviour or prefrernces. Simply drag and drop the Audience groups to set the audience priority.
Audience screen has the following sections:
1. Live user segment
Toggle this option ON to target users visiting the website. Refer to the given table to know the options available here.
| Fields | Description |
|---|---|
| User type | Identified / Anonymous: Target users based on identification status. Options: All Users, Identified, AnonymousNew / Returning: Filter users based on visit history. Options: All Users, New Users, Repeat Users | |
| User source (Referral website) | The website or platform that referred the user to your site. This helps track the traffic source and understand where users come from. You can add up to five user sources. |
| UTM Parameters | Add URL parameters to track campaign efficacy under Google Analytics campaign reports. Refer here for more details on UTM parameters. Note: UTM parameters should not contain special characters. Only dashes (-), underscore ( _ ), spaces, and pipe ( | ) symbols are allowed. |
| User location | Define the user location for personalization. Options:
|
| Time of the day | Personalize content based on the time of day when users visit your site. |
| Device | Personalize content based on the type of desktop operating system, mobile device, tablet, or user's web browser. |
| Activity | Select real-time visitor activities for personalization. If selected, this will be combined with audience activity using an AND or OR condition. Note: You can use up to five payload parameters per activity and add up to five activities for each audience. You can add as many activities you want as per your requirements. |
2. List / Segment
Toggle this option ON to select lists or audience segments for your personalized campaign.
Note
- Select list/segment from your saved segments because you cannot create a new segment in this section.
- Segments/lists in the audience section refresh every 24 hours.
Specify Payload Paramter
Imagine you are running a personalized online store where different users see different things based on what they've done. This includes what products they've looked at, added to their cart, or what pages they've browsed. This feature helps you control how the system decides which user activity to "listen to" before showing a personalized message or offer.
Workflow
When you want to show personalized content based on user activity (like "Add to Cart" or "Product View"), you now get to select how the system matches the user's actions (payloads) using three modes:
- Latest
- Any
- All
| Mode | Description | Example |
|---|---|---|
| Latest | Matches only the user's most recent action. | If the last action was a product view, show recommendations based on that product. If the last action was unrelated (like opening the cart), show default content. |
| Any | Matches any of the user's past actions, not just the latest one. | The user viewed 3 shirts, then visited the FAQ. Even though the FAQ was the last action, the system still uses the shirt views to show relevant offers. |
| All | Matches only if all instances of the action meet the condition. | A user adds 5 items to the cart. Show a "Free Shipping for Electronics" banner only if all 5 items are electronics. If one isn't, the banner won't appear. |
5. Personalization: Create your website personalization and define other details.
Personalization
After the basic setup and defining the target audience, Personalization is the section where you can create your website personalization and define other details. You can create or edit your Personalization using various editing options in this section. There are two modes available:
- Edit: The Edit mode lets you directly change the content and style of elements on your website. Update text, images, and other settings in real time to personalize your site.
- Navigate: In navigation mode, you can browse the website as usual, but not leave the page you are editing. If you do, any unsaved changes will be lost. This mode is useful for websites with carousels of banners or images. You can use navigation mode to scroll through banners, then switch to edit mode to change the banner you want.
Create Website Personalization
Key Functionalities
Here are the key options available to customize your website personalization.
| Option | Description |
|---|---|
| History | View the history of changes made to the website personalization settings. |
| Track Click List | Track and review the list of user clicks to analyze engagement with personalized elements. |
| Add Rules | Create and apply new rules to customize how and when personalization is shown to users. |
| Desktop View | Preview how the personalized content appears on desktop devices. |
| Tablet View | Preview how the personalized content appears on tablet devices. |
| Mobile View | Preview how the personalized content appears on mobile devices. |
| Nullify & Exit | Discard all changes made and exit the editor without saving. |
| Discard | Discard recent changes and return to the previous state without saving. |
| Save & Exit | Save all changes made and exit the editor. |
Edit Content
Click on the element you want to edit for a list of available options. Check the table for more details.
| Option | Description |
|---|---|
| Add Element | Allows you to insert a new element (such as text, image, or button) into the webpage for personalization. |
| Edit | Allows you to modify the selected element's content or style directly within the editor. |
| Edit HTML | Allows you to access and modify the HTML code of the selected element for advanced customizations. |
| Copy Style | Allows you to copy the selected element's styling (like fonts, colors, or spacing). |
| Paste Style | Allows you to apply the copied styling to another element for a consistent design. |
| Set as Original | Allows you to mark the current version of the element as the default or original state for reference. |
| Select Parent | Allows you to select the parent container of the selected element to edit or adjust its settings. |
Overlay
Overlay are pre-designed components you can use to enhance your website personalization. They allow you to add functional and visually appealing elements to your site quickly. Refer to the table below for the available overlays. Refer to this document for detailed information and editing options available for each widget.
| Overlay | Description |
|---|---|
| Home Hello Bar | Use this to add a bar at the top of your homepage to display announcements or special offers. |
| Progress Bar | Use this to add a visual progress bar to show users their progress during tasks like checkout or form completion. |
| Recently Viewed | Use this to display previously browsed products and help users to revisit and purchase products. |
| Coupon on Sliding Drawer | Use this to add a sliding drawer that reveals a coupon or offer to encourage user interaction. |
| Tab Talk | Use this to add a side tab for quick messages or chat options to engage users. |
| Back to Top | Use this to add a button that lets users quickly scroll back to the top of the page. |
In-line Widget
Inline widgets are interactive elements added directly into your website content. They let users access key features, like lead forms, extra info, or quick actions, without leaving the page. Think of them as smooth, on-page boosters for engagement and conversion. Refer to the given document to know more about the In-line widget.
Set Up an Inline Widget
Refer to the given table to know the options below to control how your widget looks.
| Setting | Description |
|---|---|
| Position | Select where to place the widget:
|
| Content | Use a pre-made template from the gallery or build your own from scratch. Click Edit to open the template editor (UCE), where you can add layouts, elements, and styling. Once ready, click Save and Insert. |
| Style | Customize the background (color or image), adjust alignment and padding. Click Apply to confirm the style. |
ImportantDon’t forget to click Apply Changes to save your personalization. If skipped, your changes won’t be saved.
Add Product Block
Add a Product Picker block inside an in-line widget's content to show live, relevant products, for example, recently viewed items, bestsellers, or a curated collection, without leaving the page.
The Product Picker works the same way inside an in-line widget as it does in Email: drag it onto the canvas in the content editor (UCE), then choose whether it should update automatically (Dynamic) or stay fixed to a manually selected list (Static).
Steps to use Product Block
Follow the steps below to use a product block in an inline widget
- While creating in-line widget, under Content, click Edit to open the template editor (UCE).
- Drag the Products block onto the canvas.
- Configure the block's Type, product details, and layout exactly as you would for an email template.
- Click Save and Insert, then Apply Changes to publish your widget.
To understand the complete configuration guide for Product Block in UCE, refer here.
6. Schedule: Specify the date and time to run your personalized campaign.
Schedule
Finish creating and previewing your personalization, then schedule your campaign.
- Start campaign: Select Now to start immediately or select later to run it on your desired date and time.
- End campaign: Select Never to run the campaign indefinitely until you manually stop it or select Specified date to end it on your desired date and time.
- Campaign frequency: Control how many times a user views your campaign.
You have three options under Select the frequency.- Time per session: Number of times personalization is shown per session.
- Time per day: Number of times personalization is shown per session
- Time per campaign: Number of times personalization is shown per campaign.
- Add Delay to Content Personalization: Set a time delay before showing personalized content to users, helping trigger content at the right moment for better engagement.
- Click the Preview & Publish option to save your campaign and preview the personalization. Once you have checked the details and appearance of your entire campaign, click Publish Campaign to publish it.
Updated 8 days ago