
Product Catalog Integration
Integrate and sync product catalogs seamlessly with Product Catalog Integration.
Netcore's Product Catalog Integration enables you to import, manage, and use your product catalog within the Netcore CE dashboard. You can integrate product data from multiple sources, like Shopify, Google XML feeds, or Custom URLs, to enable features such as Merchandising Triggers, Product Picker, and personalized marketing.
Let's say, as a marketer, you want to integrate your Shopify store catalog and a custom Google XML feed into PCI. Once integrated:
- The platform automatically syncs products and regularly updates changes to ensure your catalog stays up to date.
Note
This does not mean instant updates after every change. Updates are processed at frequent intervals.
- The Product Picker lets you easily add products to emails without manually entering details.
- A price drop trigger campaign runs automatically whenever a product’s sales price decreases.
This workflow saves you time, improves consistency, and ensures your marketing campaigns always use up-to-date product information.
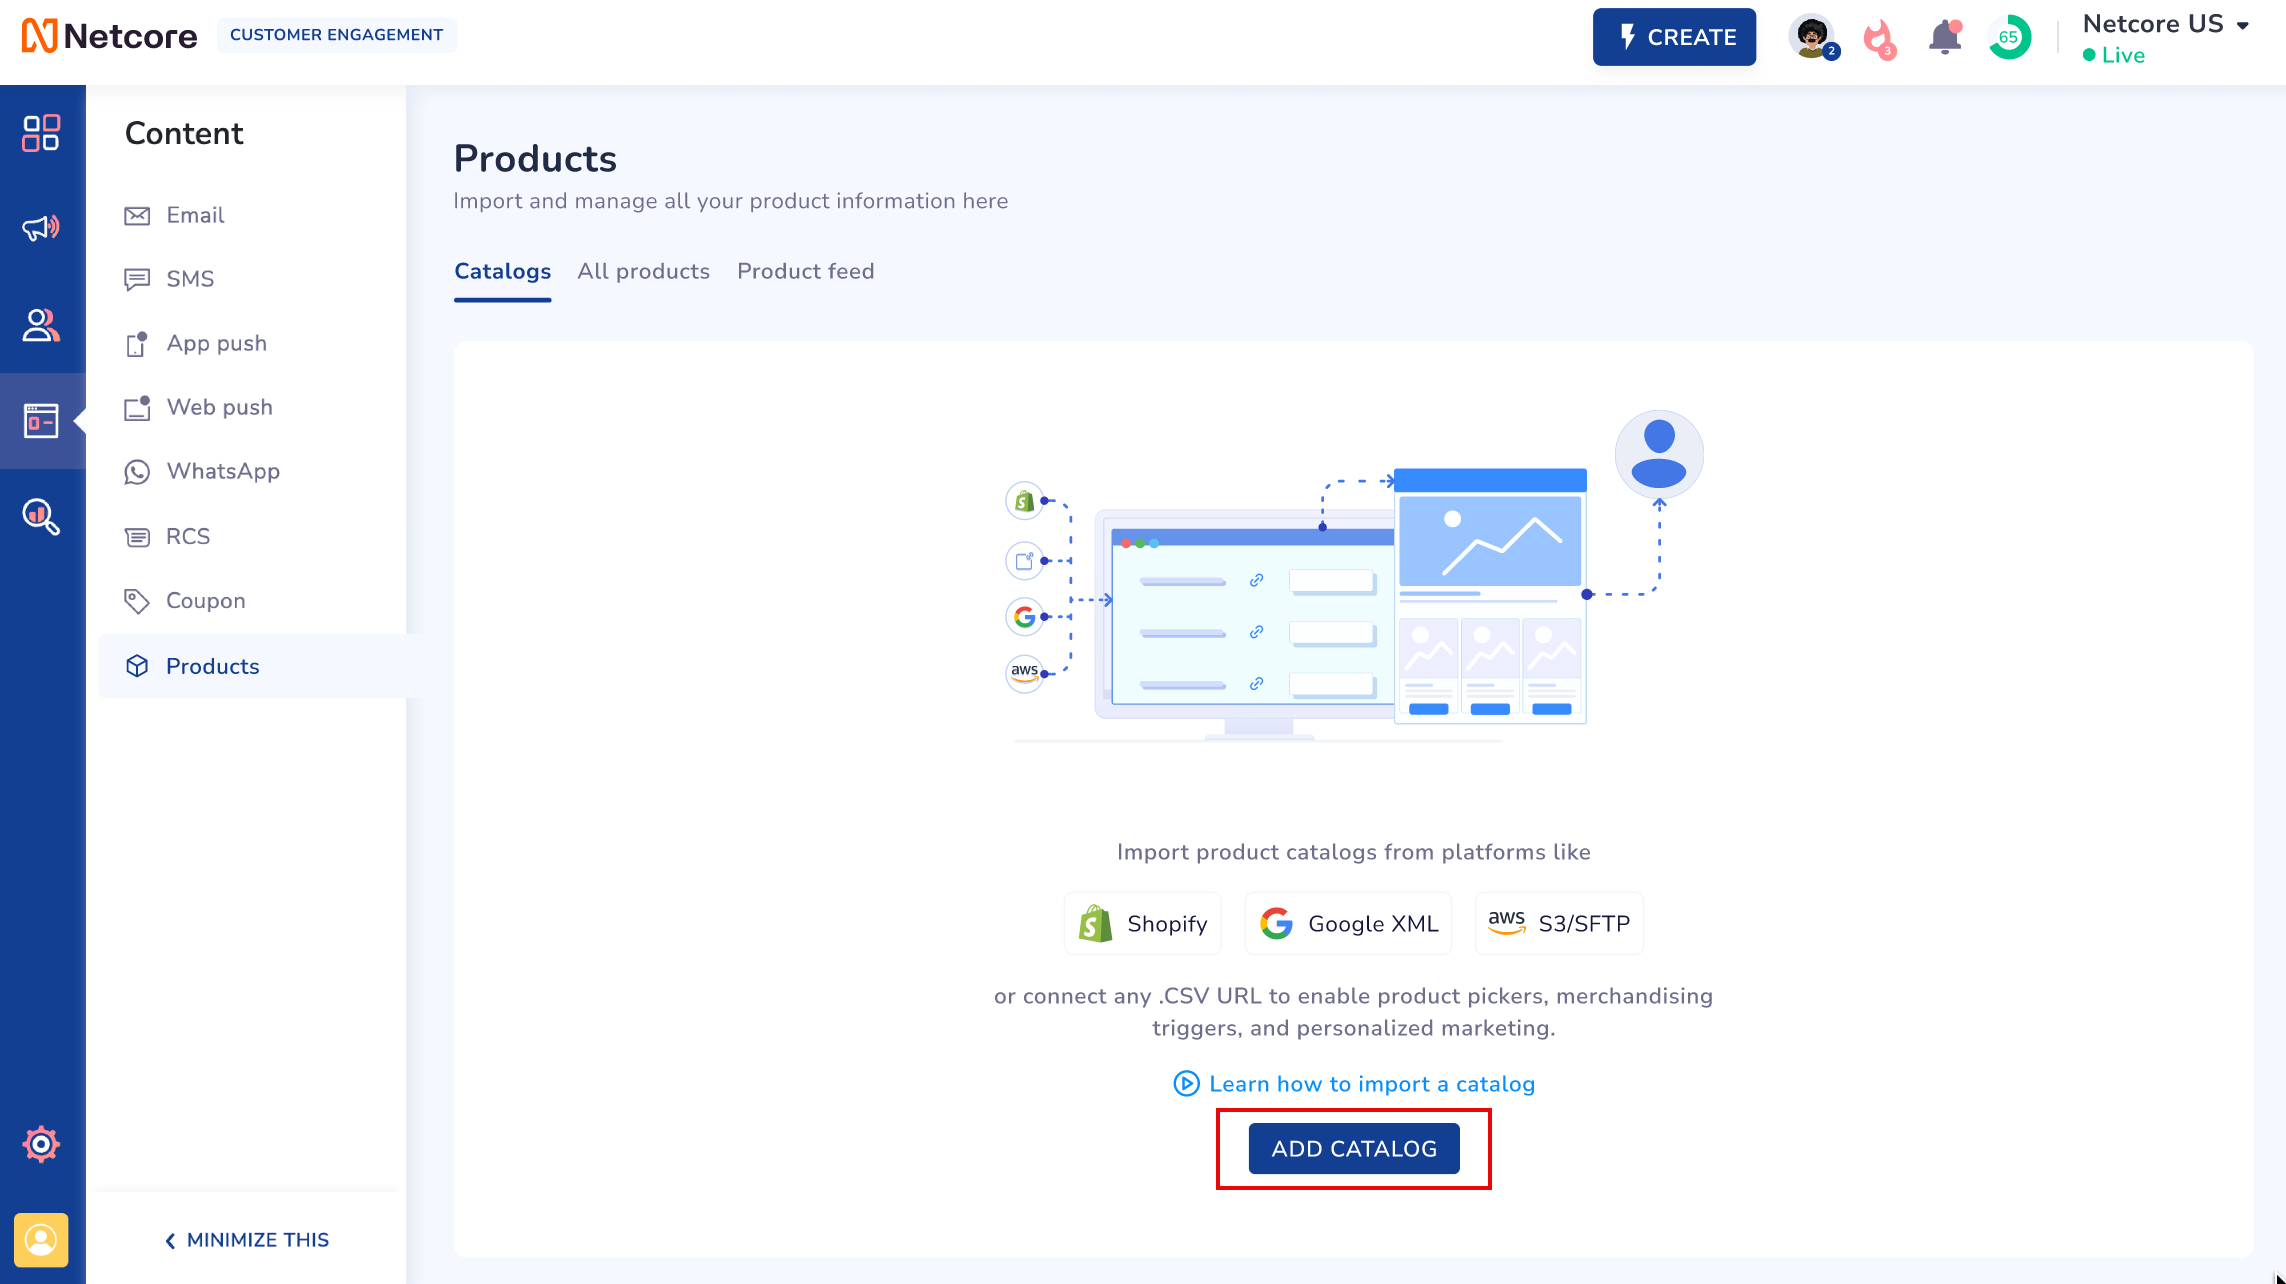
Add Catalog
Follow the steps to add the catalog to the Netcore CE dashboard and use the product picker thereafter.
- Log in to the Netcore CE dashboard and navigate to Content > Products.
- Click ADD CATALOG button to get started.
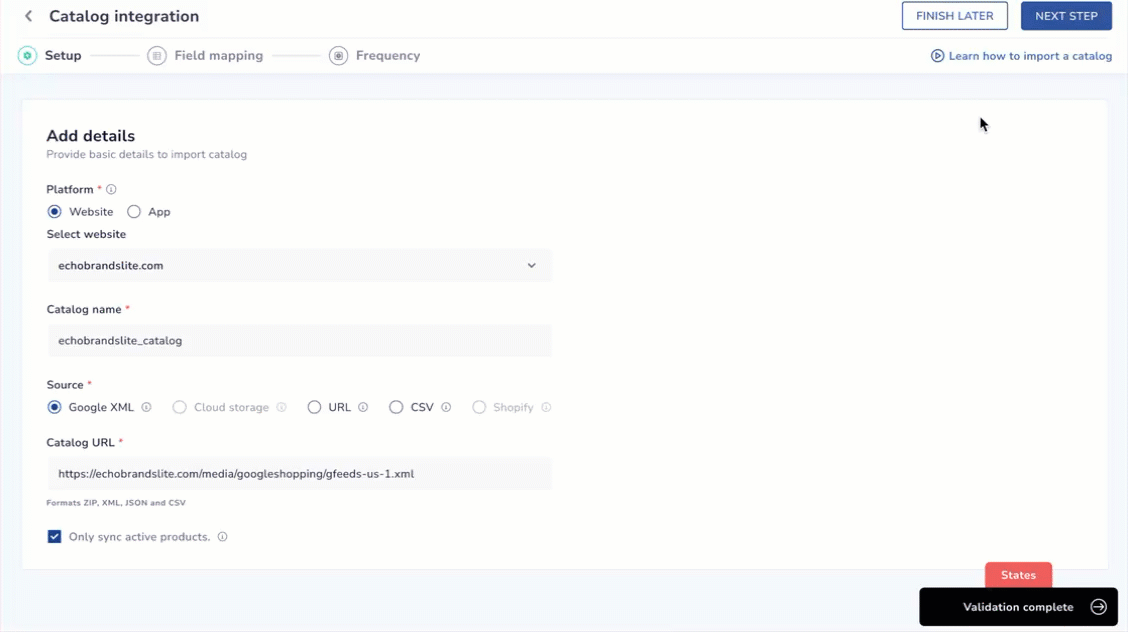
There are three sections you come across when creating a product catalog:
Setup
-
On the Setup page, provide basic details on importing the catalog.
-
Select the platform (Website or App) that is connected to your Netcore CE dashboard.
-
Use the dropdown menu to select the specific Website or App you want to sync.
-
Once selected, we automatically generate a default Catalog name for you. If necessary, you can edit this name before saving.
-
Select the Source for your catalog:
- Shopify: Requires plugin installation from the Shopify App Store. Refer to the given document to know how to install a Shopify plugin.
- Google XML: Paste a valid XML/CSV/JSON feed URL. For the supported XML feed structure, refer here.
Request Support for Your XML StructureIf your XML structure isn't currently supported, we're here to help:
- Click the Send request button
- An automated email will be sent directly to our support team
- Our team will review your XML structure and provide a solution as quickly as possible
You will receive a response with next steps to get your XML structure integrated.

- Custom URL: Enter your custom product feed URL.
- Cloud Storage (Coming soon): Connect via the Integrations section; select the configured catalog here.
- Manual Upload: Upload a CSV file as a one-time import.
NoteThe system validates URLs immediately. Invalid links cannot proceed to the next step.
Check the Only sync active products option to include only products marked as "active" in your catalog.
NoteActive products typically refers to products that are available for sale (not out-of-stock, archived, or disabled). Ensure your catalog’s product status is up to date before syncing.
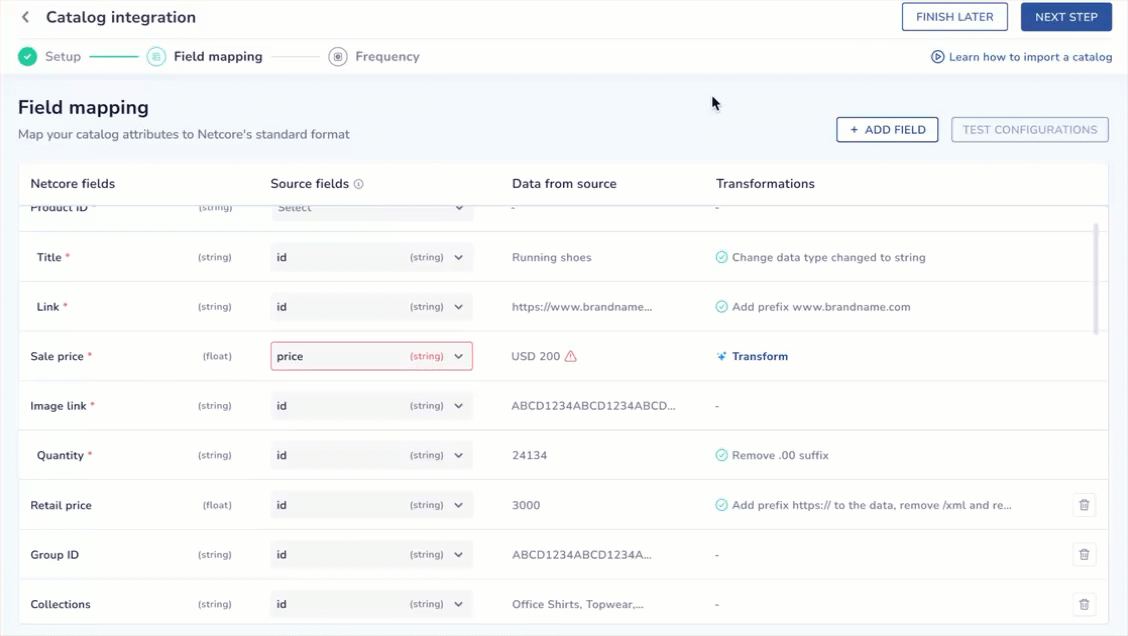
Map your catalog attributes to Netcore's standards format. Our AI Co-marketer transforms the field automatically based on your prompt. Refer here to know more about Transformations.
XML Feed Structure
Follow the structure of the XML feed below for integrating product data with platforms that accept the Google Merchant Centre specification.
<?xml version="1.0" encoding="utf-8"?>
<rss xmlns:g="http://base.google.com/ns/1.0" xmlns:c="http://base.google.com/ns/1.0" version="2.0" encoding="utf-8">
<channel>
<item>
<g:id>NC-LAPTOP-PRO-I9</g:id>
<g:title>Netcore Pro Laptop 2024 (i9, 32GB RAM) - Space Gray</g:title>
<g:description>The flagship Netcore Pro is built for power and portability. Featuring a stunning 16-inch Retina display, Intel Core i9 processor, 32GB of unified memory, and 1TB SSD. Ideal for developers, designers, and multimedia professionals. Includes the revolutionary 'Netcore Chip' for enhanced security and performance optimization. This model boasts a 14-hour battery life and fast-charging capabilities. Shop now and experience the difference.</g:description>
<g:link>https://netcoregear.com/laptops/pro-i9-space-gray</g:link>
<g:image_link>https://netcoregear.com/media/images/products/nc-laptop-pro-i9.jpg</g:image_link>
<g:price>2499.00 USD</g:price>
<g:sale_price>1999.00 USD</g:sale_price>
<g:sale_price_effective_date>2025-11-20T00:00:00Z/2025-11-27T23:59:59Z</g:sale_price_effective_date>
<g:brand>Netcore</g:brand>
<g:gtin>1234567890123</g:gtin>
<g:condition>new</g:condition>
<g:color>Space Gray</g:color>
<g:shipping_weight>2.50 kg</g:shipping_weight>
<g:availability>in stock</g:availability>
<g:product_type>Electronics > Computers > Laptops > Professional Series</g:product_type>
<g:google_product_category>Electronics > Computers > Laptops</g:google_product_category>
</item>
<item>
<g:id>NC-MOUSE-ERGO-BLK</g:id>
<g:title>Netcore Ergo Wireless Mouse - Jet Black</g:title>
<g:description>A comfortable and precise wireless mouse designed for all-day use. Features an ergonomic vertical grip to reduce wrist strain and a high-precision 16000 DPI sensor. Connects via 2.4GHz USB dongle or Bluetooth 5.0. 9 programmable buttons. Perfect for work or gaming.</g:description>
<g:link>https://netcoregear.com/accessories/ergo-mouse-black</g:link>
<g:image_link>https://netcoregear.com/media/images/products/nc-mouse-ergo-blk.jpg</g:image_link>
<g:price>75.00 USD</g:price>
<g:brand>Netcore</g:brand>
<g:gtin>9876543210987</g:gtin>
<g:condition>new</g:condition>
<g:color>Jet Black</g:color>
<g:availability>out of stock</g:availability>
<g:product_type>Electronics > Computer Accessories > Mice & Pointing Devices</g:product_type>
<g:google_product_category>Electronics > Computer Components > Input Devices > Mice</g:google_product_category>
</item>
</channel>
<config>
<system>DummyFeedGenerator</system>
<extension>NetcoreTechDocs</extension>
<version>1.0.0</version>
<magento_version></magento_version>
<time>5 seconds</time>
<date>2025-11-20 10:31:00</date>
</config>
</rss><?xml version="1.0" encoding="utf-8"?>
<feed xmlns="http://www.w3.org/2005/Atom" xmlns:g="http://base.google.com/ns/1.0">
<title>Netcore Gear Tech</title>
<link href="https://www.netcoregear.com" rel="self"/>
<entry>
<g:id>NC-HEADSET-XM5-WHT</g:id>
<g:title>Netcore Ultra Noise Cancelling Headset XM5</g:title>
<g:availability>in stock</g:availability>
<g:condition>new</g:condition>
<g:description>Experience pure sound with the Netcore XM5 headset. Featuring industry-leading noise cancellation technology, 30 hours of battery life, and crystal-clear call quality. The lightweight, ergonomic design ensures maximum comfort for all-day wear. Comes with a compact carrying case and a 3.5mm audio cable. Available in Arctic White and Midnight Black.^M
Perfect for travel, remote work, and immersive audio experiences. Two-year limited warranty included. Wash Care: Wipe clean with a soft, dry cloth. Avoid exposure to extreme temperatures and moisture.</g:description>
<g:image_link>https://img.netcoregear.com/products/headphones/xm5-white.jpg</g:image_link>
<g:link>https://www.netcoregear.com/product/ultra-headset-xm5-white</g:link>
<g:price>399.99 USD</g:price>
<g:sale_price>349.99 USD</g:sale_price>
<g:sale_price_effective_date>2025-11-20T00:00:00Z/2025-11-27T23:59:59Z</g:sale_price_effective_date>
<g:brand>Netcore</g:brand>
<g:additional_image_link>https://img.netcoregear.com/products/headphones/xm5-white-angle.jpg, https://img.netcoregear.com/products/headphones/xm5-case.jpg</g:additional_image_link>
<g:age_group>adult</g:age_group>
<g:color>Arctic White</g:color>
<g:gender>unisex</g:gender>
<g:item_group_id>NC-HEADSET-XM5</g:item_group_id>
<g:google_product_category>Electronics > Audio > Headphones & Headsets</g:google_product_category>
<g:material>Aluminum, Faux Leather, ABS Plastic</g:material>
<g:pattern>Solid</g:pattern>
<g:shipping>Standard Shipping (3-5 days): $5.00<br>Express Shipping (1-2 days): $15.00</g:shipping>
<g:size>One Size</g:size>
<g:tags>ANC, Bluetooth, Wireless, Hi-Fi</g:tags>
<g:add_desc><div><div><b>Connectivity:</b></div><div>Bluetooth 5.2, 3.5mm Jack</div><div><br><b>Country of Origin:</b> China<br></div><div><br><b>Manufactured &amp; Sold By:</b></div><div>Netcore Gear Tech Ltd.</div><div>1000 Innovation Drive</div><div>Tech City, CA 94019<br>tel:+1-555-555-5555<br></div></div></g:add_desc>
<g:origin_country>US</g:origin_country>
<g:manufacturer_info>Netcore Gear Tech Ltd. - 1000 Innovation Drive, Tech City, CA 94019 USA</g:manufacturer_info>
<g:custom_label_1>Best Seller</g:custom_label_1>
<g:custom_label_2>Headphones</g:custom_label_2>
<g:custom_label_3>Premium</g:custom_label_3>
<g:custom_label_4>XM5 Series</g:custom_label_4>
<g:category_type>Noise Cancelling Headsets</g:category_type>
</entry>
</feed>Field Mapping
Field mapping ensures your catalog matches the platform’s standardized fields.
- Netcore Fields (fixed structure: Product ID, Title, Link, Image Link, Sales Price are mandatory).
- Source Fields (from your feed). You map them to Netcore fields.
The other functionalities available on this screen are:
- Add Field: Add a new field by defining its name. Select the appropriate data type, and map it to a source field. You can create as many custom fields as needed.
Add Custom Fields
- Test Configuration: Before importing your full feed, view a 10-product sample. Verify data correctness and transformations.
Transformations
By default, Netcore automatically reads your catalog and applies the necessary transformations to ensure your data fits our standardized format. This means most tasks, such as cleaning values, fixing mismatched data types, or normalizing attributes, are done for you.
If you need additional customizations beyond the default, you can apply them directly using our AI Co-marketer.
Transform your Fields with AI
Examples of Transformations
-
Prefix or Suffix Addition
Example: Add your website domain to a relative product link
/shoes/123→https://www.mystore.com/shoes/123 -
Replace Values
Example: Change category delimiter
"Men > Shoes > Sneakers"→"Men, Shoes, Sneakers" -
Set Default Values
Example: Ifcoloris empty, set it to"Black" -
Apply Fallbacks
Example: Ifmain_imageis missing, usealternate_image -
Convert Data Types
Example:"USD 2499"(string with currency) →2499.00(float)
Examples of Transformation
| Source Catalog Field | Netcore Field | AI Transformation | Result |
|---|---|---|---|
relative_url = /shoes/running123 | Link | Add website prefix https://www.sportify.com | https://www.sportify.com/shoes/running123 |
price = "USD 2,499" | Sales Price | Remove currency text + convert string to float | 2499.00 |
Sync Frequency
Select how often the catalog should refresh. The options available here are:
- One-Time Sync – Import immediately (default = current date/time).
- Recurring Sync – Auto-refresh at intervals. Options:
- Hourly (choose interval, e.g., every 3 hours).
- Daily (choose time).
- Weekly (choose day + time).
- Monthly (choose date + time).
Shopify catalogs additionally use real-time sync with webhooks and a weekly full refresh.
Preview sample product values after transformations and validate mandatory fields. Once done, click Save
Errors & ValidationsThe system proactively validates your configuration.
- Invalid Feed Link or Credentials – Error messages specify missing/incorrect details.
- Failed Sample Import – Highlights missing required fields or mismatched types.
- Mapping Errors – Flags unaligned attributes.
- Transformation Errors – Shows invalid operations or unsupported conversions.
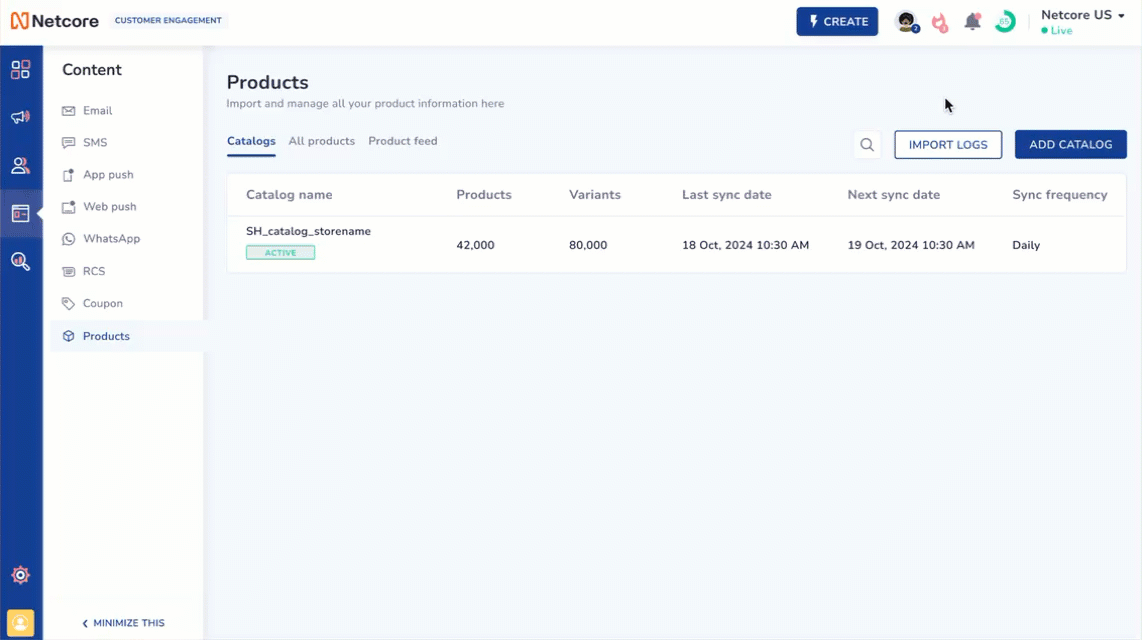
Product Catalog Listing
Once your product catalog is set up, you can view its details on the listing page. Refer to the table to know the headers available on the Product Catalog Listing page.

View Catalog Details
| Header | Description |
|---|---|
| Catalog name | The unique name assigned to the catalog during integration. For Shopify, it follows the auto-generated naming convention (e.g., SH_catalog_storename). |
| Products | The total number of parent products in the catalog. Each parent product may have one or more variants. |
| Variants | The total number of child products (variants) associated with parent products. If no parent-child structure exists, this field shows 0. |
| Last sync date | The date and time when the catalog was last successfully synced with the source. |
| Next sync date | The scheduled date and time for the next catalog sync, based on the configured sync frequency. |
| Sync frequency | The set frequency at which the catalog data refreshes (e.g., Hourly, Daily, Weekly, Monthly). |
Import Logs
View Logs of Imports
Monitor the status of product catalog synchronization. Click IMPORT LOGS located on top right of the screen.
The Import tab provides important features and information to track the synchronization process, identify issues, and address potential errors.
Refer to this document to learn about Import logs.
Refer to the given documents to All Products and Product feed.
Updated about 1 month ago