
Liquid Tags Setup Guide
A step-by-step guide to writing your first Liquid-enabled campaign in Netcore CE. Covers App Push Notifications and WhatsApp.
Prerequisites
- Liquid Tags must be enabled for your workspace. Contact [email protected] to activate it. Existing campaigns are not affected.
- Liquid Tags applies only to newly created campaigns and journeys.
Attributes on your user profiles. Liquid Tags reads from the same user attributes you already use for segmentation. At minimum, first_name and one custom attribute (like loyalty_tier or city) will get you through this guide.
- Two or three test user profiles with different attribute values, so you can preview how the message renders for different customers.
- For WhatsApp: Liquid maps into the template's positional variables (
{{1}},{{2}}). It does not create new templates on the fly. - For APN: An app configured for push notifications, with active tokens.
To learn how Liquid Tags work and how to use them effectively refer here.
Set up Liquid Tags in App Push Notification
Liquid Tags can be used in campaigns or Journey. To use a liquid tags in a campaign start by creating a template. Follow the steps below to do so.
- On the Netcore CE dashboard, navigate to CREATE > Create template > App Push.
- Set up your template by giving below details.
Field Name Description Sample Value Template Name Name of the template that you are creating LiquidtagtestSelect OS type Select between Android or iOS or both. Android,iOSAdd Tags Add the tag for the template. You can select from the existing or create a new one. AppPushTest - Click NEXT to continue, then select the layout of the template. Refer here for layout selection in App Push.
- On the layout setup page, start by setting up the template content. This is where Liquid Tags is available. Each field is evaluated independently.
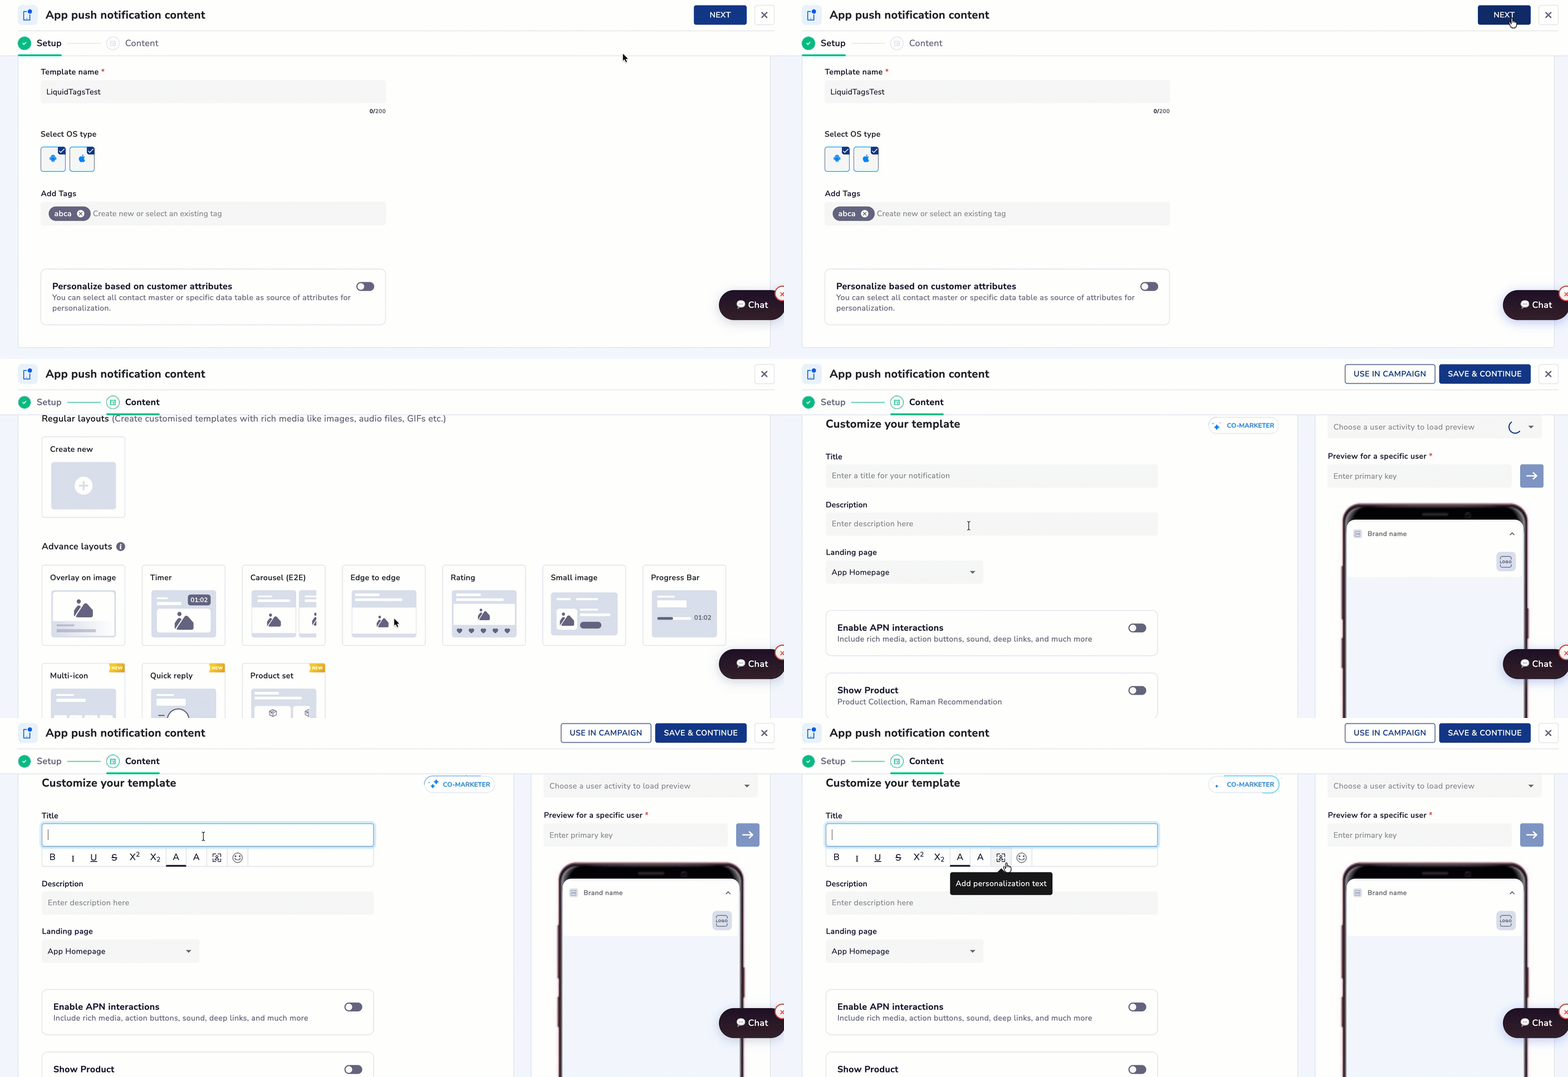
Set up App Push Template
The APN template editor accept Liquid in the following fields:
| Field | What it does |
|---|---|
| Title | The headline shown on the device |
| Description | The main notification text |
| Media URL | The image shown in the rich notification |
| Button: Deep Link | Where the app opens when the user taps the notification |
| Icon URL | The small icon shown alongside the notification |
| Summary Text | A one-line summary shown under the description on Android |
Title
In Title field and click Add personalization text and select the personalization payload between
- USER ATTRIBUTE
- User Activity Payload
- Business Activity Payload
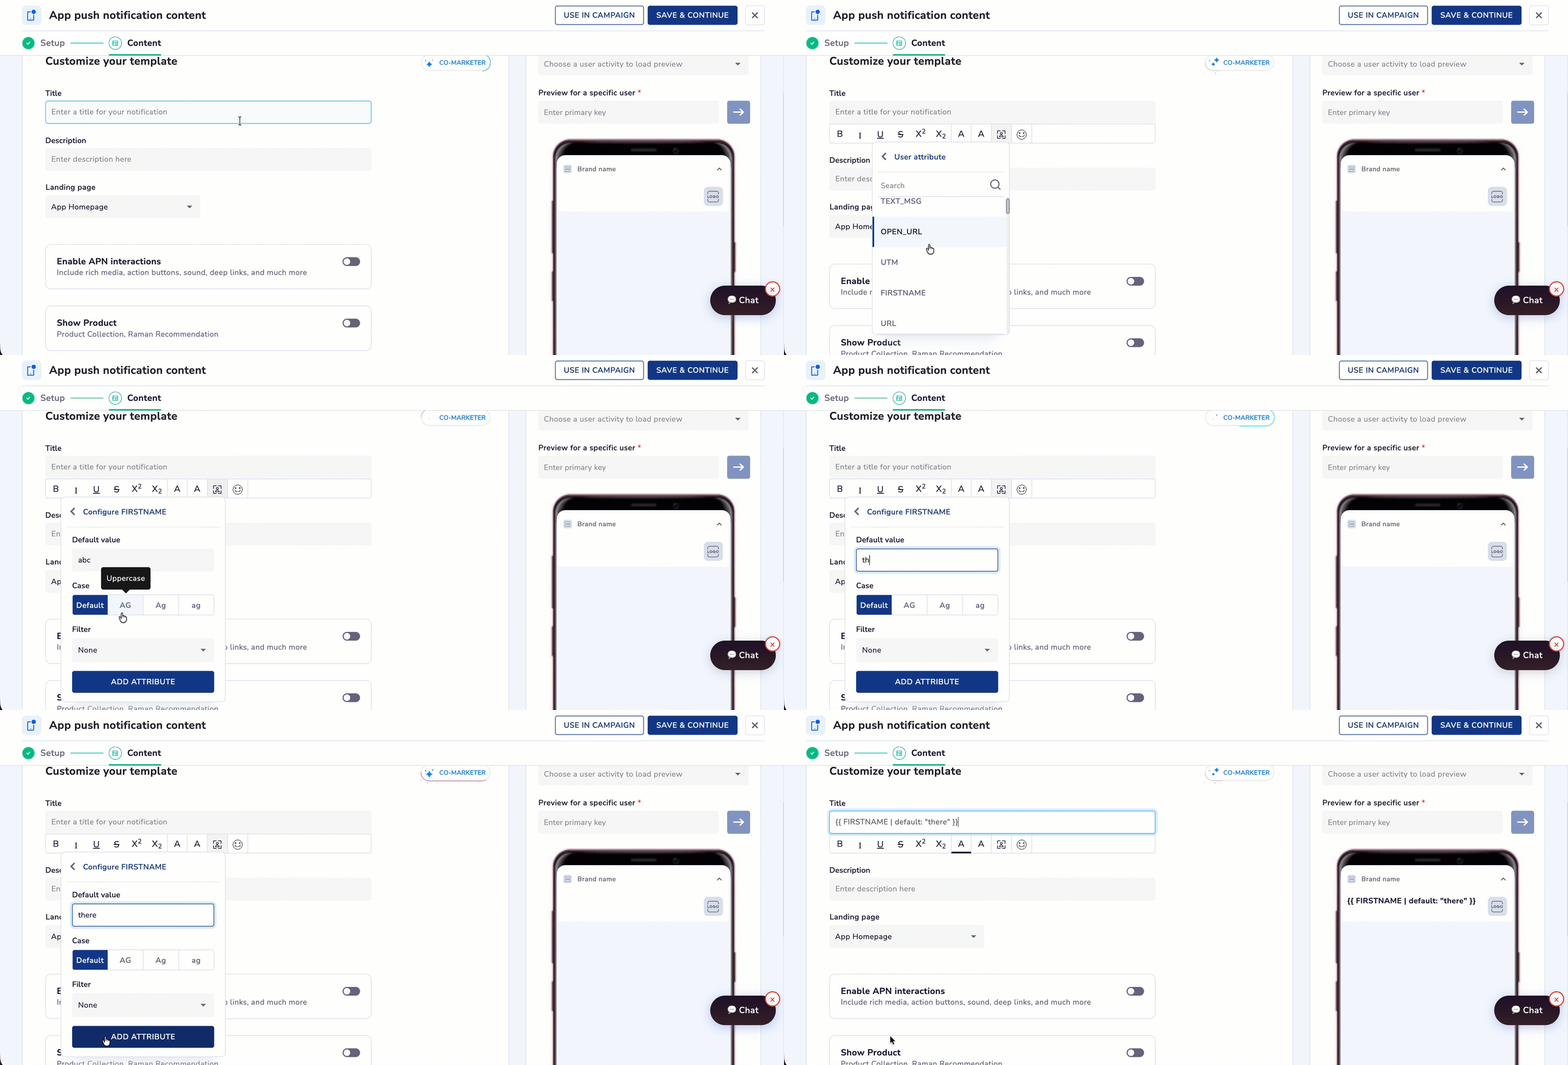
Personlization of Title with Liquid Tags
Output
{{ first_name }}is the Liquid tag. It reads the user's first name from their profile.
| default: "there"is a fallback. If a user doesn't have a first name on file, the message renders as "Hi there, your offer is ready" instead of "Hi , your offer is ready".The editor validates Liquid syntax as you type. If the format of the liquid tag is incorrect like a missing bracket, an unknown attribute, the tag wont be accepted.
Description with Conditional Logic
In Description field and click Add personalization text and select the personalization payload.
Output
- This shows a different message depending on the user's
loyalty_tierattribute.
- Gold members see one offer, Silver members see another, and everyone else sees the default free-shipping line.
Personalize Image and Deep Link
If you want each tier to see a different banner image and land on a different in-app screen, add Liquid to the Image URL and Deep Link fields:
Liquid Output
- A gold member sees
gold.jpgand lands on the Gold offers screen.- A user with no tier sees
member.jpgand lands on the general member screen.If
{{ loyalty_tier }}is missing and you have not set adefault, the URL will resolve tohttps://cdn.brand.com/push/.jpga broken image.
- Before you schedule, it is recommended to run Personalised Preview from the top-right of the editor and check the message renders correctly.
- If it looks right for all three, send yourself a test push using Send Test to verify the visual on a real device.
Set up Liquid Tags in WhatsApp
Prerequisites
- WhatsApp messages must use a template that Meta has approved.
- Approved templates contain positional variables
{{1}},{{2}},{{3}}and Liquid maps into those.
WhatsApp Template Workflow
- When you use Liquid in the Netcore WhatsApp editor like
{{ first_name | default: "Customer" }}. - If first name is Ravi, Netcore resolves the Liquid:
Ravi. - The resolved string is bound to the template's positional variable:
{{1}} = Ravi. Then Meta delivers the final message.
Important Points to Remember
- Meta never sees the Liquid syntax only the final rendered values. This means your fallbacks matter more here than anywhere else.
- If a positional variable comes through as empty, Meta rejects the message.
efore you start, ensure the WhatsApp template you want to use is available in Netcore and has been approved by Meta. You can create a template directly in Netcore and submit it for Meta approval from WhatsApp > Create Template, then wait for approval before continuing. Refer here to know more about WhatsApp template creation.
Follow the step below to use liquid tags in a WhatsApp Template
- Create a new template in Netcore and submit it for Meta's approval.
- Once approved, to use the template in a campaign, navigate to WhatsApp template section and select the approved template and click edit.
Note: the number of positional variables in the body, header, and buttons. You need to map Liquid into each of these.
In the template editor shows each positional variable as a mapping field. This is where Liquid goes.
Liquid Tag QueryThe Meta approved template body reads:
Hi {{1}}, your order #{{2}} has been confirmed. Expected delivery: {{3}}.
The editor will show an Add variable option, one per variable. You can click this option and enter the Liquid code within the variable section.
| Variable | What to enter |
|---|---|
{{1}} | {{ first_name | default: "Customer" }} |
{{2}} | {{ payload.order_id }} |
{{3}} | {{ payload.delivery_date | date: "%d %B" }} |
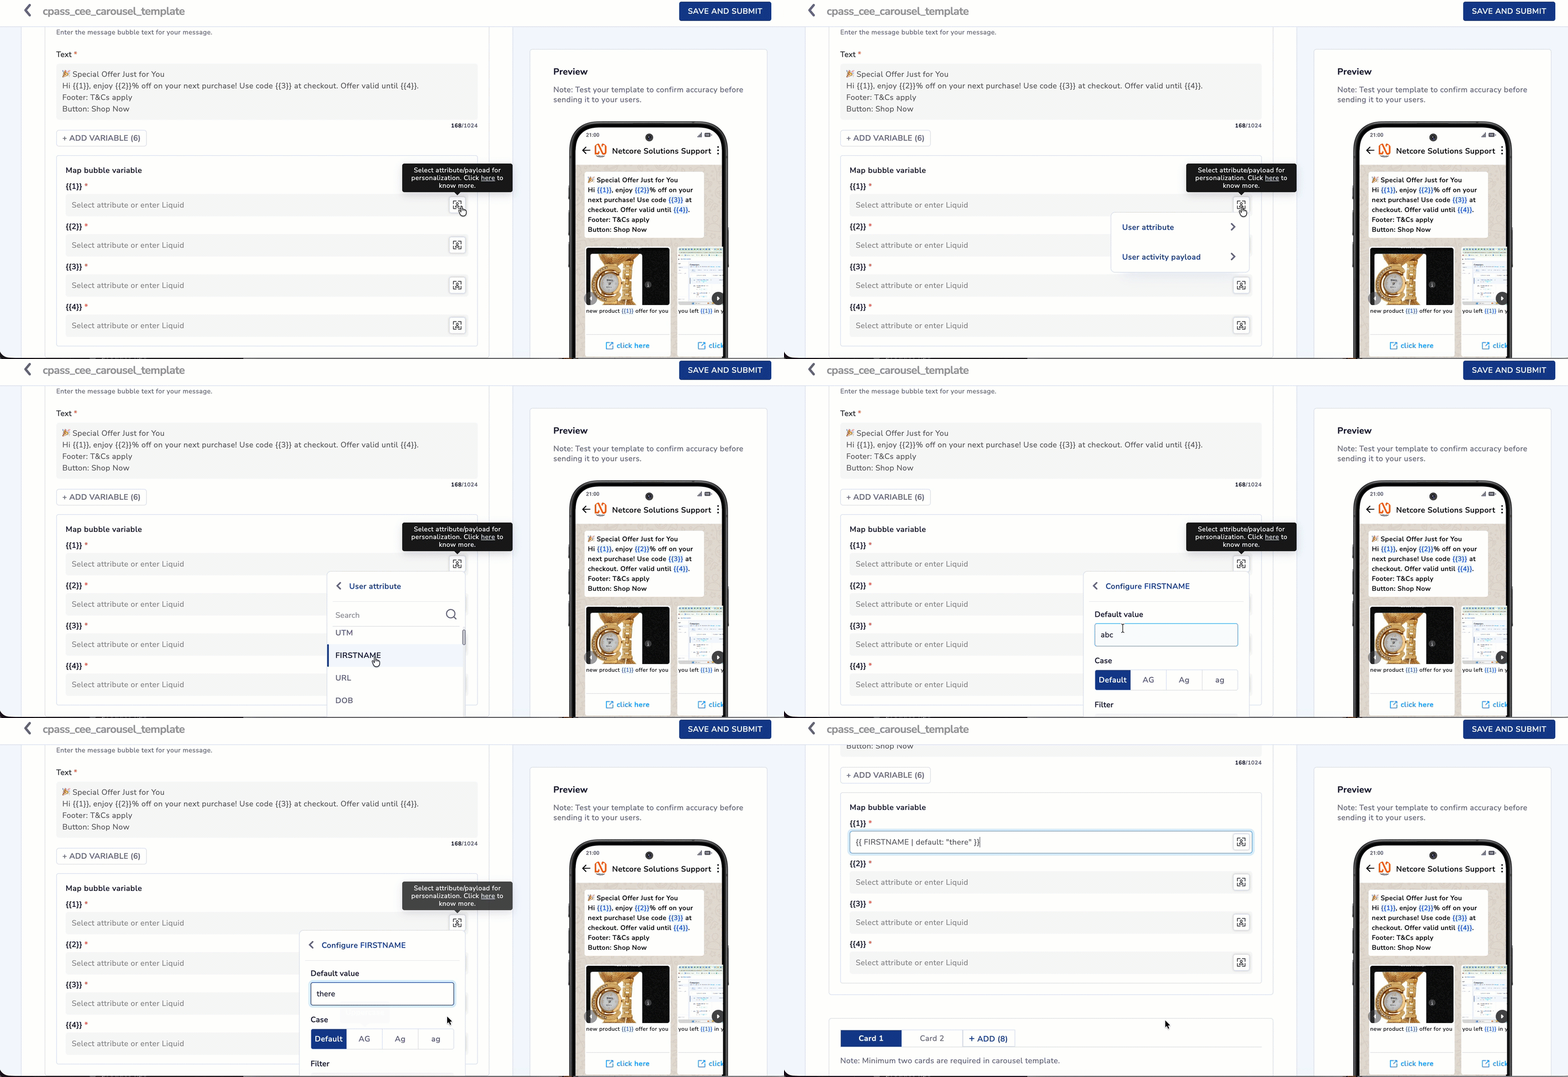
Setting up variables for liquid tags in WhatsApp
Guard Critical Variables
- For any variable that Meta cannot accept as empty like order IDs, delivery dates, policy numbers, add a guard at the top of the campaign so the user is skipped cleanly if the data is missing.
In the guard field at the top of the campaign editor (or the first line of the body variable, depending on your workspace setup), enter:
{% if payload.order_id == blank or payload.delivery_date == blank %}
  {% abort_message "Order or delivery data missing" %}
{% endif %}
If either value is missing when the campaign runs, the user is skipped and the reason is logged in the Skipped Users report. Meta never sees a broken message.
When to useabort_messagevsdefaultUse
defaultfor cosmetic fields (first name, product name) — the message is still useful with a generic substitute. Useabort_messagefor functional fields (order ID, policy number, delivery date) — the message is misleading without the real value.
If your template has a header image or a CTA button with a dynamic URL, Liquid works there too.
Header media URL:
Button URL Parameter:
The url_encode filter is important on button URLs. Special characters in an unencoded value will break the link.
Meta enforces a per-variable character limit. Long fallbacks or Content Fetch responses can push your output over the limit and fail delivery. Use truncate on any variable that could contain long text:
{{ payload.product_name | truncate: 40 }}- Check Personalised Preview for the rendered output. Send a test to a real WhatsApp number on your account, since only a live test confirms that Meta accepts the resolved variables.
Common Use Cases
Three ready-to-use snippets that cover the campaigns most teams run first.
Works in APN Title and Body, and in WhatsApp body variables.
Works in APN Body and WhatsApp body variables.
Works at the top of any campaign to protect against broken sends.
Checklist
Run through these before scheduling any Liquid-enabled campaign:
- Every user attribute has a
default. Every{{ variable }}used in Title, Body, URLs, or WhatsApp variables should have a fallback, unless it's guarded withabort_message. - Preview renders correctly for at least three sample users. Include one user with missing data.
- For APN: rendered Title and Body fit within iOS and Android character limits (~178 and ~65 characters respectively).
- For WhatsApp: every positional variable has a Liquid mapping, and any variable that could be empty is guarded.
- Test send received on your device. Both channels support test sends.
Updated 21 days ago