
Export Events to Google Cloud Storage (GCS)
This guide walks you through exporting event data to Google Cloud Storage.
Overview
The egress flow lets you send high-volume behavioural and engagement event data from Netcore CE, like campaign clicks, opt-outs, or custom app events, into your Google Cloud Storage bucket, where your data team can run it through analytics, warehousing, or downstream pipelines. Once configured, each export writes files to your bucket on the schedule you define, in the format and structure you choose.
End-to-end, the egress flow looks like this:
- Connect: set up a Google Cloud Storage connection under Settings > Integrations, so it's available to pick from during export setup.
- Configure: create a data transfer specifying which events, schema, and fields to export, and in which file format.
- Customise (optional): apply transformations, such as renaming fields, masking PII, or reformatting dates, before the file is written.
- Go live: choose a historic or recurring schedule and create the export; files begin landing in your GCS bucket automatically.
Example: Marketing Engagement Analysis
A marketing team exports email clicks, notification opens, and campaign engagement events to GCS daily. The data is consolidated into a single file per run and fed into a BigQuery model that scores campaign performance by segment.
The export is built in four steps: Setup, Data selection, Data customisation, and Schedule.
Step 1: Open Data Transfer
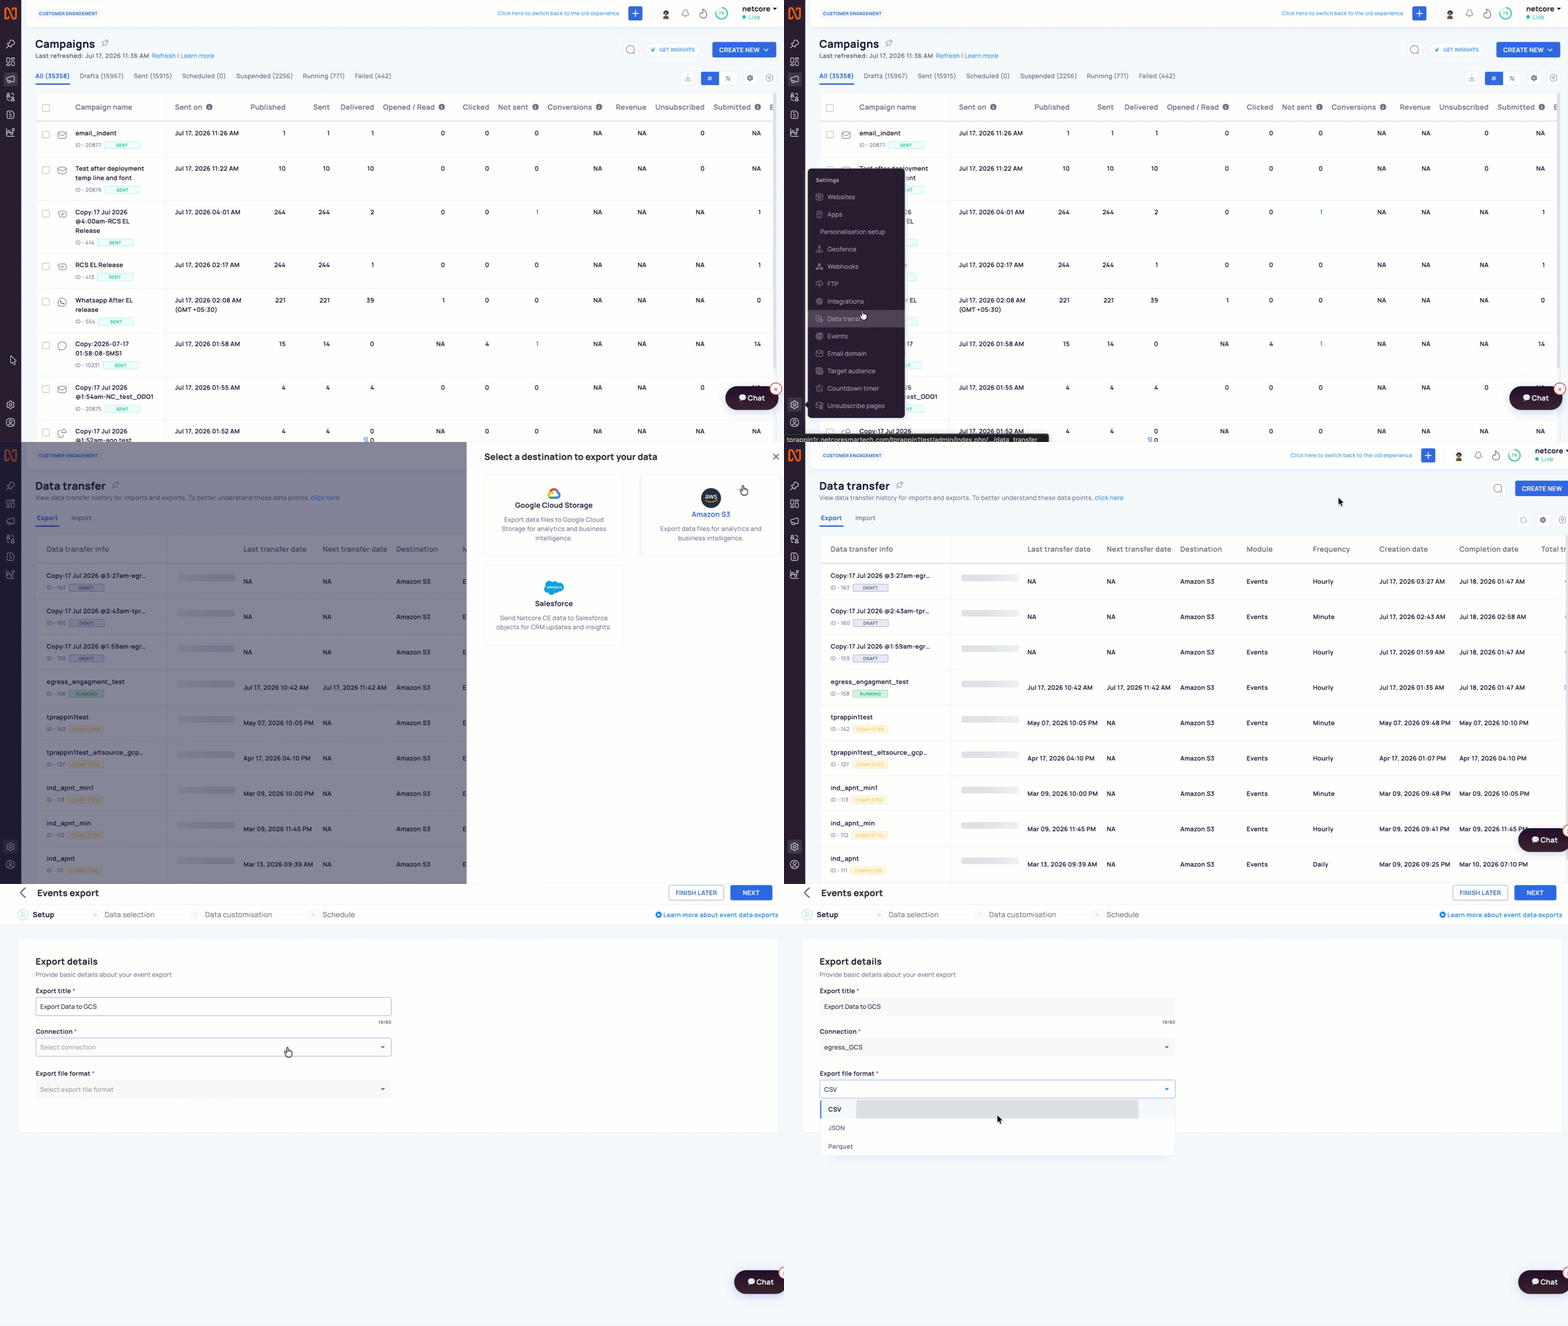
- Go to Settings in the left menu.
- Click Data transfer.
- You land on the Export tab. Here is a list of your past and current exports, along with their status.
Export Events to Google Cloud Storage (GCS)
Step 2: Start a New Export
- Click CREATE TRANSFER in the top-right corner.
- A window opens: Select a destination to export your data.
- Click Google Cloud Storage.
The export builder opens on the Setup step.
Step 3: Setup
Fill in the basic details of the export.
- Export title: Type a name for this export. You can use up to 80 characters.
- Connection: Pick your GCS connection from the list.
- Export file format: Choose the file type. The options are CSV, JSON, and Parquet.
- Click NEXT.
How GCS Setup differs from Amazon S3
- GCS has no export mode field.
- Amazon S3 asks you to pick Batch or Stream. GCS does not.
- GCS file formats are CSV, JSON, and Parquet. Amazon S3 also offers Avro.
Step 4: Data Selection
Here, you choose what data goes into the file. The left side is where you make choices. The right-hand Data previewshows the fields that will appear in your file. The preview updates as you make changes.
1. Pick the event type
Choose Engagement or Behavioural. This choice changes the options in the rest of this step. See the comparison below.
2. Pick the events
- For Engagement, use Select engagement event(s).
- For Behavioural, use Select behavioural event(s).
- In both cases, you can pick all events or search and tick specific events.
3. Pick the schema
- Standard: One file per event.
- Consolidated: All event data is stored in a single file. Each file holds up to 500 MB or 1 million events.
4. Check the standard fields
- Standard field(s) are added by default. Open the list to tick or untick fields.
5. Add extra details (optional)
- Turn on the Additional details toggle.
- Pick a Detail type, then pick the fields.
- Click + ADD to add another detail block.
6. Apply filters (optional)
- Turn on the Filters toggle.
- Pick what to Filter based on, then pick the values.
When you are done, click NEXT.
Engagement vs Behavioural
Most of the screen is the same for both. These are the parts that change.
| Option | Engagement | Behavioural |
|---|---|---|
| Event dropdown | Select engagement event(s). Examples: Email Opened/Read, Email Clicked, Email soft bounce, Email hard bounce. | Select behavioural event(s). Examples: App Push Opt-Out, Web Push Opt-Out, and your custom events. |
| Standard fields | Standard engagement parameters for the selected event. The set includes channel. | Standard parameters plus the selected event's payload parameters. The set includes event_type. |
| Additional details (Detail type) | Two types: Attribute details and Channel details. Channel details lets you add channel fields such as List ID. | One type: Attribute details. |
| Filter based on | Campaign, Journey, or Tags. | Source. You then pick the source, such as a website or an app. |
NoteWhen Additional details or Filters is on, you must fill in the fields. The screen shows a red message until you do.
Step 5: Data Customisation (Optional)
This step works the same way as it does for Amazon S3. It lets you change how fields look in the file. You can skip it if you do not need changes.
- Turn on the Transformation toggle.
- For each change, pick a Transformation type and the field it applies to:
- Rename column: Change a field name. Set the old name in From and the new name in To.
- Mask field: Hide a field value. Pick the field.
- Field to string: Turn a field value into text. Pick the field.
- Date format: Change how a date looks. Pick the date field, then pick the new format.
- Click + ADD to add another change.
NoteIf you turn the toggle on, set at least one valid transformation. The screen shows "transformation is invalid" until you do.
Send a test file (optional)
- Click SEND TEST DATA at the top right of the Data preview.
- This sends a small sample to your GCS connection so you can check the output.
When you are done, click NEXT.
Step 6: Schedule
This step works the same way as it does for Amazon S3.
- Pick the type:
- Historic: A one-time export for a date range you choose.
- Recurring: Runs again and again. Pick a Frequency (Hourly, Daily, Weekly, or Monthly) and an Interval.
- Event duration: Pick the date range for the data.
- Click NEXT.
Step 7: Review and Create
You now see a summary of all four steps: Setup, Data selection, Schedule, and Data customisation.
- Check each section.
- To change anything, click EDIT on that section.
- When everything is correct, click CREATE EXPORT.
A confirmation message appears. Your new export shows up in the list on the Data Transfer page.
Find your Data Transfer
Back on the Data transfer list, the row for your export shows its name, ID, status, last and next transfer dates, destination, and total transfer count. Use the three-dot menu on the row to manage it. The actions depend on the status. They can include Edit, Duplicate, Delete, Pause, Resume, Stop, and Retry.
TipClick FINISH LATER in the builder to save the export as a Draft. You can open it from the list and finish it later.
Updated 21 days ago