
Email Node
Understand and Configure Journey Email Action Nodes
The Email action node enables you to send personalized emails to users. The Email Action node sends an email to contacts as they move through a journey. This node allows you to:
- Configure sender details
- Select and edit an email template
- Personalise email content
- Test the email before activating the journey
The Email Action supports inline template creation, editing and node-level testing, allowing you to validate content without leaving the Journey Builder canvas.
To get started, create a new journey. Then on the Journey canvas, drag and drop the Email action node on the Journey canvas.
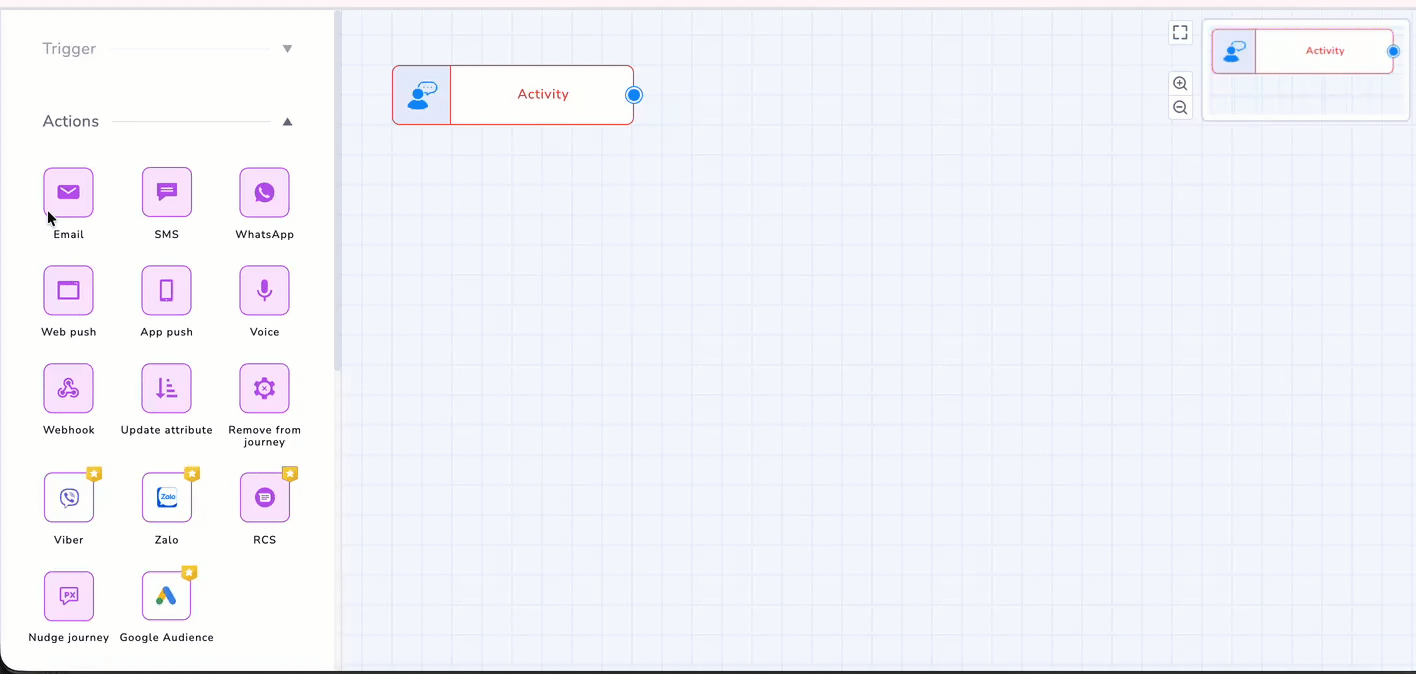
Adding Email Node to the Journey Canvas
PrerequisitesBefore configuring this node, ensure the following are set up in your Netcore CE account:
- At least one verified sending domain is configured under Account Settings > Domains.
- The email template you want to send has been created in the Templates library.
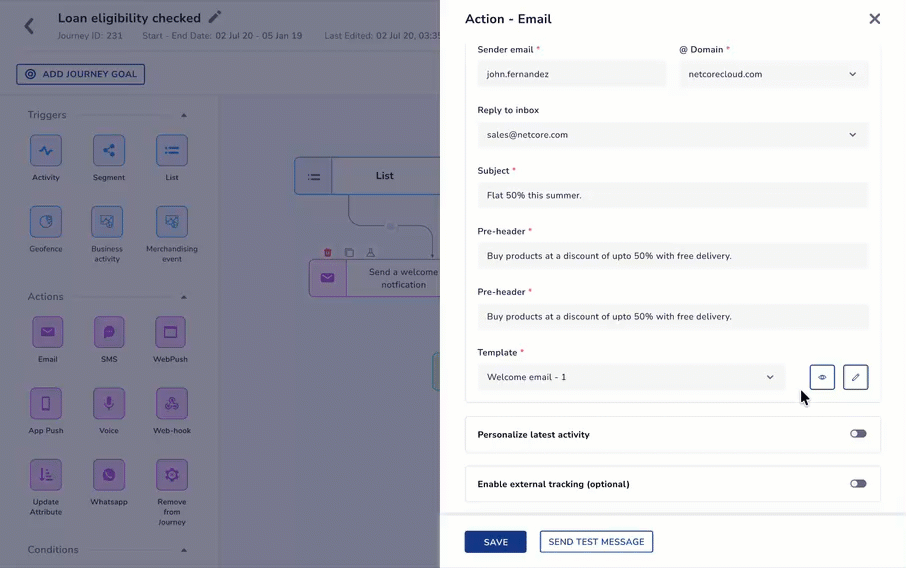
Configure the Email Action
When an Email action node is added to the canvas, a configuration panel opens where the email settings can be defined.
| Field | Description |
|---|---|
| Message Name | Name used to identify the email message within the journey. |
| Sender Name | The display name shown in the recipient’s inbox as the sender of the email. Personlization is supported. Refer here for more details on Personalisation in CE. |
| Email Type | Select the email format to be used for the communication. Choose between |
| Sender Email | Username portion of the sender email address. Example: john.fernandez. |
| @ Domain(Only available for HTML Email) | The sending domain associated with the sender email. This domain must be configured and verified in the account. Refer here to know more. |
| Reply To Inbox | The email address where the recipient replies will be directed. |
| Subject | The subject line is displayed to recipients in their inbox. |
| Pre-header | Preview text is displayed next to the subject line in most email clients. |
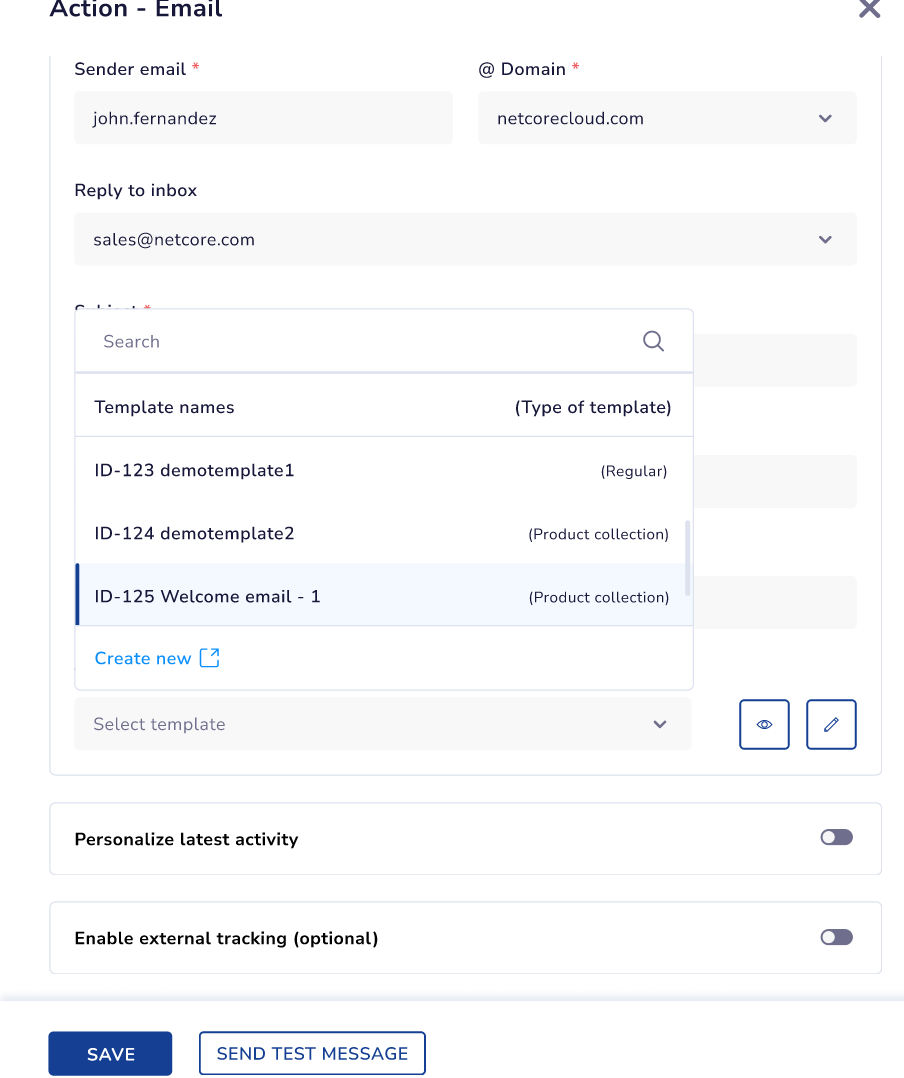
| Template | Select an existing email template to use for the message or select Create new template to create Email template from Journey Node itself. |
| Preview | It opens a preview of the selected template. Email layout and content can be reviewed. You can also edit the template you are previewing directly in this flow. |
| Edit Template | It opens the template editor, allowing you to modify the template directly from the node configuration. Refer to the documentation here for editing your template. |
| Personalize Latest Activity | It allows the email content to dynamically use data from the most recent activity performed by a contact. |
| Enable External Tracking(Optional) | This option enables tracking parameters to be added to links within the email. |
| SAVE | Use this to save the configuration of the Email node. |
| SEND TEST MESSAGE | Click on SEND TEST MESSAGE to test the email node templates with personalization. |
Edit an Existing Template
You can edit an existing template from the Email Node of your Journey. Follow the steps below to do so:
- On the Action-Email tab, select the template from the drop-down. Selectedit option as below
Editing Template from Action Email node
Important Point to Remember
- When an email template already in use in active journeys or campaigns is edited, the system displays an impact warning messsage.
- Any changes made to the template will impact existing journeys and campaigns where these templates are used.
Editing Options
| Option | Description |
|---|---|
| Duplicate & Edit(Coming Soon) | Creates a copy of the template and opens it in the editor. Changes will apply only to the duplicated template and will not affect existing journeys or campaigns. The new template is automatically selected for the current node. This is coming is near future. |
| Edit | Opens the existing template in the editor. Any changes made will affect all journeys or campaigns that use this template. |
Create New Template from Journey
You can create a new template directly. Follow the steps below to do so.
- From the drop-down, select the Create New option. The Email Template Gallery opens in a new browser tab.
Click here to know more about Email Template creation.
Create a new template from the Email Node.
- Create the template as per your requirements, click SAVE & CLOSE, and return to the Journey Builder. Your created template will be auto selected in the Select template section of Email node.
NoteEditing an exisitng template will affect all other journeys or campaigns that uses the same template.
Send Test Message
You can also directly test your templates from the Journey Email node flow.
The TEST option allows you to choose the identifier type, enter test recipients, and reuse recent test profiles. Configure the test email addresses from the panel account configuration.
Click here to know more about Email Send Test from Journey node.
Validation for Test EmailIf an entered email address is not found in your contact list, the test message will not be sent.
Frequently Asked Questions
Q. Can I use the same email template in multiple journey nodes?
A: Yes. The same template can be reused across different journey nodes and different journeys. Changes to the template will reflect in all journeys using it.
Q. What happens if a contact's email address is invalid?
A: The email will bounce.
Q. Does the Pre-header field support emojis?
A: Yes. Emojis are supported in both the Subject and Pre-header fields. Use them sparingly to draw attention without triggering spam filters.
Q. Can I edit the email template directly from the journey?
A: Yes. The Edit Template option allows you to modify the selected template without leaving the Journey Builder.
Q. What happens if I edit a template that is already used in active journeys?
A: Any changes made will reflect across all journeys and campaigns using that template. A warning message is shown before applying changes
Updated 6 days ago